A Recipe for a Turntable
Last time (Affordable$$Audio, November 2010, From the Pulpit), I provided a recipe for an inexpensive DIY uni-pivot tonearm of better-than-average quality. Careful purchases and creative sourcing of the required components can result in a tonearm costing as little as $2.19 to make. If using all-new materials, however, the tonearm does cost more to make, depending on how handy you are. Your mileage may vary, but I am sure that by using far more exotic components, you could top say USD $200 or more. It all depends on how fancy you want to make it, and how many “audiophile-approved” pieces you purchase to finish the arm off. Buying a tonearm mount/arm lift mechanism can easily top $50. Surprisingly, the single most expensive component in my build is the headshell, although it’s still very cheap by audiophile standards. The Yamamoto headshells that inspired the headshell design cost something like $70 or $80 each.
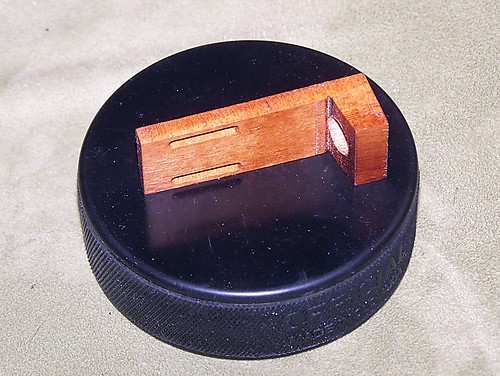
Yamamoto-style headshell
For this installment, I promised to provide you with a “multi-configurable” turntable. By that I mean something that can be set up with AC or DC motor drive systems, and with the various drive modes that one can use for a platter in a DIY system: belt, idler, and rim drive. These are the same modes used in almost all turntables currently offered (although a few direct-drive types are still being made, and have been almost continuously since about 1970-ish), and most used in the past (most notably idler drives). As the proper design and implementation of a quality direct-drive system is beyond the scope of most DIYers, I omit them. Not because of quality of sound, but because the required electronics can become quite complicated (and are truly beyond my capabilities and resources to produce).
If you are interested in improving the sound of direct-drive turntables, there are a few ideas on the Internet. Some are re-plinths of (old) existing tables, or tweaks to current production ones (including the venerable Technics SL1200, which has proven to be – at the very least – durable).
This discussion is limited to two of the three previously-mentioned (belt and idler/rim) drive system types. This is not a discussion regarding suspension types, although I may make a couple of comments. There are lots of discussions, forums, etc., where the suspended vs. non-suspended issues are discussed ad nauseam.
Drive types
I’ll start with belt drives, which are the most prevalent. Basically, you have a motor that is mounted some distance axially from the spindle, with a pulley attached to its shaft. The rotational speed required by the motor is determined by multiplying the desired platter rotational speed by the ratio of the diameter of the platter to the diameter of the pulley. That is:
Motor RPM = Platter RPM x Platter Diameter / Pulley Diameter
If, for example, the pulley is 10 mm in diameter and the platter is 300 mm in diameter, then for 33 1/3 RPM operation, the motor speed is 33 1/3 x 300 / 10 = 1000 RPM.
Conversely, the desired pulley diameter can be calculated by swapping the Motor RPM and Pulley Diameter in the above equation. For example, if a motor is available with a 300 RPM rotational speed, then the desired pulley diameter is 33 1/3 x 300 / 300 = 33.333 mm.
It doesn’t matter whether an AC motor or a DC motor is used, the speed requirements are the same. This does not take into consideration any elasticity in the belt.
The same basic math is used for idler and rim drives. It is the ratio of the primary drive wheel to the driven wheel (the platter) that is important in determining the speed required. The only difference between an idler drive and a rim drive is that a rim drive has the drive wheel attached directly to the motor (which is the same as in a belt drive system), which in turn is in direct contact with the platter rim, while the idler uses an intermediate wheel to help isolate the motor from the platter. A rim drive type also requires the motor to turn in the opposite direction (counter-clockwise) that the platter is required to turn (clockwise) in order to allow a record to be played. There are arguments surrounding which of these two drive systems is “better.” Both have some positives and negatives.
Of primary concern is the noise and vibration that can be transferred to the platter, and ultimately the cartridge stylus. Arguments in favour of the belt systems have been that the belt can help isolate the motor from the platter. The quality of the belt is also something one ought to look at, as well as the physical characteristics of the belt material, and the precision with which it is made. While rubber is commonly used, belts can also be made using thread or magnetic tape or mylar. Each material has its own associated “sound.” To me, the obvious choice would be mylar or magnetic tape. Although fussy to set up and to keep tension on, once set these polymer-based, relatively non-stretchable belts can provide excellent tension and long-term stability.
Making a mylar- or tape-based belt system requires a reasonable way of adjusting the tension. If the motor is mounted in a separate housing, then it is quite easy to do: just move the motor housing towards or away from the platter to set the required tension. If the motor/pulley is mounted on the same plinth, it becomes a little more difficult, but adjustment schemes can be copied from various automotive or industrial applications. In fact a belt drive with some sort of suitable belt idler pulley can be a very good execution of this type of belt system, if mylar or magnetic tape is used for the belt.
Idler wheel drive systems replace the belt with an intermediate wheel that couples the motor drive to the platter. The largest argument against this system is the added mechanical noise due to the additional mechanical device and the friction of the idler wheel itself (both within its bearing, and from the friction between the idler and the driven portion of the platter). The larger the idler wheel, the fewer rotations it must make, and thus (theoretically) the less noise it will impart on the stylus.
One of the primary things to consider in turntable design is (in my opinion) rotational inertia. That is, a body at a constant motion (whether linear or rotational motion) will stay in that motion until an external force acts on it. A heavy platter rotating at a constant speed will have more inertia compared to a lighter one. With a lighter platter, speed stability can be improved by providing additional torque from a larger motor, or increasing the number of motors in the system. I prefer the idea of using a relatively large motor (or motors) driving a relatively heavy platter. The idea is to have significantly more torque available than what is required, and a relatively high-mass platter to provide rotational inertia. I like platters in the 8 to 12 pound range. They allow for a common sense approach regarding esthetics and suitability within most domestic settings. In commercial settings, where “fitting in” is less of an issue, the bigger and badder, the better (I’d love to get my hands on an EMT, Rockport, or Goldmund—but that’s a different story).
So, a turntable can be driven by belt, or idler (or rim), and use either an AC motor or a DC motor. Use whichever one can provide you with enough torque. DC motors, for the same physical size, deliver more torque. But a properly designed AC motor system can provide better speed stability (I think). One system that I haven’t looked at is the one that Charles Altmann suggests on his excellent website: the use of DC stepper motors with 7.5 degree steps. As a comparison a good DC motor costs (USD) $80+ (Maxon), while these steppers can be had for as little as $2.50 a piece. Suitable AC motors can cost as little as $15 each, or up to $100 (typical types used for audio turntables).
A few additional considerations that should be kept in mind:
- The motors must have enough torque available to overcome any friction in the main bearing;
- The main bearing must be of reasonable quality in order that it does not contribute much noise (or “rumble”) to further excite the stylus; and it should not transfer significant noise to the plinth, and thus ultimately to the stylus;
- The AC system does not introduce significant electrical noise to the system.
Plinths and noise
Regarding the transfer of noise from the plinth to the stylus: if the plinth is excited, it will transfer some of that energy back to the platter/bearing system, and to the tonearm/cartridge system. The choice of materials for plinths is quite important, as is the construction technique. There are simple single-material plinths (often made of wood, acrylic, metal, stone or other solid surface materials), and multi-layer types. This seems to be where a lot of the “black art” of turntable design lies. It is my opinion that – all else being equal – a plinth of multiple layers of differing density can be capable of excellent sound if implemented well.
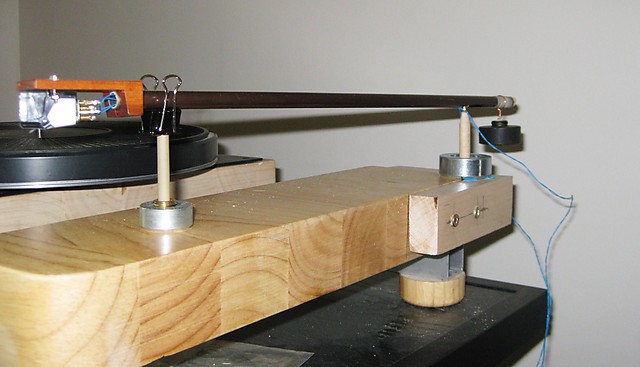
An early version of my "219" tonearm including tonearm wiring. Dust is optional.
Motors
A DC motor can have its speed adjusted by adjusting the voltage applied to it, and measuring the speed of rotation. Good DC supplies take into consideration speed drift, something the builder must be aware of. With AC synchronous motors, the frequency of the signal is what must vary to change the speed of rotation. This is accomplished using a variable frequency generator and an amplifier, transformer, and variable resistors or multi-turn trimpots. It can become somewhat frustrating to many amateurs (me included), unless one is quite experienced with electronics. Several designs exist, and can be searched out on the “Interweb.”
There are alternatives available though. A few kits exist, as well as pre-made solutions. Then there’s my “stupid simple” variable frequency generator: a CD player or MP3 player with a recorded frequency (in North America 60 Hz, 50 Hz in Europe and Australia). This allows for some variance in the diameter of the “drive” pulley or wheel. We then need a transformer and amplifier to boost the output of the CD player or MP3 player to the 120 (or 220 or 240) VAC to spin the AC motor. Reducing the AC voltage will reduce torque, but often results in a quieter motor.
Regardless of the type of motor used, a laser tachometer is by far the easiest method for determining the speed of rotation of the platter. These can be purchased inexpensively (I paid something like CAD $40 for mine, accurate to +/- 0.005 RPM).
A platter
Platters can be had in any number of materials. Steel (Lencos and early Garrards and Thorens), aluminium (most), wood, acrylic, vinyl… the list can go on and on. A platter can be recycled (along with a main bearing) from an existing turntable “donor.” As I stated before, I like platters that weigh in at 8 to 12 pounds, as they are practical. Some commercial tables use what I consider to be “ridiculous” platters. I am sure they sound very good, but I don’t feel they offer anything that is practical enough to fit into most rooms where other folks (partners and kids) reside as well.
Practical considerations
Really, the easiest turntable to build is a re-plinth. This is where basically all the working “guts” of a turntable are removed from whatever housing it is in and installed in a better sounding one. I’ve had good results using thick chopping blocks. My Sugden re-plinth is an example of this. If making a plinth one ought to consider creating one to hold the main bearing and platter, another for mounting a tonearm, and a final one for mounting the motor and any required electronics. DC motors tend to be much quieter, and could be battery driven, thus removing lots of electrical background noise from the system.
An example
Here’s my implementation of the “219” tonearm and Sugden re-plinth. The split plinth has helped reduce noise and has allowed me to experiment with different tonearm lengths. The wooden feet rest on cheap glass marbles, but ball bearings could be used. No attempt at isolation is made, however I have built suitable shelves (not pictured) that reduce the noise considerably.
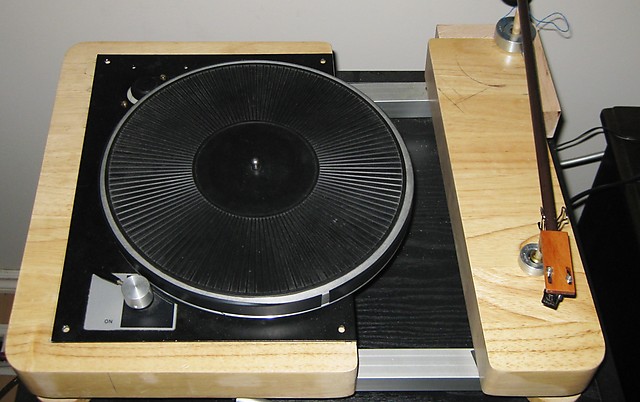
Top view of replinthed turntable
If you choose to pursue any of these ideas and wish to share them, please email me direct at: stewnelless@Affordableaudio.org or stew@HiFizine.com.


Great article about turntables. Very impressed with the modifications you have made – I have made an attempt at doing something similar – but I can never seem to find the time to finish!
Looking forward to future posts
Phil
I like the very practical approach. What about adding weight to a donor platter?
Concerns would be bearing wear and maintaining platter balance with added material.