DH Labs Cables
As I have recently moved into a new house, the topic of cabling was on my mind as I set up and configured my stereo system. I was still hooking up my system when I decided to contact Darren Hovsepian, the president of DH Labs, to ask him about his cabling. Having had many components swapped in and out on my system over the last few years, I realized I had not done enough experimenting with audio cables. The reason I contacted Darren was because of DH Labs’ unique designs, plus the fact that all of their cables are made in the US at a facility where NASA gets some of their wiring – this suggests to me that Darren is serious about quality; either that or anything NASA wires sounds great! He sent me over a pile of raw cables, connectors, silver solder and instructions with the request to have fun.
The goal with these test cables was for me to construct a few different cables in the DH Labs line-up and give Darren some feedback, as well as to write a fun and informative DIY article. Feeling the itch of the soldering iron, I decided to start with the digital coax cable. Darren warned me ahead of time that he was sending me what was labeled as his VX-1 digital video cable: “It’s the exact same cable [as the D-75 digital audio coaxial]. The only difference is in the printing on the jacket. Half way through each production run, we just switch print wheels.” I assured him that it was not a problem as a well-designed, 75 ohm digital coaxial cable functions great no matter what the appropriate application.
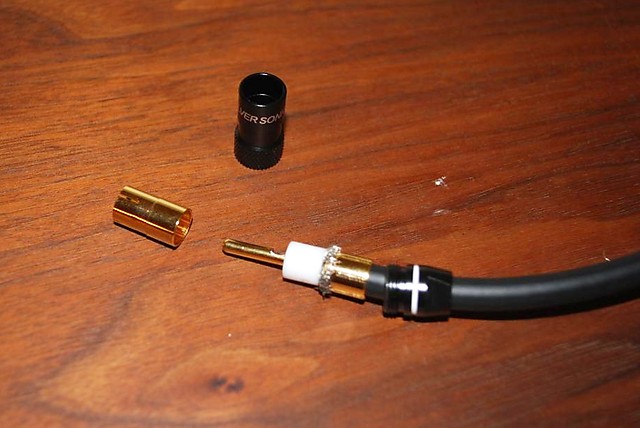
The 75 ohm RCA-3 connector which was specifically designed for their 75 ohm digital coax cable is extremely well-built, with a Teflon insulator and gold-plated connectors and a unique termination process that ensures a solid fit. After stripping back some jacket, you slide on the top nut and gold clamp sleeve, and fold the shield back over the sleeve. Then, after stripping off a bit of the Teflon insulation between the solid center conductor and braided shield, you solder the gold pin and Teflon spacer on the center conductor. Finally, you slide the gold ground crown over the center pin unit, and screw the barrel down on the top nut, securing everything together and ensuring a good connection between the braided shield and plug ground.
Functionally, the DH Labs digital coax cable is excellent as it’s smooth to the touch and easy to route, as well as performing flawlessly at a distance of 25 feet. I’ve never been a big advocate that digital interconnects make as much of a difference as analog interconnects, but this cable sounds just a little better than my previous Canare DIY cable. My bottom line with any digital connection is buy a good one the first time and forget about it; and I cannot think of a better combination of well-built, well-engineered, and well-priced than the DH Labs D-75/VX-1 75 ohm digital coaxial cable and RCA-3 connectors.
DH Labs Digital Coax
The second cables I built were Darren’s Pro Studio Interconnects. According to DH Labs:
The new Pro Studio interconnect from DH Labs was designed specifically for the DIY and Pro audio markets and is only sold unterminated. It combines phenomenally transparent sound with complete immunity to noise, and is highly flexible and easy to work with. The Pro Studio will put you in the concert hall, front row center, and is destined to become an audiophile favorite!
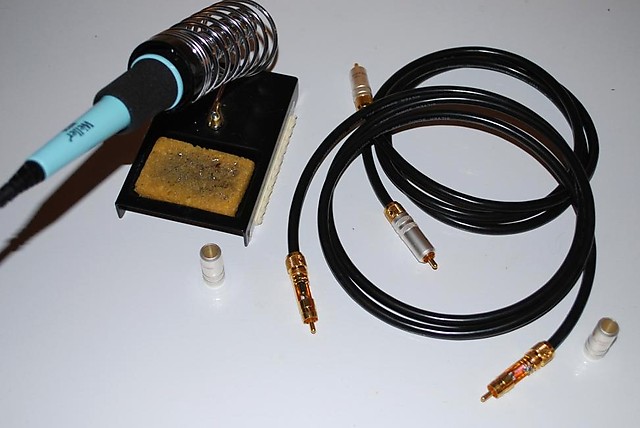
Sent along with them were a pair of his famed Ultimate RCA locking connector, which at over 99% is tested to have the highest copper content out of any RCA plug in the industry. With claims that good, I knew I needed to get soldering and listening to this unique cable. Building it was quite straightforward, as the cable is a heavily-shielded, twisted pair with 22 AWG stranded, silver-over-copper conductors. The jacket of the cable is marked with directional arrows, so I was instructed to tie the braided shield into the ground of the source end of the interconnect, which helps to minimize noise. Soldering the conductors onto the center pin was easy enough, but since the Ultimate RCA connector is a large piece of copper, heating it for the ground connection took a little more time with my 25 Watt iron.
The other consideration when terminating the Pro Studio cable is that, since the shield is attached only on the source end of the interconnect, the shield cannot touch the body of the plug on the other end, as it would defeat the design. After a few tries, I realized that I needed to heat-shrink the cable after I strip off the excess jacket and shield, in order to insulate the conductor. Once constructed, I screwed the barrels of the connectors down but without tightening them as they are locking.
DH Labs Pro Studio interconnects being built
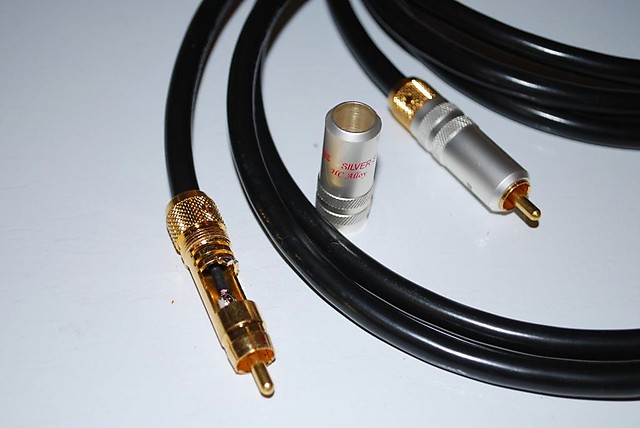
The overall look and feel of the completed Pro Studio interconnect is simple yet classy, with its black jacket and weighty, gold connectors.
DH Labs Pro Studio interconnects - completed
The last cable I constructed was a pair of DH Labs Q-10 speaker cables. These are a quad-conductor, stranded silver-over-copper, with a very attractive knit jacket. The cables can either be run as a bi-amp set with all four conductors separated, or as a single run with the conductors paired, which results in massive 10 AWG cables. I decided to terminate this 6-foot pair in a single run configuration, and got to work stripping back the outer jacket, as well as the Teflon insulation on the individual conductors.
Included with the raw cable were spade, banana, and locking banana terminations for the choosing. To get the full experience, I decided to solder gold spades at the speaker end and the standard gold bananas at the amp end. The locking banana plugs that Darren provided use screw terminals to hold onto the wire; they work well but I do prefer a soldered connector because of all the abuse I put my cables through.
The Q-10 Signature uses a combination of two 12 AWG and two 14 AWG conductors, which were very easy to strip and solder together for the combined 10 AWG pair of conductors. Using silver solder on the 10 AWG conductors with copper terminations was a fairly easy process, even with my 25W iron, as long as I tinned the wires and the plugs beforehand. On the first plug, I forgot to slip the heatshrink over the wire beforehand, and had to desolder the plug and start over. Applying heatshrink to the wires in plugs has always provided a more professional and finished product on any cables I have built; and in the case of these speaker cables, it also made it easy to differentiate between the left (black) and right (red) conductors with colored heatshrink. I always double-check my connections and wires with a multi-meter when I am finished with any project – your safety and the safety of your equipment is important. Luckily, there is a lot less that can go wrong with incorrectly wired speaker cables than, say, a power cable.
DH Labs Q10 Signature
After building the cables, I finally got down to comparing the DH Labs offerings head-to-head with another popular DIY interconnect and a comparable speaker cable. The showdown for RCA interconnects was between the Cardas Crosslink (stranded multi-gauge copper) and the DH Labs Pro Studio (shielded, silver-plated stranded copper). These cables are very similar in that they are both offered to the DIY market, as well as both being a twisted conductor design with a drain wire. The two speaker cables were the PS Audio xStream Prelude (10 AWG multi-stranded copper) and the DH Labs Q-10 Signature (10 AWG silver-plated stranded copper).
For the test, I ensured that all the cables were adequately broken in, and then used the cables in varying orders and combinations while playing “Seven Years” by Norah Jones over and over (and over and over) again. The associated equipment with the cable test was: PC Music Server, Virtue Audio Nirvana USB cable, Musiland 01USD USB Transport, DH Labs D-75 Digital Coax, Matrix mini-i Balanced DAC, Custom KingRex T20U+PSU Amplifier, Klipsch Forte speakers with Jantzen Crossover and Crites Tweeters, and Monster HTS2500 Power Center.
DH Labs Pro Studio RCA. These cables have a well-defined low bass that is a little leaner than the Cardas Crosslink, and a very natural and balanced sound overall. The leanness in bass I attributed to their “studio” design that doesn’t emphasize any one part of the sound spectrum; but note: this would not have been noticeable without direct comparison to the bass-friendly Crosslinks. As far as usability goes, they have a very smooth jacket, and are some of the most flexible interconnects I’ve used.
Cardas Crosslink RCA. These cables were also balanced, but slightly veiled compared to the others with an emphasis on bass. They have a very musical sound but are not neutral. The Crosslinks also have a great jacket without any netting or other fluff, and are about 25% less flexible than the Pro Studios.
DH Labs Q-10 Signature Speaker. In my system, the better choice of speaker cables. This cable provides a little less bass response in the lowest bass region, but was more natural in the upper midrange, and provided a little more distance and clarity in the soundstage. The cable itself is fairly flexible and small in diameter for a pair of 10AWG conductors, but you are stuck with whatever terminations come on the cables are they are soldered/crimped.
PS Audio xStream Prelude Speaker. This cable has great bass extension and a rich, musical sound. I could hear some leanness in the upper midrange, but only when compared back-to-back with the Q-10 Signature, and I probably would have kept them in my system otherwise. The screw-style connectors provide for great flexibility, as you can change between spades and bananas on either end, at any time. These are the thickest and least flexible cables I’ve used to date, and actually pulled on my amplifier a little if they weren’t braced.
Audio cables in a stereo system are important and do affect the overall sound. However, stereo components can be dependent on their synergy with the other components and their cabling. Always start with good, quality cables as that will make the biggest difference, and the silver-over-copper with Teflon created by DH Labs are high quality wires. To me, silver cables can sound a little unnatural compared to copper, but Darren has found the magic combination of silver over copper that provides great musicality no matter what the application.


Are these blind tested? It’s not possible for these cables to act like a “tone control” !
The cables were not blind tested, just swapped in and out after listening to the same song over and over again on repeat to get and aural feel for the sound of each cable. This allowed me to hear the subtle differences in each cable, and choose what attributes of each cable provided the best attributes for my system. In a way, this does provide some tone control in that you can tweak the sound of you system depending on what analog cables you choose. Give it try and enjoy the listening!
Dear Mr. Montzingo
Pursuant to your article dated March 2011 regarding your experience with DH Labs cables, I have a few questions specific to the Q-10 termination. I to plan to terminate a 5 ft. pair in a straight (not bi-wire) configuration.
1) Other than removing the outer knit jacket braiding, Teflon insulation PTFE Dielectric (red or black), was there any further prep or manipulation of the silver coated continuous crystal copper?
2) your article indicated that Darren himself sent solder for the job and you followed his instruction by soldering the spades. I received different instructions from Greg at DH Labs as follows:
“We do not solder our spades…crimp only. The less introduced into the signal path, the better”.
Q-10 is most often assembled using our SP-10 Spades.
Greg
DH Labs, inc.
Can you please comment on this conflicting information as I am on the fence about soldering the spades.
Thank You very much for your kind consideration of my questions.
Respectfully,
Darrell M. Chappelle
Hi Darrell,
I am not answering for DH Labs, but in my experience I like to crimp then apply some solder. I have listened back and forth but cannot tell much of a difference, if any. The solder will make sure all strands are connected, as I have seen many crimp connections with a few loose strands. A special tool is needed for a thorough crimp across the whole connector. Simple wire stripping pliers are ok, but not like a special tool.
I don’t have the special tool, so I first apply Pro Gold to the stripped wire, slip on the shrink tubing, crimp on the connector, apply a small amount of flux, then solder using Mundorf or other solder with copper content. Clean off flux, apply a final treatment of Pro Gold, then the shrink tubing. For best strength run the insulation up to the connector before crimping. This prevents a weak bending point.
Amendum : If you can get a really good crimp, meaning all strands compressed to the connector, you can use meltable wall shrink tubing, sometimes called marine grade. This kind of shrink tubing is very tough when cooled. Beware though, the purists will say it’s extra signal robbing dielectric.