Syncing a music library to a Droidisk (or PiDisk)
In an earlier article, I suggested that one might want to synchronize a music library from a Mac or PC to a Raspberry Pi-based music server, dubbed pidisk. In that article, I used rsync on a Mac, but didn’t provide any instructions for Windows. A reader recently questioned me about it, and it occurred to me that there’s a better solution that is cross-platform and easier to set up. Enter Resilio Sync.
Since my current server, dubbed droidisk, is based on the ODroid HC1 instead of a Raspberry Pi, I’ll use that as the example in the instructions that follow.
Context
First, you’ve built a pidisk or droidisk. Second, you have music files on your computer or on external hard drives that you want to sync to the pidisk/droidisk. There may even be multiple people who want to have their music synced to the central server from their own computers.
Caveats and warnings
I’ve only been testing this solution for a few days. So far so good, but I recommend that you try it first with a test library, not your real library. Also, make absolutely sure that you sync to the pidisk/droidisk using a read-only key.
I have tested this only on my droidisk, but I don’t see why it wouldn’t work fine on a pidisk. In that case, I would suggest the latest model, the Raspberry Pi 3B+, for its faster network interface. From now on, though, I’ll just write the instructions for the droidisk – a pidisk should be the same except for the machine and user names.
Finally, for the example in this article I used a folder named “John’s Library.” This was mostly to see if having spaces and punctuation in the name would work. It does, but even so I’d advise against it, especially if using Windows.
Installing Resilio Sync on your computer
This should be easy. Just download Resilio Sync to your computer and run the installer.
Installing Resilio Sync on the droidisk
These instructions are based on Resilio’s Installing Sync package on Linux page. I had to take a couple of passes at it to get it right, so I’ve written down the exact instructions that work on the droidisk.
As in the earlier articles on the droidisk, I use “mypc” as the name of the computer and “myname” as the username. Text in constant-width font is what appears in the shell window. Black text is the prompt that asks you for input. Red text is what you type in as a command. Most commands can simply be copied from the webpage you are viewing and pasted into the terminal. Blue text is what the ODroid HC1 sends back to you, possibly abbreviated for clarity.
First log in to the droidisk:
mypc:~ myname$ ssh droid@droidisk
In the following, commands are executed in the “droid” account (or “pi” on the pidisk). For the times when administrator privileges are required, “sudo” is typed at the start of the command. The first time you run sudo, you will need to type your password.
Add the Resilio Sync repository to the apt package manager, and then install it:
droid@droidisk:~$ echo \
    "deb http://linux-packages.resilio.com/resilio-sync/deb resilio-sync non-free" \
    | sudo tee /etc/apt/sources.list.d/resilio-sync.list
deb http://linux-packages.resilio.com/resilio-sync/deb resilio-sync non-free
droid@droidisk:~$ curl -LO http://linux-packages.resilio.com/resilio-sync/key.asc \
    && sudo apt-key add ./key.asc
  % Total    % Received % Xferd  Average Speed   Time    Time     Time  Current
                                 Dload  Upload   Total   Spent    Left  Speed
100   957  100   957    0     0  18025      0 --:--:-- --:--:-- --:--:-- 18403
OK
droid@droidisk:~$ sudo apt-get update
...
Fetched 3,071 kB in 5s (571 kB/s)
Reading package lists... Done
droid@droidisk:~$ sudo apt-get install resilio-sync
Reading package lists... Done
Building dependency tree
...
Processing triggers for ureadahead (0.100.0-19) ...
droid@droidisk:~$
Edit the configuration file /usr/lib/systemd/user/resilio-sync.service:
droid@droidisk:~$ sudo nano /usr/lib/systemd/user/resilio-sync.service
Change the last line of this file from
WantedBy=multi-user.target
to:
WantedBy=default.target
Start the service:
droid@droidisk:~$ systemctl --user enable resilio-sync
Created symlink from /home/droid/.config/systemd/user/default.target.wants/resilio-sync.service
  to /usr/lib/systemd/user/resilio-sync.service.
droid@droidisk:~$ sudo loginctl enable-linger droid
droid@droidisk:~$ systemctl --user start resilio-sync
droid@droidisk:~$
Edit the configuration file ~/.config/resilio-sync/config.json:
droid@droidisk:~$ nano ~/.config/resilio-sync/config.json
Change:
  "webui" :
    {
        "listen" : "127.0.0.1:8888"
    }
to:
   "webui" :
    {
        "listen" : “0.0.0.0:8888"
    }
Let’s live life on the edge and see what happens after we…
droid@droidisk:~$ sudo reboot
Wait at least a full minute before proceeding.
Configuring Resilio Sync
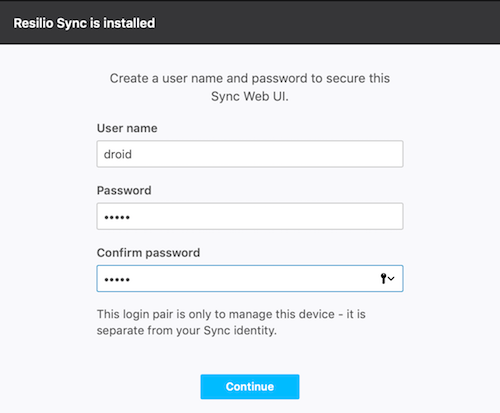
Open a web browser on your computer and go to http://droidisk:8888/gui/index.html. With any luck, the Resilio Sync interface will load and prompt you to set an access username and password. I used “droid” and “droid” for this example, but I do suggest you use a more secure password:
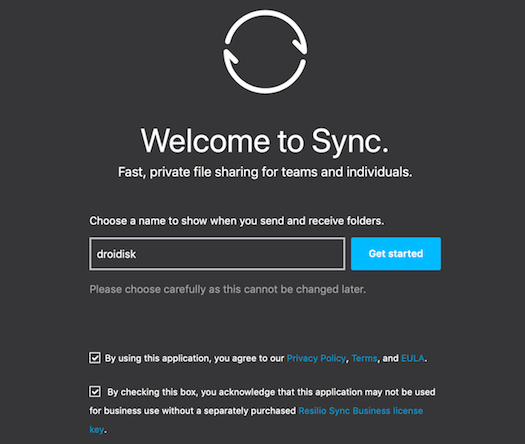
You will then be asked to name this device. Enter “droidisk”, click the checkboxes to agree to the terms of use, and click Get started:
You will now see the Resilio Sync interface for your droid:
![]()
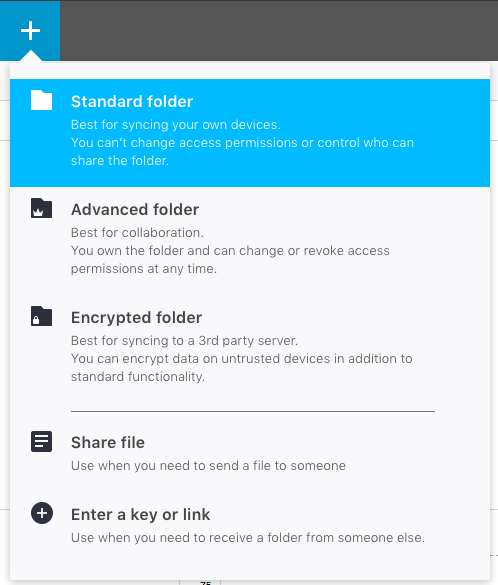
Obviously, there’s nothing there yet. You will need to add shared folders using Resilio Sync running on your Mac or PC. Leave this browser window open and start Resilio Sync on your computer. On your computer, click on the big “+” sign at the top left and select Standard folder:
Navigate to your test library and select it. On the next screen, make sure that the option for Read Only is checked – that way, if there’s some problem on your droidisk and files get deleted, they won’t get deleted on your computer as well. Also, turn off the option to approve new peers:
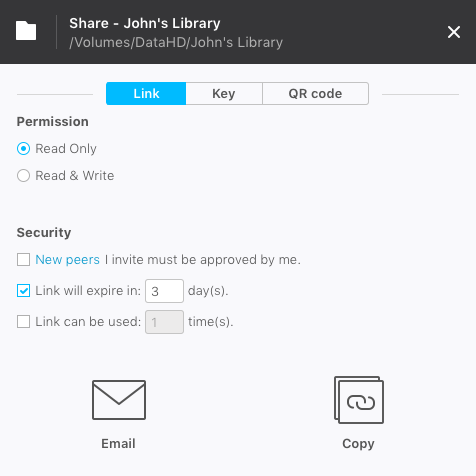
Click on Copy.
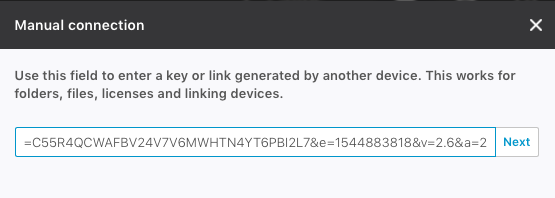
Switch to the web browser window with the droidisk Resilio interface. Click on the big “+” and select Enter a key or link. Then paste into the text entry box:
Click Next. The next window will present the default location, which you don’t want to use:
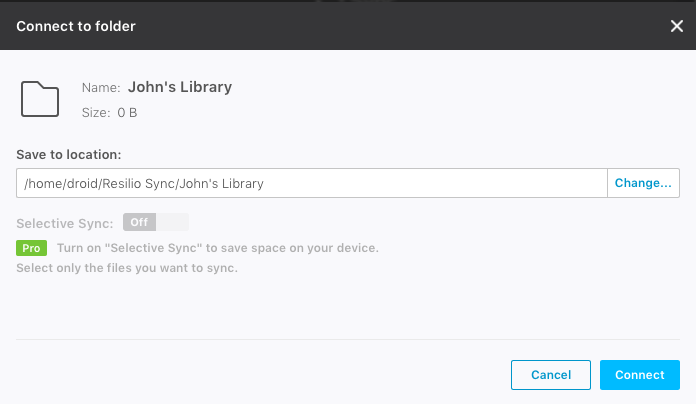
Click on Change. On the screen that comes up, create a folder under /srv/droidisk:

Click Open, on the next screen check that the correct path is shown for Save to location:, then click Connect. Et voila! Your files should start syncing:
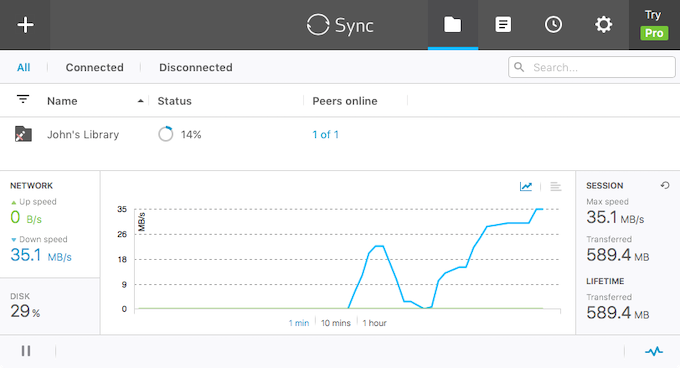
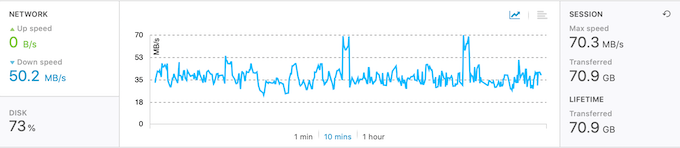
Click on the little squiggle at the bottom right to see the transfer speed graph. While transferring, I did notice the droidisk getting warmer than usual. If it’s of interest, you can monitor the CPU temperature as well as a lot of other info with:
droid@droidisk:~$ htop
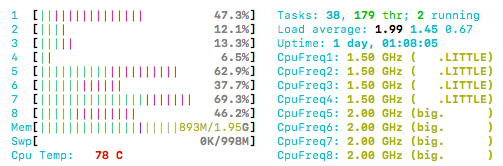
As you can see, Resilio Sync does keep the 8-core CPU fairly busy. Over time, I got an average speed of about 35 MBytes/second, or around 2 GB per minute. A terabyte will take a bit more than 8 hours.
Configuring read-only folder options
To change the options on the droidisk read-only folder, right-click on its name and select Preferences from the drop-down menu. Set the options like this:
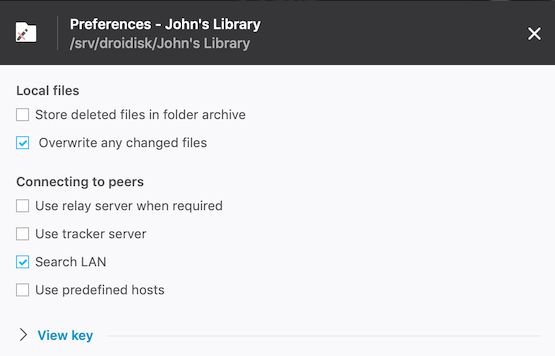
Store deleted files in folder archive. Turn this off. If you don’t and then delete a file on your Mac/PC, Resilio Sync will keep a copy in the hidden folder named “.sync” for 30 days. However, MinimServer doesn’t know it’s supposed to be hidden, so as far as it’s concerned the file will still be in the library.
Overwrite any changed files. This is supposed to be a read-only copy of your library. If you do change a file somehow, then you want the copy on your Mac/PC to overwrite the changed version.
Use relay server when required and Use tracker server. Turning these off prevents syncing to your computer if it’s outside your local network. Apart from being a little more secure, it can also save accidentally using up all your mobile bandwidth.
Configure MinimServer
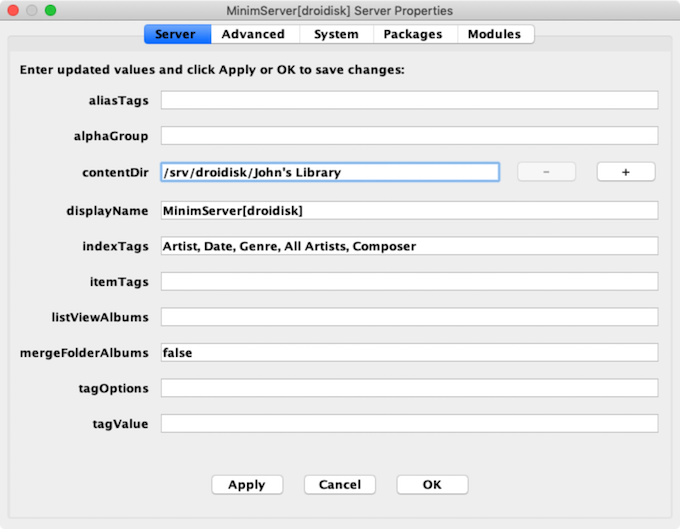
Wait until Resilio Sync completes the sync. Then use MinimWatch to open the Properties windows, and add the new folder for your test library to MinimServer using the contentDir parameter. In this example, the test library is the only folder I am giving to MinimServer, as this makes it easier to confirm that the test library is being scanned:
Then select Rescan from the MinimWatch menu. If you are using the Lumin app as your controller, you can also initiate the rescan by clicking on the gear icon, then under Music Library tap Options then MinimServer Rescan. When the rescan finishes, open your DLNA controller and check that the files are visible.
You may want to add or delete albums and make sure that the library is being updated as you expect. On Windows, Resilio Sync may give some warnings about files being locked during the transfer – you can ignore these, they will sort themselves out.
Once you are satisfied that everything is working with your test library, go ahead and repeat the process with your real library.
Multiple shared folders
You may wish to create multiple shared folders.
- If you have multiple music locations on your Mac/PC, just create more shared folders as above.
- If you have external drives that you want to sync to the droidisk, create another shared folder for each drive as above. When sync completes, pause Syncing in the Resilio interface and eject the drive. In some cases, you may need to do a hard eject, or shut down the computer before disconnecting the drive. Resilio Sync on your Mac/PC will complain about the missing drive, but you can ignore it. Or if this really is a one-time sync, you can just remove the share from Resilio Sync on both the Mac/PC and the droidisk.
- If you have more than one computer to sync, install Resilio Sync on those as well and add new shared folders as above.
Of course, each new folder added to the droidisk will also need to be added to MinimServer as additional contentDir entries.
Automatic library rescan
While library syncing is automatic, library rescanning is not. To have the library automatically rescan every 24 hours, create a cron job:
mypc:~ myname$ ssh droid@droidisk
droid@droidisk:~$ crontab -e
Add this line to the end of the file:
0 3 * * * echo rescan | ~/minimserver/bin/mscript
Save the file (Ctrl-O) and exit (Ctrl-X). The rescan will run at 3 AM daily. You can check that it ran by looking at the log in MinimWatch.
Concluding remarks
And that’s all folks! If you try this out, please post in comments below.


Thanks for your instructions!
In my case, to get the cronjob running on my Pi, I had to do the following:
1. Enable cronservice
a) Verify if cronservice is running: service cron status
b) To enable inactive cronservice: sudo systemctl enable cron
2. Replace echo rescan | ~/minimserver/bin/mscript:
a) Create rescan.sh file with command rescan and make it executable
b) In crontab, create the following job with full paths): 12 11 * * * /home/pi/minimserver/minimserver/bin/mscript /home/pi/minimserver/minimserver/bin/rescan.sh