PiDisk – an inexpensive Raspberry Pi music server
This is the first part of a short series on PiDisk – an inexpensive music server based on the Raspberry Pi. While originally intended as a single article, I have broken it into three articles (for the benefit of reader and writer!):
- Part 1: An inexpensive music server (this article) – introduces the concept of the PiDisk and sets it up as a basic file server.
- Part 2: Adding the music services – adds MinimServer and BubbleUPnP Server to the PiDisk so that it is a functioning music server (including streaming TIDAL and/or Qobuz).
- Part 3: Syncing the music library – explains how to automatically synchronize your music library to the PiDisk over the network, and concludes with a few additional tips.
I have chosen a “ground up” approach to building this server – that is, adding functions and configuration to the base operating system rather than using a prebuilt distribution with (for example) a web-based configuration interface. As a result, the procedure described here does involve quite a lot of remote command-line work. I’ve broken it down into numbered “bite-sized” chunks and tried to describe it as carefully and thoroughly as I can so that even those unfamiliar with Linux will be able to make their own PiDisk.
While these articles refer to using an Apple Mac quite a lot, the server itself really has nothing to do with the Mac. However, you do have to do various things on a regular computer in order to set things up, and I’ve assumed in these articles that it’s an Apple Mac. It’s just a pragmatic decision.
- Architectural overview
- 1. Getting started
- 2. Initial configuration with raspi-config
- 3. Connect the drive
- 4. Format the drive
- 5. Mount the drive
- 6. Create a file share
- Wrapping up (Part 1)
Architectural overview
The overall system architecture, shown below, is quite similar to that presented in earlier articles, in particular the conclusion to the “Streaming TIDAL” article. Now, however, the host for MinimServer and BubbleUPnP Server is a Raspberry Pi instead of an Apple Mac. So there are now two Pi – one the server, and one the player (aka renderer). The server Pi aka the “PiDisk” has its own attached hard drive, and is synchronized over the network with the main music library.
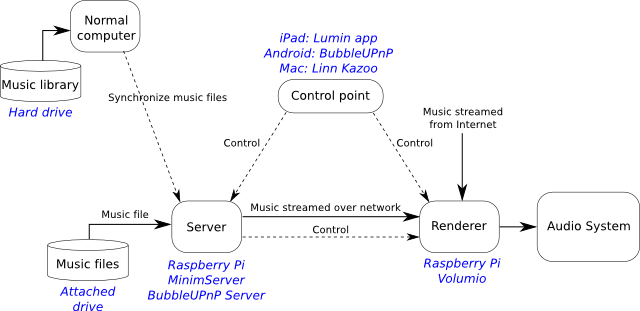
All you need to make a PiDisk is a single Raspberry Pi 2 or 3, a power supply, a micro-SD card to put the operating system on, an Ethernet connection, and a hard drive.The attached drive can be self-powered or bus-powered (if sufficiently low power). Don’t connect the drive yet though.
1. Getting started
Get Raspbian Jessie Lite from the Raspbian download page. Write it to a micro SD card (as explained in Part 1). Plug the card into the Raspberry Pi, connect the Ethernet cable, and plug in the power.
To communicate with and configure the Raspberry Pi, these articles will be using a shell (aka command line). I will assume that you are running the Pi “headless” – with no monitor, keyboard or mouse connected directly to it.
To run a shell, open the Mac’s Terminal program, located in the Applications/Utilities folder of your Mac’s hard drive. When you do so, you will see a prompt:
mymac:~ myname$
I am using “mymac” in the examples as the name of the Mac, and “myname” as the username. All of the text in constant-width font is what appears in the Terminal window. Black text is the prompt that asks you for input. Red text is what you type in as a command. Most commands can simply be copied from the webpage you are viewing and pasted into the terminal. Blue text is what the computer will send back to you (typically omitted or elided in some way). For example, this is how you log in to the Raspberry Pi from your Mac:
mymac:~ myname$ ssh [email protected]
The authenticity of host 'raspberrypi.local (192.168.1.20)' can't be established.
RSA key fingerprint is db:b4:76:52:92:08:a8:b8:bb:5f:0a:73:af:f7:fd:c0.
Are you sure you want to continue connecting (yes/no)? yes
Warning: Permanently added 'raspberrypi.local,192.168.1.20' (RSA) to the list of known hosts.
[email protected]'s password: raspberry
Linux volumio 3.18.5-v7+ #748 SMP PREEMPT Wed Feb 4 21:33:52 GMT 2015 armv7l
...
Debian GNU/Linux comes with ABSOLUTELY NO WARRANTY, to the extent
permitted by applicable law.
Last login: Sat Jun 18 20:08:31 2016 from mymac
You will now be in the command shell for the Raspberry Pi, which will display this prompt:
pi@raspberrypi:~ $
From here, you can type commands and the Raspberry Pi will respond. The first part of the prompt shows that you are logged into the Raspberry Pi as the ordinary user “pi.” When you are installing software and doing “system stuff,” you need to have what is called “root” or “superuser” privileges. (Like being an administrator on a Mac or PC.) In Linux, the typical way to gain root privileges is to type “sudo” at the start of each command.
Try this out now – update the Raspberry Pi operating system by typing the following commands. Type “Y” when prompted by either of these commands. It may take a few minutes of downloading and updating to complete:
pi@raspberrypi:~ $ sudo apt-get update
pi@raspberrypi:~ $ sudo apt-get upgrade
2. Initial configuration with raspi-config
Run the utility raspi-config:
pi@raspberrypi:~ $ sudo raspi-config
The documentation for this utility is here. Here’s how it looks:
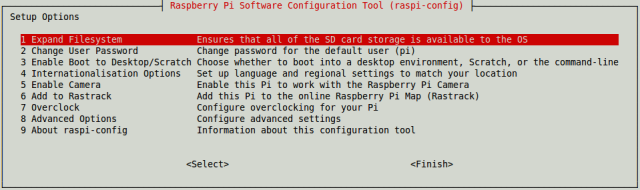
Press the Return key to select option 1 to expand the file system. This is because the image that you loaded onto the SD card was formatted for a small card. You will need the extra space, so do this first.
Then use option 8 and select the option to change the hostname. The default hostname is “raspberrypi,” which will cause confusion if you end up with more than one on your network. You can name it what you like, but I named mine “pidisk,” so that name will be used in the rest of this article.
Then navigate to the <Finish> button, press Return, and select Yes to the question about rebooting the Pi. You will be kicked out of the shell. Wait a minute or two, and then connect and log in again, but this time to the device “pidisk.local”:
mymac:~ myname$ ssh [email protected]
pi@pidisk:~ $
3. Connect the drive
The Raspberry Pi doesn’t supply very much power through its USB ports. If you are about to connect a bus-powered drive, it’s a good idea to first tell the Pi to allow more power through its USB ports. Edit the file /boot/config.txt:
pi@pidisk:~ $ sudo nano /boot/config.txt
In the editor, add this line to the file:
max_usb_current=1
Press Ctrl-O to write the file, hit return at the confirmation prompt, and then press Ctrl-X to exit the editor. Then reboot:
root@pidisk: /home/pi# sudo reboot
Wait a minute, then log in again:
mymac:~ myname$ ssh [email protected]
With this tweak, I was able to use a portable hard drive of the type intended for laptop backups. (A Toshiba Canvio.) An SSD was also fine. A Hitachi 5K1000 drive in a fast USB3 enclosure, however, wouldn’t spin up (the drive makes a stuttering sound when this happens), so a powered USB hub was required for that drive.
Now connect the drive (or powered hub) to one of the Pi’s USB ports. Wait a few seconds and then check that the operating system can “see” it:
pi@pidisk:~ $ sudo fdisk -l /dev/sda

Disk /dev/sda: 931.5 GiB, 1000204886016 bytes, 1953525168 sectors
Units: sectors of 1 * 512 = 512 bytes
Sector size (logical/physical): 512 bytes / 512 bytes
I/O size (minimum/optimal): 512 bytes / 512 bytes
Disklabel type: dos
Disk identifier: 0x00000000

Device     Boot Start        End    Sectors   Size Id Type
/dev/sda1           2 1953525167 1953525166 931.5G  b W95 FAT32
The above confirms that the drive is visible as device /dev/sda and that it has one partition named /dev/sda1. In this example, it’s been formatted as a Windows FAT32 drive (which is typical of portable backup drives).
4. Format the drive
We are going to format the partition in ext4, the native Linux filesystem. While it is possible to use drives formatted in FAT32, the native Linux filesystem is a more robust solution.
First, delete the existing partition and create a new one, using the command “fdisk” in interactive mode. In the following, there are a number of places where input is given to fdisk – these are shown in red. There are two questions about the partition blocks where you can just press the Return key (shown as <Return>).
pi@pidisk:~ $ sudo fdisk /dev/sda

Welcome to fdisk (util-linux 2.25.2).
Changes will remain in memory only, until you decide to write them.
Be careful before using the write command.

Command (m for help): d
Selected partition 1
Partition 1 has been deleted.

Command (m for help): n
Partition type
   p   primary (0 primary, 0 extended, 4 free)
   e   extended (container for logical partitions)
Select (default p): p
Partition number (1-4, default 1): 1
First sector (2048-1953525163, default 2048): <Return>
Last sector, +sectors or +size{K,M,G,T,P} (2048-1953525163, default 1953525163): <Return>

Created a new partition 1 of type 'Linux' and of size 931.5 GiB.

Command (m for help): w
The partition table has been altered.
Calling ioctl() to re-read partition table.
Syncing disks.
Let’s check the result:
pi@pidisk:~ $ sudo fdisk -l /dev/sda

Disk /dev/sda: 931.5 GiB, 1000204883968 bytes, 1953525164 sectors
Units: sectors of 1 * 512 = 512 bytes
Sector size (logical/physical): 512 bytes / 512 bytes
I/O size (minimum/optimal): 512 bytes / 512 bytes
Disklabel type: dos
Disk identifier: 0x00000000

Device     Boot Start        End    Sectors   Size Id Type
/dev/sda1        2048 1953525163 1953523116 931.5G 83 Linux
You can see that the partition is now of type “Linux.” Now format the partition:
pi@pidisk:~ $ sudo mkfs.ext4 /dev/sda1 -L pidisk
mke2fs 1.42.12 (29-Aug-2014)
Creating filesystem with 244190389 4k blocks and 61054976 inodes
Filesystem UUID: e28c99b0-caf5-4020-97a2-49f323fb498b
Superblock backups stored on blocks:
	32768, 98304, 163840, 229376, 294912, 819200, 884736, 1605632, 2654208,
	4096000, 7962624, 11239424, 20480000, 23887872, 71663616, 78675968,
	102400000, 214990848

Allocating group tables: done
Writing inode tables: done
Creating journal (32768 blocks): done
Writing superblocks and filesystem accounting information: done
5. Mount the drive
The drive needs to be mounted so that it is accessible as part of the file system. First, create the mount point i.e. the directory where the drive will be mounted:
pi@pidisk:~ $ sudo mkdir /media/pidisk
Now we need the “UUID” of the drive, which was printed out in the formatting command but can always be obtained again with:
pi@pidisk:~ $ sudo blkid /dev/sda1
/dev/sda1: LABEL="pidisk" UUID="d8335763-cfa2-4f0c-8258-3fe77cad4da1" TYPE="ext4"
Edit the file /etc/fstab:
pi@pidisk:~ $ sudo nano /etc/fstab
and add this line to the end of that file:
UUID=d8335763-cfa2-4f0c-8258-3fe77cad4da1 /media/pidisk ext4 defaults 0 0
The UUID to use here is of course the string you obtained for your own drive. Press Ctrl-O to write the file, hit Return at the confirmation prompt, and press Ctrl-X to exit the editor.
Mount the drive and check that it mounted:
pi@pidisk:~ $ sudo mount /dev/sda1
pi@pidisk:~ $ df -h /media/pidisk
Filesystem      Size  Used Avail Use% Mounted on
/dev/sda1       917G   72M  917G   1% /media/pidisk
Modify the file system permissions:
pi@pidisk:~ $ sudo chown -R pi:pi /media/pidisk
pi@pidisk:~ $ ls -al /media/pidisk
total 24
drwxr-xr-x 3 pi   pi   4096  Jun  3 09:50 .
drwxr-xr-x 3 root root 4096  Jun  3 06:17 ..
drwx------ 2 pi   pi   16384 Jun  3 09:50 lost+found
6. Create a file share
In this section, the drive will be made accessible over the network. The following is largely adapted from this article.
Install samba, the file sharing software. Answer “Y” to the prompt:
pi@pidisk:~ $ sudo apt-get install samba
Edit the samba configuration file:
pi@pidisk:~ $ sudo nano /etc/samba/smb.conf
Add the following to the end of the file:
[pidisk]
path = /media/pidisk
valid users = @users
force group = users
create mask = 0660
directory mask = 0771
read only = no
Restart the samba server:
pi@pidisk:~ $ sudo /etc/init.d/samba restart
Set up a user to access the new fileshare. You will be prompted for a password twice. Both times, enter “raspberry” (without the quotes):
pi@pidisk:~ $ sudo smbpasswd -a pi
New SMB password: raspberry
Retype new SMB password: raspberry
Added user pi.
pi@pidisk:~ $
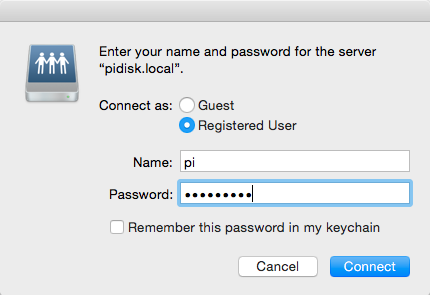
Back on your Mac, in the Finder, press Cmd-K (or select Go -> Connect to Server…). Enter smb://pidisk.local/pidisk and then click the “+” icon. Select the pidisk in the box below and click on the Connect button.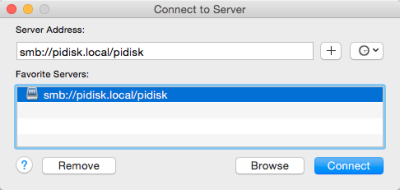
On the next screen, select “Registered User” and enter the username “pi” and password “raspberry”:
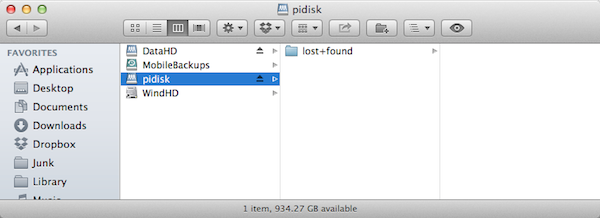
If all goes well… bingo! The file share will appear in the Finder:
Now do this:
- In the Finder, create a new folder on the PiDisk named “Music”
- Drag and drop a few music files into this new folder.
You should also be able to access the PiDisk from the sidebar in the Finder window. Here’s an example with a few files copied over:

Wrapping up (Part 1)
If you’ve got this far – congratulations! You now have the ability to drop files onto the PiDisk. Note, however, that this is not really a good long-term solution, so we will be addressing that properly in part 3. In the meantime, copy a few more music files over anyway, and we’ll install the music servers in Part 2.


