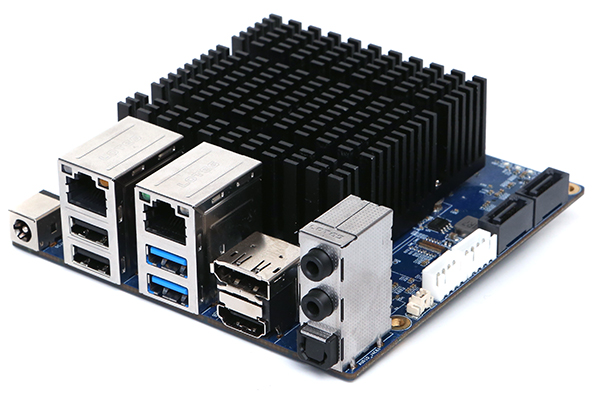
Roon Server on ODroid H2
I expect that Roon needs no introduction. In a few short years, Roon has become the go-to music player for many audiophiles. Its extensive set of features includes a consistent, modern user interface across multiple devices, built in DSP (upsampling, EQ, cross-feed, convolution), a transparent networked architecture, and tight integration with popular music services like TIDAL and Qobuz.
There is now quite a long list of “Roon Ready” players listed on the Roon partner devices page. For some time, it’s also been possible to turn a small ARM-based Linux SBC (single board computer) into a Roon player by installing the Roon Bridge software. For the Raspberry Pi in particular, RoPieee is a ready-to-go Roon player distribution that supports most popular analog and digital output cards.
However, the Roon Server requires a more substantial piece of hardware. This sucker ain’t gonna run on your Granma’s Raspberry Pi! All the indexing, cataloguing and connection-making between your music files takes place on the Roon Server, as well as the above-mentioned DSP if you’re using it. Roon refers to the result of this CPU work as “metadata.” In CPU terms, baking and digesting metadata isn’t cheap, so Roon Server requires an x86_64 processor.
Ever since I discovered how easy it is to set up a DLNA music server on a Raspberry Pi or an ODroid HC1, however, I’ve been reluctant to dedicate a “proper” computer as a music server. Even an Intel NUC seemed expensive compared to the Pi and the HC1. Enter the ODroid H2 from South Korean Hardkernel Co., Ltd., a $111 SBC sporting an Intel Gemini Lake Celeron SoC (“system on a chip”) with tolerable benchmark scores, an NVMe socket for a fast SSD, and two SATA connectors for hard drives. I couldn’t help but wonder if that would be enough for Roon Server.
Well, thunk I, there’s one way to find out.
Context and comparisons
Let’s place the H2 into context. First, CPU power. For their dedicated ROCK server distribution, Roon currently recommend the 8th generation NUC8i3BEH for “small to medium libraries” and the NUC8i7BEH for “large libraries.” When I started writing this article in June 2019, their recommendation (here) was the 7th generation NUC7i3BNH and NUC7i7BNH respectively. The graphic below shows the Geekbench scores for these NUCs along with two generations of Mac mini. Since Roon Server makes good use of a multicore processor, I’ve sorted them in order of the multicore score:
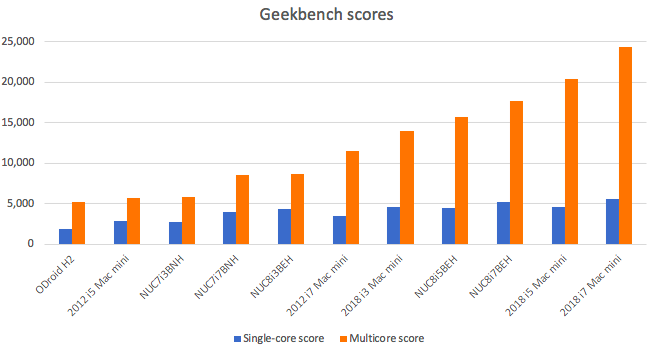
ODroid H2 CPU speed compared to others using Geekbench scores
The H2 is slowest…but only just. It’s not far behind Roon’s “small to medium” recommendation as of June 2019, or the 2012 i5 Mac mini that I used as a Roon server for some time without even thinking about performance.
What about pricing? When you order an H2, you will also need the parts to bring it up to being equivalent to say a NUC: case, SATA cables, and power supply. Delivered in the USA that will run you about $170, whereas a NUC8i3BEH from newegg.com is $315, or 85% more. However, you still need to add memory and storage, which will be the same in both cases.
Speaking of storage, Roon strongly recommends that the system drive be an SSD for performance reasons. Both the H2 and Intel NUC have an NVMe slot for a fast SSD*1. For my H2 Roon Server, I’m using the cheapest good quality drive I could find, a Samsung PM961 128GB OEM drive. Below are some measured read and write speeds, in MBytes/second*2.
| Drive / computer | 4k random read | 4k random write | Sequential read | Sequential write |
|---|---|---|---|---|
| Samsung 850 Pro 250GB (65%) 2012 i5 Mac mini |
20.8 | 26.1 | 485 | 144 |
| Samsung 840 Evo 1TB (75%) ODroid HC1 |
21.6 | 27.4 | 373 | 347 |
| Apple APO256 250GB (90%) 2018 i5 Mac mini |
53 | 100 | 2231 | 1283 |
| Samsung PM961 128GB (6%) ODroid H2 |
60 | 142 | 1,500 | 809 |
| Samsung 970 Evo Plus 250GB (5%) ODroid H2 |
61 | 143 | 1,500 | 992 |
| Samsung 970 Evo Plus 250GB (5%) Intel NUC8i5BEH |
57 | 268 | 2,300 | 1,600 |
Clearly, the NVMe drives outperform the SATA drives by a considerable amount*3. The 970 EVo plus is also an excellent drive, but was quite a bit more expensive and in the H2 has little advantage over the PM961. The 970 Evo Plus performs better in the Intel NUC because the NUC has PCIe 3.0 lanes whereas the H2 has PCIe 2.0.
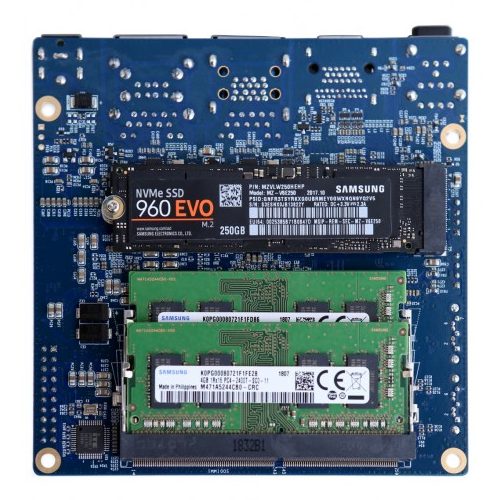
ODroid H2 with two memory sticks and an NVMe SSD mounted (stock photo from odroid.co.uk)
For music storage, I’m assuming a hard drive or drives will be needed*4. If so, H2 has the advantage, as it can use one or two 2.5″ or 3.5″ drives in addition to the NVMe SSD. The NUC can have only a single internal 2.5″ drive in addition to the NVMe drive; furthermore, with a maximum allowed height of 9.5mm, currently available drives limit capacity to 2 TB. For my H2, I used a 4 TB Western Digital “Red” 3.5″ drive.
As far as storage goes, the Mac mini is a solid last. The 2012 model can be made to carry two 2.5″ drives although with one SSD and one HDD installed, macOS will want to turn them into a Fusion drive. The 2018 model can’t have internal storage changed or added at all.
(*) Notes on this section:
- Note that this applies to NUCs with Core processors only – Celeron NUCs do not have the NVMe slot. This makes the Celeron NUCs unattractive for this application because you can’t have an SSD and a hard drive in the same box.
- On Linux, these scores were obtained with dd for the sequential read/write times and iozone for the 4k read/write times. On the Mac, scores were obtained with BlackMagic Disk Speed Test for the sequential read/write times and AmorphousDiskMark for the 4k read/write times.
- The SATA drives are about 2/3 full and have been in use for some time. Fresh empty drives always benchmark better. Still, the differences here are not small and the SATA interface itself is limited to 600 MB/sec. I’ve indicated the used capacity next to each drive in parentheses.
- If you already have your music library on network storage, then the internal storage capability of the server will not be a consideration for you. Here I’m assuming that a self-contained server unit including music storage is desired.
Physical assembly
The H2 is a bare board. You will need to add one or two DDR4 memory sticks. I used a single Samsung 4GB stick. The NVMe SSD slips into the socket also located on the bottom of the board and is secured with a screw thoughtfully supplied by HardKernel.
Odroid offers several different case styles, depending on whether you want no SATA drives (Type 2), 2 x 2.5″ drives (Type 3), 2 x 3.5″ drives (Type 1), or 1 x 3.5″ drive (Type 4). I used Type 4, shown below.
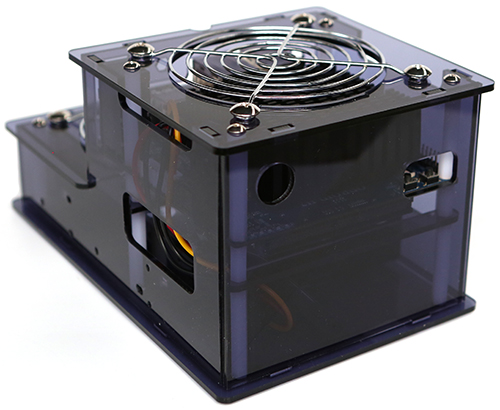
Case “Type 4”. Not elegant, but it serves to hold everything together and it’s fairly cheap.
The case is assembled around the drive, with the side pieces screwed into the drive. With the Type 4, there are ten bits of oddly shaped plastic to be assembled and it’s easy to get something backwards, so I do recommend watching the instruction video carefully. I guess you could say this case is functional, but not convenient – it needs to be dismantled again to swap a drive or a memory stick.
This case doesn’t include a fan, although one could be installed if desired. I didn’t find the fanless H2 to run hot in my testing with Roon: in an ambient of 20 degrees C, I saw CPU core temperatures in the low to mid 40’s while playing music. The highest temperature I noticed was about 64 degrees during initial library load.
In retrospect, the Type 1 case would be a better choice. While it is larger, it’s less fiddly, holds two drives and comes with a fan, so you could hide it in a cupboard and forget about it.
Installing an OS
Since the H2 has an x86 processor, you don’t need a special download for the operating system as you do for ARM processors. Any x86_64 Linux installer should work. For this application, I think stability is one of the more important attributes in choosing a distribution, so I installed Ubuntu Server 18.04 LTS. This is supported until 2023.
Installation is simple. In short, after downloading, burn the image to a USB stick with Etcher. For installation, connect a screen and keyboard to the H2. Insert the USB stick into one of the USB ports and plug in the power. During the installation process, you will format the NVMe SSD and choose a login username and a hostname – I used “roonuser” and “roonsrvr” respectively. At the point where you are asked whether to install OpenSSH server, check the box to affirm. When installation is done, press Return to reboot. The installer will ask you to remove the USB drive and press Return.
Why not ROCK?
ROCK (Roon Optimized Core Kit) is a Linux distribution that runs Roon Server and only Roon Server. It’s only supported for Intel NUCs. While I read reports of ROCK running on other hardware, it won’t run on the H2: ROCK requires legacy BIOS boot but the H2 only supports the newer UEFI boot method.
This is not a concern to me – I prefer to install Roon Server on an existing Linux installation anyway. That way, I can get better visibility into what the machine is doing (see Appendix) or install other services. Still, if Roon were to create a distribution of ROCK that worked with UEFI boot, it would certainly be worth a test install on the H2.
After the reboot completes, log in using the attached keyboard and screen and update the OS:
$ sudo apt-get update && sudo apt-get upgrade -y
You will need this networking utility:
$ sudo apt install -y avahi-daemon
Because the H2 has two network cards and you will have only one of them connected, there is a two minute holdup during boot. To fix this:
$ sudo nano /etc/netplan/50-cloud-init.yaml
Add “optional: true” lines to this file, so it looks like this:
network:
    ethernets:
        enp2s0:
            dhcp4: true
            optional: true
        enp3s0:
            dhcp4: true
            optional: true
    version: 2
Then:
$ sudo netplan --debug generate
$ sudo netplan apply
Finally:
$ sudo reboot
You can now disconnect the keyboard and screen from the H2 and use ssh to log in from another computer. Doing so also makes it easy to copy and paste many of the commands in the instructions that follow.
- On Mac, use the Terminal.
- On Windows, you can use Putty, although I would suggest installing WLS (Windows Linux Subsystem) and using that.
- On Linux, you’re set, just use your shell/terminal.
myname@mycomputer:~$ ssh roonuser@roonsrvr
Formatting and mounting the music drive
The SSD was formatted during the Ubuntu installation process, but you still need to format and mount your music drive. I’ve described this before, so please refer to Sections 2 and 3 of Droidisk – An inexpensive compact music server. Adjust the username and hostname in the instructions to those you chose during Ubuntu installation.
Installing Roon Server
Roon Server is easily installed using the instructions on the Roon website. First, install ffmpeg and cifs-utils:
$ sudo apt install -y ffmpeg cifs-utils
Then run Roon’s “easy install” instructions:
$ curl -O http://download.roonlabs.com/builds/roonserver-installer-linuxx64.sh
$ chmod +x roonserver-installer-linuxx64.sh
$ sudo ./roonserver-installer-linuxx64.sh
And that’s it! Start the Roon UI on a computer or a tablet and you will be able to “connect” to the server running on the H2. Note: if you already have Roon Server running somewhere, like say on a PC or Mac, you will need to “deauthorize” it in the Roon UI before you will be able to connect to the H2.
Once you’re connected, you will be able to point Roon to your music drive in the initial setup wizard.
Getting music onto the music drive
Roon has an awesome trick that I wasn’t aware of until I started writing this section – you can drag and drop files into the Roon UI on your computer, and Roon will upload them to the Roon server. Very impressive.
So that’s one way of getting music files onto the server. Here are a few more:
- Install Samba and create a network file share. See Sections 4 and 5 of Droidisk – An inexpensive compact music server. Then you can drag and drop files using your computer’s file manager.
- Use rsync to upload files. This is a very robust way to get a lot of files from one computer to another. See Section 13 of PiDisk – syncing the music library.
- Use a synchronization utility like Resilio Sync, as described in Syncing a music library to a Droidisk (or PiDisk). Other similar utilities, like FreeFileSync, may work just as well.
Does it work?
Yes! It works great. With a library of about 50,000 tracks, I find it to be quite responsive. However, “quite responsive” is a little vague, so I searched for ways I could quantify the UI performance and found this list on the Roon forum.
I worked through the list, timing each by hand. The numbers are quite low, so this is not very accurate but good enough I think to justify my “quite responsive” statement. I was logged into Qobuz while doing this. The timings do vary – repeating the same operation is typically faster. I then repeated the tests with Roon Server running on a 2018 i5 Mac Mini and with the library on an external 2.5″ drive. In both cases, the Roon UI is running on a Wifi-connected laptop. Here are the results:
| Item | ODroid H2 with internal 4TB drive | 2018 i5 Mac Mini with external portable drive |
|---|---|---|
| Open Overview page. | Two seconds the first time, and between one and two seconds from then on. | About two seconds the first time, then a second. |
| Open Discover page. | About a second and a half the first time, and a second after that. | About a second and a half the first time, then a second after that. |
| Perform a search for “The Beatles”. | About a second to a second and a half. | About a second. |
| Open “The Beatles” artist page. | About a second and a half. | Instant. |
| Open the “Help!” album page. | Half a second. | Instant. |
| Start playback of “Help!” (how long does it take before it plays?). | A second and a half. | A second. |
| Search for “Daft Punk”. | Between a second to 2 and a half seconds. | A second. |
| Open the “Daft Punk” artist page. | Half a second. | Instant. |
| Open the “Random Access Memories” album page. | Half a second. | Half a second. |
| Start playback of “Random Access Memories”. | A second. | A second. |
According to the CPU benchmark scores shown earlier in this article, the 2018 Mac mini is nearly 4 times faster than the H2, yet the times of various user interface actions are not very different. This suggests that these times are dominated by load time to the laptop (2015 MacBook Air) and rendering time for the user interface.
Summary
Based on the user interface timings above, it seems there’s little to gain from having a faster computer than the H2. Of course, things may be different with a larger library, but I suspect it would have to be quite a bit larger to make a noticeable difference.
The ODroid H2 has so far proven itself to be a very competent little computer. My main reservation is actually the case. Still, it’s workable and once you’ve set it up, you shouldn’t need to mess with it again.
All in all, I’d say it’s a win! Thanks for reading, if you try setting up your own Roon Server with an ODroid H2 or have any questions, please post in the comments below.
Appendix A: monitoring CPU load
To monitor the CPU load:
$ htop
This will fill the terminal window with process and CPU usage information. At the top left, the usage for each CPU core is shown, along with the memory usage:
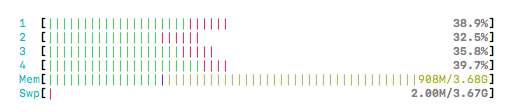
Type “q” to exit.
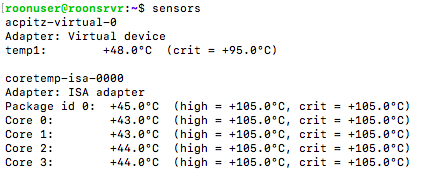
Appendix B: monitoring temperatures
To monitor the temperature of the CPU:
$ sudo apt install -y lm-sensors
$ sudo sensors-detect
When you run sensors-detect, accept the default for all questions i.e. hit Return, except at the very end when it asks you “Do you want to add these lines automatically to /etc/modules?”, when you should type YES in response.
Then:
$ sensors
If you want to update the readout continuously:
$ watch sensors
Type Ctrl-c to exit.
Appendix C: Starting and stopping
To stop Roon Server:
$ sudo systemctl stop roonserver
To start it again:
$ sudo systemctl start roonserver
To reboot the H2:
$ sudo reboot
To shut down the H2 completely:
$ sudo poweroff
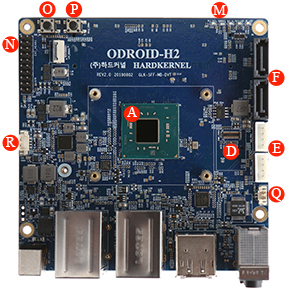
The last is always recommended before unplugging the power. To start it up again after poweroff, press the power button in the corner of the board, shown as “O” in this picture:


Like BubbleUPnP, in the other thread, Roon (both *Server and *Bridge), by default, runs as root. On general grounds, this is a bad idea. Particularly so, for a program that updates itself over an unencrypted web connection.
Fortunately, this is easy to fix. For RoonServer,
% sudo systemctl stop roonserver
% sudo adduser –system –group –home /var/roon roon
% sudo adduser roon audio
% sudo chown -R roon:roon /opt/RoonServer /var/roon
% sudo chmod 755 /opt/RoonServer
Now edit /etc/systemd/system/roonserver.service and add the line:
User=roon
to the [Service] section of that file. Finally
% sudo systemctl daemon-reload
% sudo systemctl start roonserver
The only thing the unprivileged “roon” user can’t do is mount remote volumes. So if your music is (say) on a Samba server on your network, you’ll have to mount it for him.
First create a file to hold your Samba credentials
% sudo nano /var/roon/.smb
and add your credentials to it:
user=xxxx
password=yyyy
For good measure, make it readable only by root
% sudo chmod 600 /var/roon/.smb
Now add a line to the end of /etc/fstab :
//192.168.xxx.yyy/Music /media/Music cifs credentials=/var/roon/.smb,uid=roon,gid=roon 0 0
where you want to put in the actual IP address of your Samba server and the name of the Samba share (which I, unimaginatively, called “Music”).
Finally
% sudo mount -a
and your music should all be found locvally at the mount point /media/Music . Point Roon at that local directory instead of the remote Samba server, and you’re good to go.
For RoonBridge, the procedure is the same, but a little simpler
% sudo systemctl stop roonbridge
% sudo adduser –system –group –home /var/roon roon
% sudo adduser roon audio
% sudo chown -R roon:roon /opt/RoonBridge
% sudo chown -R roon:roon /var/roon
As before, add the line:
User=roon
to the [Service] section of /etc/systemd/system/roonbridge.service . Then
% sudo systemctl daemon-reload
% sudo systemctl start roonbridge
and you’re done.
Has anyone compared performance of these mini server to ROON Server capable QNAP such as the QNAP TS-473?
In terms of CPU performance, the RX-421ND in the TS-473 has similar geekbench results to the J4105 in the ODroid H2, so they are roughly equivalent. In the ODroid configuration outlined above the system drive is SSD as recommended by Roon, whereas with the TS-472 it’s not clear whether an installed M.2 SSD can be used similarly, so that would be something to look into. Of course, the TS-473 can hold 4 drives in RAID and has other NAS features but at a substantially higher price. Hope that helps 🙂
Here’s a good review of the Odroid H2. One of the points made is that, for the sort of tasks that Roon engages in, you get a 20% speed boost if you install the RAM in matched pairs as opposed to using a single module.
At these prices, we’re talking about a ~15% increase in the total cost, for a comparable increase in performance.
Good point, I suppose Roon would use ffmpeg for FLAC (and other) decoding. I did put another stick in mine 🙂 Even so I’m a bit surprised at how light a load Roon is so I’m now running it virtualized on “half” the H2.
I think RAATServer may handle FLAC internally, but Roon uses ffmpeg for everything else (ALAC, MP3, AAC, …). And there is a lot of decoding/transcoding going on. 24- or 32-bit PCM gets sent down the wire and “volume-leveling,” if you have that turned on, does an intermediate conversion to 64-bit float. So, yeah, I’m pretty sure dual-channel RAM does speed things up.
That’s kinda hilarious. I’m curious to learn what you use the other “half” for.
One thing that impresses me is how cool the H2 runs. CPU core temperatures hover at 39℃ — cooler than any of my Raspberry Pi’s. Under load, the temperature does shoot up, but (in normal use) Roon does not seem to be much of a load.
Still working on it, it was initially an experiment, this graphic gives an idea of the load (via netdata, still figuring that out too…). The load when streaming is higher than file playback.