How to stream Qobuz to almost anything
A few years ago, I wrote How to stream TIDAL to the Raspberry Pi. That article turned out to be one of HifiZine’s most popular for long-term readership. I assumed in that article that audio would be played to a Raspberry Pi with Volumio installed on it. I think it’s about time, however, for some updates that cover things other than the Raspberry Pi. This article presents the big picture, and follow-up articles will look at specific audio players.
I’m going to use Qobuz as the streaming service in these articles. Qobuz streams native high-res audio at up to 192 kHz, so it raises the bar on the capabilities of the streaming system. I also noted that the Qobuz desktop player claims DLNA streaming support (in beta) but as far as I can tell, it doesn’t work. The method described here does.
Contents
- System architecture
- Some example renderers
- Set up BubbleUPnPServer
- Set up a controller
- Appendix A : Set up a music server
- Appendix B : Turn any SBC into a music player
System architecture
Figure 1 illustrates the architecture of the system, which sets out the main pieces of hardware and software involved. In the center is a key piece of software called BubbleUPnPServer. You can install it on a Mac or Windows computer, or on its own SBC (single board computer). This software is what enables us to stream Qobuz to lots of audio players, streamers, devices, or “things”. By “thing” I am of course evoking the Internet of Things (ioT).
In UPnP parlance, these “things” are called renderers. As long as a device supports UPnP/DLNA, it will work in this architecture. While previously I have used a Raspberry Pi running Volumio as an example, there are lots of things that can be used, including other Linux SBCs and off-the-shelf devices such as those on this list. You can have as many renderers as you like on your network.
You also need a way to browse music on Qobuz, to select a renderer to play music to, and to control playback. That’s the purpose of the control point or controller i.e. the user interface. With this architecture, you don’t need to leave a controller turned on once you have started music playback. You can also switch between controllers while music is playing. The diagram lists controller apps that I have found to work well.
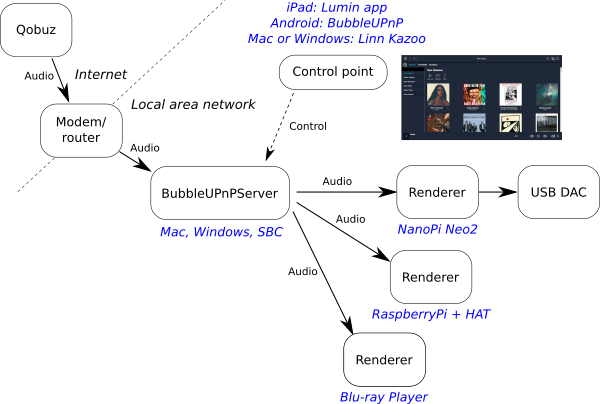
Figure 1. System architecture for Qobuz streaming
Some example renderers
This photo shows a couple of the renderers I’m using right at the moment. At the top left is a NanoPi Neo2, while on the right is a Raspberry Pi with an Allo DigiOne digital output HAT. The Pi is running the ready-to-go distribution Volumio, while the NanoPi Neo2 has the player software installed from scratch. This is fairly straightforward to do with almost any Linux SBC, and I’ve provided instructions in Appendix B.
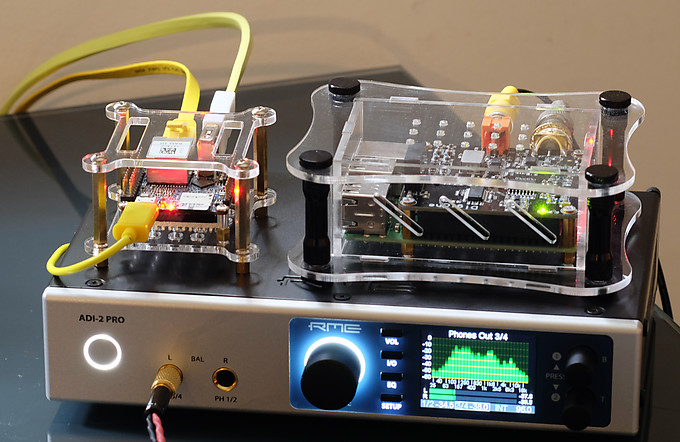
Two renderers sitting on top of my RME ADI-2 Pro
There are more expensive turnkey SBC-based streamers (although still cheap by high end audio standards) with analog outputs that are engineered for high quality audio output. For example, the folks at Volumio have released their own streamer called the Primo, and young company Orchard Audio have announced the forthcoming PecanPi.
Don’t get stuck thinking this is only about cheap single board computers, though. High end audio streamers – such as those from Lumin and Linn, who provide two of my preferred controller apps for free – fit into this architecture too. As do combined digital streamer and speaker crossover units such as the DEQX HDP-5.
It’s exciting times in the land of networked audio streaming!
Set up BubbleUPnPServer
Once you have a renderer or two, you will need to get BubbleUPnPServer running on your network. To install on a Windows computer, follow the instructions here. You can choose either the single-user install or install as a service. For a Mac, follow the instructions here. You can also install it on an SBC as I have done for my droidisk.
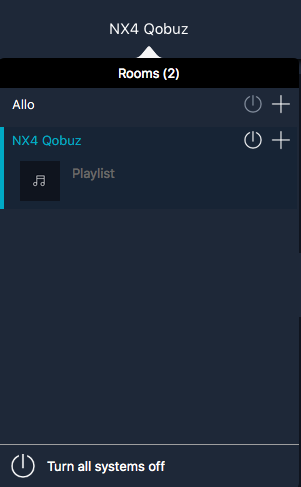
When installation completes, a browser should start up with the address http://localhost:58050. I recommend turning off all Internet access options, as explained in the earlier article. On the Media Renderers page, you should see the renderers you have on your network down the left side:
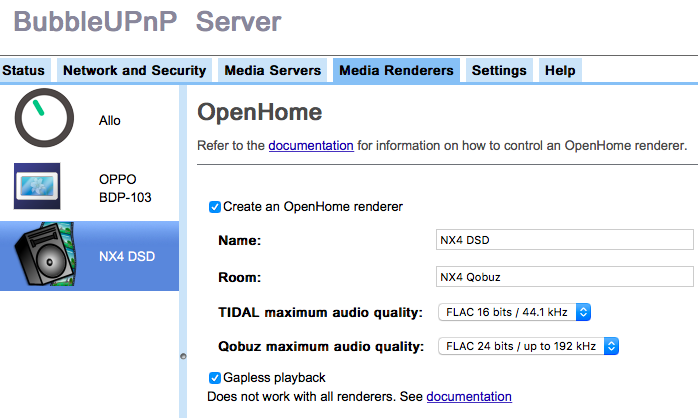
Click on one to select it and turn on the option “Create an OpenHome renderer.” In the “Room” field, type in a different name. In this example, I have used “NX4 Qobuz.” You will probably want to set the maximum sample rate for your Qobuz streaming to better than the default 44.1 kHz – Qobuz can stream up to 192 kHz, depending on the service tier to which you have subscribed. Finally, turn on the option “Gapless playback.”
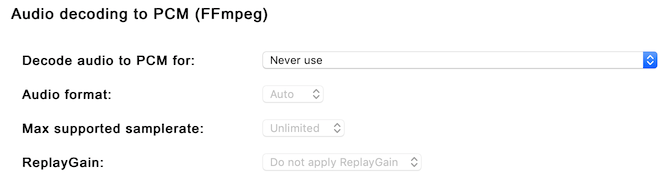
If there are fields enabled for audio decoding, set to “Never use”:
Repeat the above, starting with “Create an OpenHome renderer,” for the rest of your renderers.
Set up a controller
Pick a DLNA controller from those recommended in the earlier article. I’ll use Linn Kazoo as an example.
Note: if you have installed BubbleUPnPServer on Windows, you cannot run Linn Kazoo on the same computer. You will need to install Kazoo on a different computer or use a phone or tablet for the controller.
In Kazoo, select an OpenHome renderer from the dropdown list:
Go to the settings page:
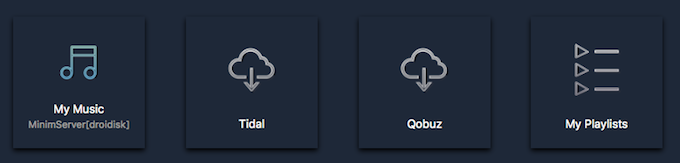
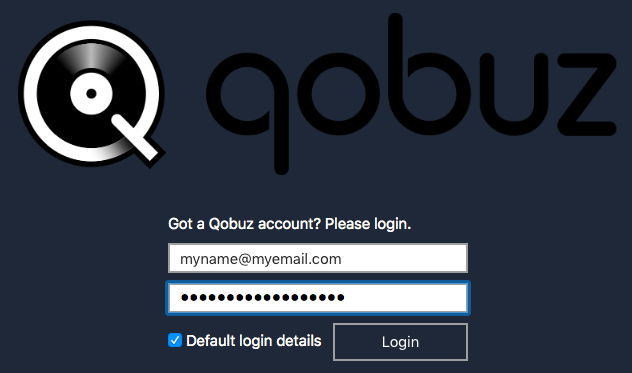
Click on Qobuz and enter your login credentials:
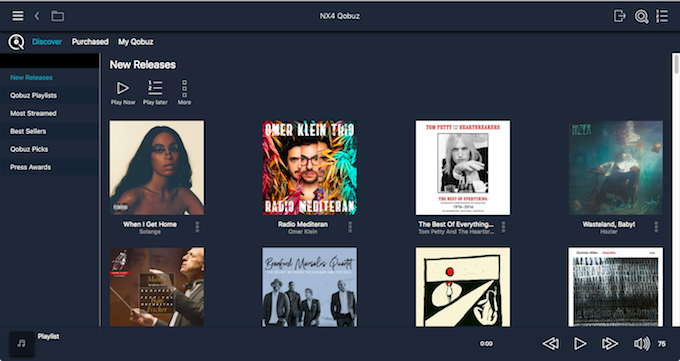
The Qobuz home page will appear. Search for music and click on Play Now:
And that’s it! You can now stream Qobuz to any UPnP/DLNA renderer on your network. Until next time, happy streaming!
Appendix A. Set up a music server
To stream files from your own music library to the renderers, I suggest using MinimServer. Usually, you install it on the same machine that has your music files on it. This could be even a NAS. See the MinimServer installation page. Once you have MinimServer installed, you can select files to play using the same controller that you use for Qobuz.
Appendix B. Turn any SBC into a music player
When using a single-board ARM computer (the Raspberry Pi being the best-known) as a music player, it’s usual to use a complete distribution (aka “distro”) like Volumio. However, the list of SBCs (single board computers) supported by Volumio is quite short – what if I want to stream to a different board? Or perhaps I have a board that has a different distro on it and I want to add music playback capabilities to.
As long as you have set things up as described earlier in this article, installing a couple of packages on the SBC will meet this need. The instructions below should work if you’re using an OS based on Debian or Ubuntu. I’ve done this on a number of boards now, including the Raspberry Pi 3A+, the ODroid HC1, the NanoPi Neo2, and the NanoPi Neo Plus2. Some boards didn’t work that well, usually because of networking or WiFi limitations, like the Raspberry Pi Zero and the NanoPi Neo. In general, I find it’s best to avoid boards that only support 2.4 GHz WiFi.
Before installing, determine the card number of your USB DAC. It’s most likely to be 1, but better to check and make sure:
username@sbc:~$ aplay -l
**** List of PLAYBACK Hardware Devices ****
card 0: Codec [H3 Audio Codec], device 0: CDC PCM Codec-0 []
  Subdevices: 1/1
  Subdevice #0: subdevice #0
card 1: DSD [NX4 DSD], device 0: USB Audio [USB Audio]
  Subdevices: 1/1
  Subdevice #0: subdevice #0
In this example, the USB DAC is card 1, device 0.
Install mpd, the Music Player Daemon:
username@sbc:~$ sudo apt install -y mpd mpc
Reading package lists... Done
Building dependency tree
...
Processing triggers for libc-bin (2.27-3ubuntu1) ...
Processing triggers for systemd (237-3ubuntu10.13) ...
Edit the MPD configuration file:
username@sbc:~$ sudo nano /etc/mpd.conf
Locate the lines for audio_output and change them to:
audio_output {
        type                "alsa"
        name                "MySBC"
        device              "hw:1,0"
        replay_gain_handler "none"
        auto_resample       "no"
        auto_channels       "no"
        auto_format         "no"
        mixer_type          "none"
}
Note that the line
device "hw:1,0"
specifies output 0 of card 1. If your USB DAC is a different card number, use e.g. “hw:2,0” for card 2 and so on.
Now install upmpdcli, which is a UPnP/DLNA interface to mpd:
username@sbc:~$ sudo add-apt-repository ppa:jean-francois-dockes/upnpp1
 Ubuntu builds for the upmpdcli UPnP front-end for mpd, the upplay Linux UPnP Control Point
 and the libupnpp library they depend on.
 More info: https://launchpad.net/~jean-francois-dockes/+archive/ubuntu/upnpp1
Press [ENTER] to continue or Ctrl-c to cancel adding it.
<Enter>
...
Reading package lists... Done
username@sbc:~$ sudo apt-get update
username@sbc:~$ sudo apt-get install -y upmpdcli
Reading package lists... Done
...
Processing triggers for libc-bin (2.27-3ubuntu1) ...
Processing triggers for systemd (237-3ubuntu10.13) ...
Edit the configuration file:
username@sbc:~$ sudo nano /etc/upmpdcli.conf
Search for the line matching each property below and change as shown:
friendlyname = MyPlayer
openhome = 0
checkcontentformat = 0
In theory you can now just restart mpd and upmpdcli, but I find that it’s better to do a full reboot after making configuration changes:
username@sbc:~$ sudo shutdown -r now
After a minute or two, you should see the renderer “MyPlayer” appear in BubbleUPnPServer.
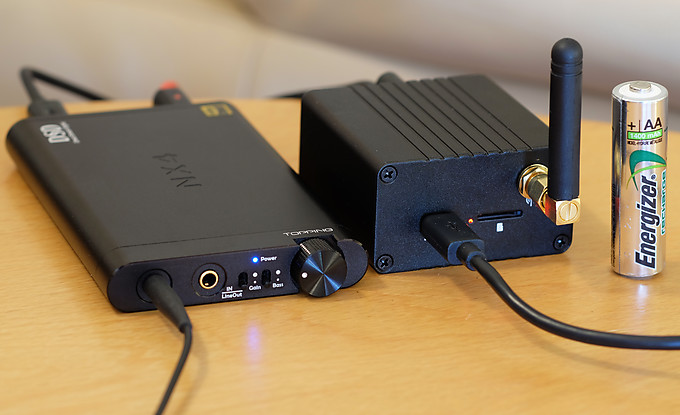
NanoPi Neo Plus2 (right) with Topping NX4 DSD makes a nice little headphone listening station that can fit almost anywhere. This little SBC has an onboard eMMC and has quickly become one of my favorites. AA battery included for scale only.


You have described my methodology to a t! An important fact to include is that BubbleUPnP server also allows chromecast devices to be assigned as UPnP/DLNA or Openhome renderers, and offers equalization for each renderer instance. With Minimserver one can use the companion Minimstreamer that allows for transcoding (some native, some with the aid of FFMpeg).
I currently have seven physical renderers (one Windows 7, three linux, two chromecast and a D-Link dch m225 streamer/wifi extender) and one virtual group comprising the chromecast devices grouped together through Google Home. The Windows and two linux devices run Foobar2000 with the foo_upnp component; the other linux device runs gmediarender.
My control program is Linn Kazoo run on a cheap android phone dedicated to the task.
BubbleUPnP server is run on an Android set top box, while two instances of Minimserver run on two Windows devices.
The only problems I have experienced with my set up is the inability of the chromecast devices to play some m3u radio streams and intermittent stuttering with the D-Link device, especially with higher sample rate material.
Hi, good to hear 🙂 Thank you for the tip on Chromecast, I will get one to try out.
Great article. I use upmpcli and Minim server on my RPi Zero W with Justboom Digi Zero pHAT. Use Linn Kazoo (on PC and mobile phone) as controller. Works as a charm.
It’s a pity that Qobuz cannot get their streaming support working while already more than a year in beta. Have contact Qobuz but they seam very reluctant… Cannot understand, though
IMHO Qobuz should keep their UpNp feature immature to keep the space free for third party manufacturers offering audio servers devices.
Not too fair for customers since control apps like Kazoo offer incomplete Qobuz support, missing commentaries or booklets reading for ex.
Finally, your advice on using BubbleUpNP Server comes to the rescue! One used to be able to access Qobuz directly, through the upmpdcli-qobuz plugin. That’s no longer the case.
Hopefully, the Qobuz people don’t decide to revoke BubbleUpNP Server’s API key as well. They seem to be tolerating non-open-source projects (they revoked and then re-issued MyVolumio’s API key), but open-source access to the Qobuz API seems to be a thing of the past.
Hmmm. When I follow these instructions, and then switch (in Linn Kazoo) to another renderer, I get the error:
Qobuz is not available.
Your DS need to be running Davaar 29 or later.
I suppose I could create a 2nd renderer (under BubbleUpNP) for EACH of my current renderers. But I thought the upshot of your post was that one needed to do that only for ONE renderer, and then the rest would be able to stream Qobuz.
Right, you need to set up each renderer in BubbleUPnP. I’ll add something to the article to clarify.
And, I guess, you need to change “openhome = 1” to “openhome = 0” in the upmpdcli.conf file of each of the renderers, to make the original renderer disappear from the OpenHome Control Point(s).
The downside of this is that it completely breaks Songcast support (so no multiroom playback). 🙁
It also breaks Internet Radio support. 🙁 🙁
Another thing worth mentioning is that, in its default configuration, BubbleUPnP Server runs a root (and, among other sins, fetches updates to itself over an unauthenticated/unencrypted http connection). Fortunately, it seems to run just fine as an unprivileged user, which is probably worth suggesting.
Hi Jacques, what platform are you running BubbleUPnPServer on?
Currently, I am running it on the Odroid HC1 that doubles as my music server (running MinimServer).
I experienced the error message in Linn Kazoo which you mentioned when I used the default OpenHome proxy “room” and “name” variable values, which happened to be the same value. When I changed the “room” variable to be a unique value, I stopped getting this error.
Note that the hifizine instructions actually say to do this — “In the “Room” field, type in a different name.” — but it’s easy not to appreciate what they are telling you to do, I didn’t at first!)
Anyhow, try changing one of them (in EVERY OpenHome proxy you create) and see if that solves the problem.
BREAK BREAK
Great article, this method works beautifully. Thank you for publishing it. It’s so nice to be able to stream Qobuz to my each of my stereo rigs alongside of my own music from my UPnP music server!
Qobuz, if you read this, please continue to offer a route to stream your music via DNLA/UPnP/OpenHome (eg BubbleUPnP). I want to use open source software, and I resent services that lock me into proprietary streaming solutions like Roon or Heos. Frankly, that’s the reason I opted for Qobuz over Amazon HD! I suspect there are lots of others like me who have no interest in running proprietary software or being forced to buy specific ‘approved’ hardware.
Thanks for the fine article!
I have a new Integra DRC R.1 preamp, which has an integral powerful DAC. It has apps for a variety of streaming apps for the “run of the mill” streaming services, so, not including Qobuz. It does have Chromecast built in and I’ve used it to stream Qobuz. But as far as I can find out, that will not permit a sampling frequency to 192khz, which Qobuz has. I had hoped that your guide would provide me with a mean to to use the full potential of Qobuz. I succeeding using Bubbleupnp Serverm but apparently that still takes the Chromecast route. Am I correct?
Hi, if the Integra shows up on the Renderer’s page in BubbleUPnPServer then I would assume it’s using DLNA… why do you think it’s using Chromecast?
Excellent guide, thank you!
I’m trying to get Qobuz to stream to a Marantz ND8006, but the controller options mentioned (Linn Kazoo, Lumin) show only Tidal. Does anyone know if those apps stopped supporting Qobuz? The renderer I’m using supports Tidal, among other streaming services, via the HEOS app, but I don’t see why this would prevent other controllers from showing a Qobuz login. Did I make a mistake configuring BubbleUPnP? I’m trying the free version of mconnect, and it works with Qobuz so far, so I suspect not.
Hi, it sounds like perhaps you are not selecting the OpenHome version (created by BubbleUPnPServer) in the renderer? Kazoo and Lumin work fine with Qobuz, I use them regularly 🙂
HI. Thanks for the guide!
I suceeded to install Bubble server on top of Volumio thanks to this plugin https://github.com/dgrzeszczak/Volumio-BubbleUPnP-Server/
Unfortunatly, Qobuz seems not working anymore :/
Similar story here- no Qobuz option in Lumin when using the BubbleUPnP Server from the Raspberry; however, when using the BubbleUPnP Server installed on my Windows 10 computer the Volumio/Raspberry shows up as a renderer and Qobuz works using Lumin (iOS) as the controller.
Very new to Raspberry Pi- imaged a card with Raspbian (Buster) and followed instructions- have tried unsuccessfully to “locate package upmpdcli” thus I can’t get BubbleUPnP to find the Raspberry Pi renderer. Any tips for getting the upmpdcli package for my version of Raspbian?
Using Volumio as OS for Raspberry Pi 4. Installed BubbleUPnP server on Windows 10 computer and able to see the Raspberry in the Renderer section WHILE connected to the router thru ethernet connection. Able to stream QOBuz, though a little wonky as LUMIN sometimes shows the QObuz s=ettings and some times does not. However, I want to use the Raspberry wirelessly. When I connect wirelessly to the network, I lose the Raspberry from the Renderer/Client tab in BubbleUPnP. What am I missing?
Update: Everything working when using BubbleUPnP server installed on my Windows 10 computer. Lumin has the Qobuz icon and I am able to access my Qobuz account. As noted by doom above, I am unable to view Qobuz icon in Lumin when using BubbleUPnP server installed on my Volumio/Raspberry Pi 4. Still happy to be up and running!
Thanks a bunch John!!!
Thank you very much for this guide. Very useful.
I have it nor running with:
Qobuz Studio account
Linn Kazoo controller on Windows
Bubble UPNP server on a Linux machine (NAS)
Denon AVR-3600H amplifier/renderer (capable of 192 kHz – 24 bit)
It works flawlesly, but what ever i do, it never goes above 44 kHz – 24bit.
I don’t know, what i’m doing wrong…
Any ideas?
Looking at the configuration tabs, it appears my Marantz 8805 is functioning as both Media Server and Renderer which means (I think) that the Marantz should be receiving the Qobuz stream directly from its wired connection to the internet. Is that correct? That is, the bubbleupnp is running on my Mac, but the stream isn’t going through the Mac, yes?
I’m wondering if it is possible to stream Qobuz to Foobar2000, using foobar’s BubbleUPnP component.
Hi,
Thanks for this article, very interesting.
Is there any controller for linux to stream qobuz ?
Sorry, I don’t know, you could try VLC maybe?
I just received an Orchard Audio Pecan Pi+ DAC/streamer. It is loaded with Volumio. I would like to be able to stream QoBuz without having to pay for Volumio Premium. I am admittedly not very tech savvy. Can I do tis without buying additional hardware? If so would you walk me through it? Thanks in advance!
Volumio runs as a DLNA endpoint (unless it’s changed in the last couple of years) so the Pecan Pi+ should work as described in this article.
Excuse my lack of knowledge in this area but I’m purchasing a WADAX Studio Player and plan to use Qobuz Connect to access and play songs from Qobuz/ I also have a NAS drive with hundreds of titles that I ripped. The NAS has Minim Server installed on it from my prior use of a dCS Rossini DAC / Streamer.
Question 1 – will I need to re-install Minim Server on my NAS?
Question 2 – will Qobuz Connect allow me to access and playttracks from my NAS or will I need to install a player such as JPlay?
Thanks,
Brian …