Droidisk – An inexpensive compact music server
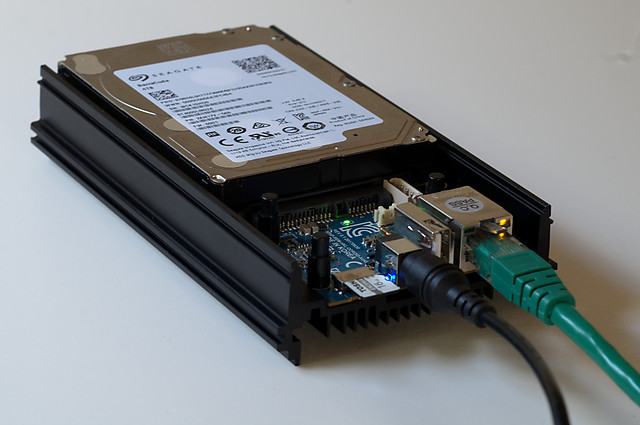
I previously wrote a comprehensive series of articles on setting up a music server using a Raspberry Pi. Well, times change (rapidly!), and there’s a much better option available now: the ODroid HC1 from Korean company HardKernel. The HC1 is – like the Raspberry Pi – a single-board computer (SBC), but it has the distinguishing feature of a SATA port, so it connects to a hard drive without going through USB. It also has a Gigabit Ethernet port and a much faster processor than the Pi.
I have chosen a “ground up” approach to building this server – that is, adding software to the base operating system rather than using a prebuilt distribution with (for example) a web-based configuration interface. As a result, the procedure described here involves quite a lot of remote command-line work. I’ve broken it down into numbered “bite-sized” chunks and tried to describe it in enough detail that even those unfamiliar with Linux will be able to make their own droidisk. This is the first of two articles (Part 2 is here).
- Architectural overview
- 1. Getting started
- 2. Format the drive
- 3. Mount the drive
- 4. Create a file share
- 5a. Access files from a Mac
- 5b. Access file from Windows
- Wrapping up (Part 1)
Architectural overview
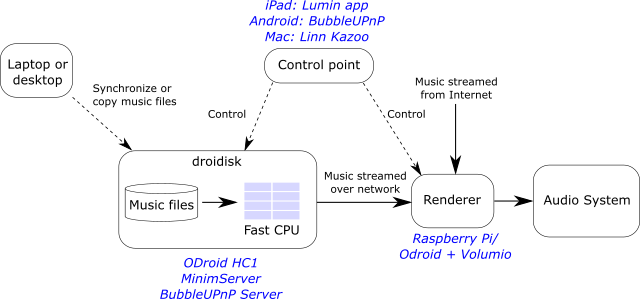
The overall system architecture is shown below. The lower left of the diagram is the droidisk, connected to your local area network with an Ethernet cable. It contains a hard drive for storing music files. To get the files onto the droidisk, you will copy them from your laptop or desktop computer.
Music playback is done by a player or “renderer.” This could be a single-board computer (SBC) like the Raspberry Pi, with a DAC card or connected to a USB DAC. Or, it could be some other device like a Blu-ray player (as long as it supports UPnP/DLNA) or another computer running JRiver Media Center.
For those disinclined to build their own player, a company named allo.com now offers a number of “plug and play” players. One of those with volumio installed would be a good match for the droidisk server.
All of this is controlled by an application running on your computer, tablet or phone.
What you will need
To build the droidisk server, you will need the following (pricing is indicative only and in US dollars):
- An ODroid HC1 ($49). This takes a 2.5″ hard drive or SSD. You can instead get the Odroid HC2, which takes a 3.5″ drive.
- You may want to add a case and the USB UART to your order. (The USB UART gives you direct access to the “console”. I haven’t used it and you probably won’t need to either, but it would be handy for debugging purposes if things don’t work first go.)
- A suitable hard drive. Choose a drive size that suits your current and anticipated library size. If you don’t have a large library, you could even use an SSD. For this build I used a 4TB Seagate ST4000LM24, which can be obtained from online vendors like Newegg. (Note: many online vendors are selling OEM version of hard drives – like the one in the photo above. This can save some money but just be aware that OEM drives have no warranty.)
- A 5V DC power supply. The minimum current rating is 4 Amps. The simplest approach would be to get the stock power supply from HardKernel when you order the HC1. However this does not come with an Australian plug, so I used a Mean Well GS25A05-P1J that I obtained from a local supplier. (NB: if using an HC2 you must use a 12V power supply.)
- A microSD card. Get a high-quality card like Sandisk, Samsung, or Toshiba, with a speed rating of at least UHS-1. I used a 16GB Toshiba M401, which has fantastic performance at a reasonable price (I measured 72 MB/s write and 84 MB/S read).
You will need to have a way to write to the card from your computer. If your computer has an SD card slot, get a card with an SD to microSD adapter. Or, use an external USB card reader/writer with a microSD slot.
1. Getting started
Download Armbian. Make sure to get the Ubuntu version, not the Debian version. (Debian could be used but the instructions in these articles won’t always work because the package library is different.)
Write Ubuntu to the microSD card. I use Etcher, which works on Mac, Windows and Linux. You may need to download a program to uncompress the download first – in that case, see the Armbian page for links.
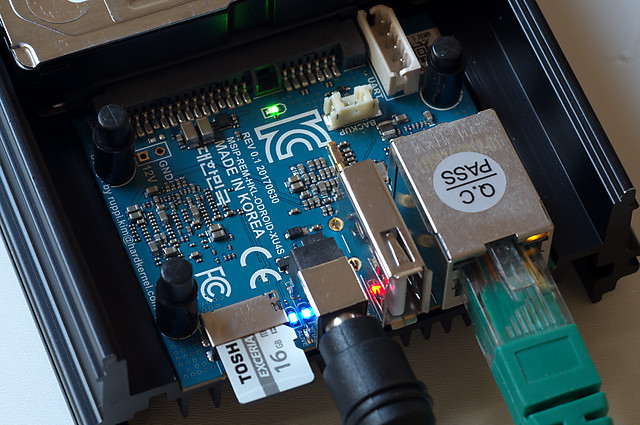
Assemble the hard drive into the HC1. Plug the microSD card in, connect the Ethernet cable, and plug in the power.
To communicate with and configure the HC1, you will need to use a shell aka command line.
- Mac: Open the Mac’s Terminal program, located in the Applications/Utilities folder of your Mac’s hard drive.
- Windows: If you have Windows Linux Subsystem installed, just open its bash shell. Alternatively you can use Cygwin.
- Linux: just open a terminal.
In the examples, I use “mypc” as the name of the computer and “myname” as the username. Text in constant-width font is what appears in the shell window. Black text is the prompt that asks you for input. Red text is what you type in as a command. Most commands can simply be copied from the webpage you are viewing and pasted into the terminal. Blue text is what the HC1 sends back to you (often abbreviated for clarity).
When you first log in to the HC1 from your computer, it will insist that you change the root password and add another user. Try it out now (remember, red is what you type):
mypc:~ myname$ ssh root@odroidxu4
The authenticity of host 'odroidxu4 (192.168.1.20)' can't be established.
ECDSA key fingerprint is SHA256:5mCdi6fgXHy7glbdeVMI/d3G6ae4QfJj13KbcejwJbg.
Are you sure you want to continue connecting (yes/no)? yes
Warning: Permanently added 'droid,192.168.1.20' (ECDSA) to the list of known hosts.
droid@droid's password: 1234
You are required to change your password immediately (root enforced)
...
Changing password for root.
(current) UNIX password: 1234
Enter new UNIX password: unguessable_password
Retype new UNIX password: unguessable_password

Thank you for choosing Armbian! Support: www.armbian.com

Creating a new user account. Press  to abort
Please provide a username (eg. your forename): droid
...
Enter new UNIX password: droid
Retype new UNIX password: droid
passwd: password updated successfully
Changing the user information for droid
Enter the new value, or press ENTER for the default
	Full Name []: <Enter>
	Room Number []: <Enter>
	Work Phone []: <Enter>
	Home Phone []: <Enter>
	Other []: <Enter>
Is the information correct? [Y/n] <Enter>

Dear droid, your account droid has been created and is sudo enabled.
Please use this account for your daily work from now on.

root@odroidxu4:~#
From here, you can type commands and the Droid will respond. The first part of the prompt shows that you are logged into the Droid as the superuser “root.” This isn’t normally recommended, but before you exit, let’s do a couple of system things.
First, update the operating system by typing the following commands. It may take a few minutes of downloading and updating to complete:
root@odroidxu4:~# apt-get update
root@odroidxu4:~# apt-get -y upgrade
Next, run the armbian-config utility:
root@odroidxu4:~# armbian-config
The documentation for this utility is here. Here’s how it looks:
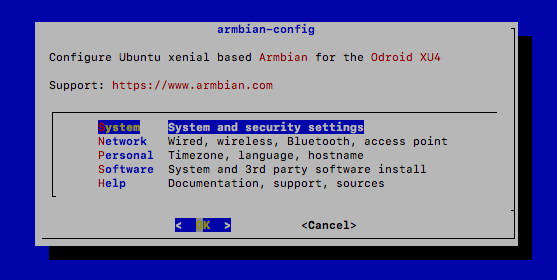
Use the arrow keys and Enter key to navigate to Personal and then Timezone. Select your country and city. Then navigate to Hostname. Delete “odroidxu4” and type in “droidisk” and press the Enter key. A dialog saying you will need to log out will pop up – press Enter to confirm. Press the Esc key twice to get back to the shell, then reboot the HC1:
root@odroidxu4:~# reboot
Wait a full minute, then log in again, this time using the new hostname (droidisk), username (droid), and password (droid):
mypc:~ myname$ ssh droid@droidisk
From now on, you should log in using this user account. To do software installation and so on, you often need to gain superuser privileges again, which is done by typing “sudo” at the start of each command. You will need to type in your password (droid) the first time you run sudo.
2. Format the drive
We are going to format the drive in ext4, the native Linux filesystem. First check that the operating system can “see” it:
droid@droidisk:~$ sudo fdisk -l /dev/sda

Disk /dev/sda: 3.7 TiB, 4000787030016 bytes, 7814037168 sectors
Units: sectors of 1 * 512 = 512 bytes
Sector size (logical/physical): 512 bytes / 4096 bytes
I/O size (minimum/optimal): 4096 bytes / 33553920 bytes
Disklabel type: gpt
Disk identifier: 223062D4-12F3-4836-AAFA-083F09D48117

Device      Start        End    Sectors  Size Type
/dev/sda1      40     409639     409600  200M EFI System
/dev/sda2  409640 7813774983 7813365344  3.7T Apple HFS/HFS+
The above confirms that the drive is visible as device /dev/sda. In this example it has two partitions and is formatted in HFS+, since I previously formatted it on a Mac. In this case, just delete all partitions now and create a new partition:
<droid@droidisk:~$ sudo fdisk /dev/sda

Welcome to fdisk (util-linux 2.27.1).
Changes will remain in memory only, until you decide to write them.
Be careful before using the write command.

Command (m for help): d
Partition number (1,2, default 2): 2
Selected partition 2
Partition 2 has been deleted.

Command (m for help): d
Selected partition 1
Partition 1 has been deleted.

Command (m for help): n
Partition number (1-128, default 1): 1
First sector (34-7814037134, default 2048): <Return>
Last sector, +sectors or +size{K,M,G,T,P} (2048-7814037134, default 7814037134): <Return>

Created a new partition 1 of type 'Linux' and of size 3.7 TiB.

Command (m for help): w
The partition table has been altered.
Calling ioctl() to re-read partition table.
Syncing disks.
If, however, you have a fresh drive, when you start fdisk you may see something like this:
<droid@droidisk:~$ sudo fdisk /dev/sda

Welcome to fdisk (util-linux 2.27.1).
Changes will remain in memory only, until you decide to write them.
Be careful before using the write command.

Device does not contain a recognized partition table.
Created a new DOS disklabel with disk identifier 0x6f11c833.

Command (m for help):
In that case, instead of deleting existing partitions, create a GPT partition table:
Command (m for help): g
Created a new GPT disklabel (GUID: 223062D4-12F3-4836-AAFA-083F09D48117).
Then proceed to create and write out the new partition with the “n” and “w” commands, as above.
Once you have created the new partition, check the result:
droid@droidisk:~$ sudo fdisk -l /dev/sda

Disk /dev/sda: 3.7 TiB, 4000787030016 bytes, 7814037168 sectors
Units: sectors of 1 * 512 = 512 bytes
Sector size (logical/physical): 512 bytes / 4096 bytes
I/O size (minimum/optimal): 4096 bytes / 33553920 bytes
Disklabel type: gpt
Disk identifier: 223062D4-12F3-4836-AAFA-083F09D48117

Device     Start        End    Sectors  Size Type
/dev/sda1   2048 7814037134 7814035087  3.7T Linux filesystem
You can see that there is now a single partition of type “Linux filesystem.” Format the partition:
droid@droidisk:~$ sudo mkfs.ext4 /dev/sda1 -L droidisk
mke2fs 1.42.13 (17-May-2015)
Creating filesystem with 976754385 4k blocks and 244195328 inodes
...
Filesystem UUID: 1b0729a0-0508-44f6-a636-d618f12b17f1
Superblock backups stored on blocks:
	32768, 98304, 163840, 229376, 294912, 819200, 884736, 1605632, 2654208,
	4096000, 7962624, 11239424, 20480000, 23887872, 71663616, 78675968,
	102400000, 214990848, 512000000, 550731776, 644972544

Allocating group tables: done
Writing inode tables: done
Creating journal (32768 blocks): done
Writing superblocks and filesystem accounting information: done
3. Mount the drive
The drive needs to be mounted so that it is accessible as part of the file system. First, create the mount point i.e. the directory where the drive will be mounted:
droid@droidisk:~$ sudo mkdir /srv/droidisk
You need the “UUID” of the drive, which was printed out in the formatting command but can always be obtained again with:
droid@droidisk:~$ sudo blkid /dev/sda1
/dev/sda1: LABEL="droidisk" UUID="1b0729a0-0508-44f6-a636-d618f12b17f1" TYPE="ext4" PARTUUID="a6ae5e33-b5b0-4ec3-87ce-5ee58d2bada8"
Edit the file /etc/fstab:
droid@droidisk:~$ sudo nano /etc/fstab
and add this line to the end of that file:
UUID=1b0729a0-0508-44f6-a636-d618f12b17f1 /srv/droidisk ext4 defaults 0 0
The UUID to use here is of course the string you obtained for your own drive. Press Ctrl-O to write the file, hit Return at the confirmation prompt, and press Ctrl-X to exit the editor.
Mount the drive and check it:
droid@droidisk:~$ sudo mount /dev/sda1
droid@droidisk:~$ df -h /srv/droidisk
Filesystem      Size  Used Avail Use% Mounted on
/dev/sda1       3.6T   68M  3.4T   1% /srv/droidisk
Modify the file system permissions and create a directory for the music files:
droid@droidisk:~$ sudo chown -R droid:droid /srv/droidisk
droid@droidisk:~$ mkdir /srv/droidisk/Music
droid@droidisk:~$ ls /srv/droidisk
lost+found  Music
4. Create a file share
To make the drive accessible over the network, install samba:
droid@droidisk:~$ sudo apt-get install -y samba
Edit the samba configuration file:
droid@droidisk:~$ sudo nano /etc/samba/smb.conf
Add the following to the end of the file:
[droidisk]
path = /srv/droidisk
valid users = droid
force group = droid
create mask = 0660
directory mask = 0771
read only = no
Restart the samba server. For Ubuntu 16:
droid@droidisk:~$ sudo /etc/init.d/samba restart
For Ubuntu 18:
droid@droidisk:~$ sudo /etc/init.d/smbd restart
Set up a user to access the new fileshare:
droid@droidisk:~$ sudo smbpasswd -a droid
New SMB password: droid
Retype new SMB password: droid
Added user droid.
droid@droidisk:~$
5a. Access files from a Mac
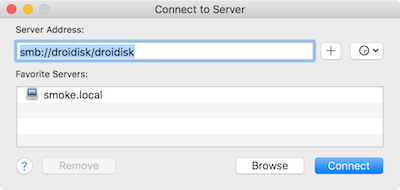
In the Finder, press Cmd-K (or select Go -> Connect to Server…). Enter smb://droidisk/droidisk and click on the Connect button.
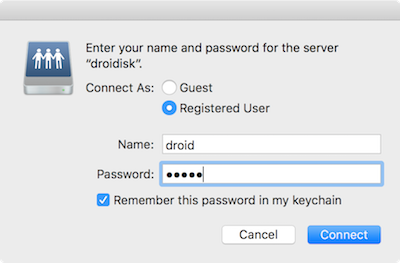
On the next screen, select “Registered User” and enter the username “droid” and password “droid”:
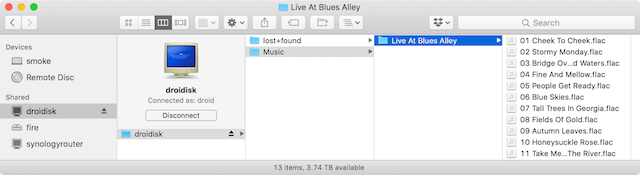
If all goes well… bingo! The file share will appear in the Finder and you can then drag and drop files into the Music folder:
5b. Access files from Windows
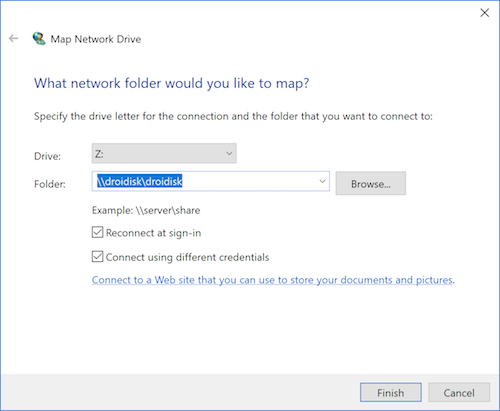
Open a Windows Explorer window. On “This PC” in the left sidebar, right-click and select “Map network drive…”. In the window that pops up, enter parameters as shown in this screenshot and click Finish:
Enter the username (droid) and password (droid) on the next screen:

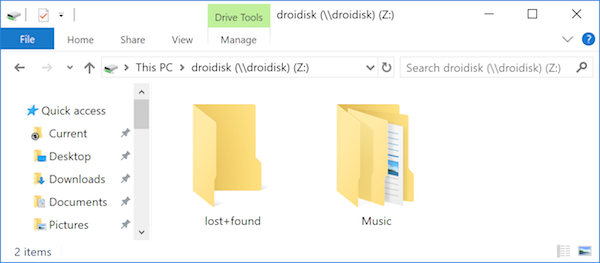
After a few seconds, the droidisk should show up! You can now drag and drop files into the Music folder:
Wrapping up (Part 1)
If you’ve got this far – congratulations! In Part 2, we will add the music-related services to the droidisk.


If you hadn’t previously formatted the disk for MacOS (and thereby created a GPT partition table), these instructions wouldn’t have worked. fdisk (apparently) can only create a DOS partition table which, in turn, is limited to 1TB partitions.
Use cfdisk instead (which has a nicer interface, anyway), and you can create a partition as large as your physical disk.
Hi Jacques, thank you for the pointer. I’ve just built a new droidisk and it turns out that fdisk can create a GPT table (“g”). I’ve updated the article to add this.
Hi John, thanks to your tutorials and previous advice I’ve had a Pi Streamer running for a year now. Next step is to add a server and I planned to get HC1. Odroid sell an SD card with Ubuntu 14.4 or latest already installed. If I get that instead of downloading Armbian onto blank SD card will your instructions in section 1 on ‘doing a couple of system things’ as a superuser still work? Thanks
Hi, the HardKernel Ubuntu won’t have the armbian-config command. You can do all of those things with command line, but honestly burning an SD card is really easy.
Dear sir,
Is This also usable for the n2+?
Regards
Jordy