PiDisk – syncing the music library
This is the third part of a short series on PiDisk – an inexpensive music server based on the Raspberry Pi.
- Part 1: An inexpensive music server – introduces the concept of the PiDisk and sets it up as a basic file server.
- Part 2: Adding the music services – adds MinimServer and BubbleUPnP Server to the PiDisk so that it is a functioning music server (including streaming TIDAL and/or Qobuz).
- Part 3: Syncing the music library (this article) – explains how to automatically synchronize your music library to the PiDisk over the network, and concludes with a few additional tips.
This article continues right where Part 2 left off. This time, I am definitely assuming that you are using a Mac as your desktop computer. It’s just a pragmatic decision, but Linux users should not have much trouble adapting. For Windows users, I’m not sure what to suggest, although the Linux shell that Windows 10 is about to acquire might be worth a look.
Sections in Part 3:
- 12. Set up RSA authentication
- 13. Load music
- 14. Set up automatic updates
- 15. Additional tips
- Wrapping up
12. Set up RSA authentication
It’s time to set up RSA authentication to the PiDisk. This will not only save you from having to type your password every time you connect to it with a shell, but it’s necessary for the script that will automatically update the music library.
On your Mac, you will need to have a public/private key pair. You may already have these, so check first, as you do not want to overwrite any that you already have:
mymac:~ myname$ ls ~/.ssh
id_dsa id_dsa.pub id_rsa id_rsa.pub known_hosts
(A reminder: most of the commands in this article can simply be copied and pasted from the web browser into your Terminal window. You don’t have to re-type them.)
If the response as above shows the files id_rsa and id_rsa.pub, do not do the next step. If those files are not there, or if you get a “file or directory not found” error, execute the following command. When asked for a passphrase, just press the Return key without entering anything:
mymac:~ myname$ ssh-keygen -t rsa
Generating public/private rsa key pair.
Enter file in which to save the key (/home/pi/.ssh/id_rsa):
Created directory '/home/pi/.ssh'.
Enter passphrase (empty for no passphrase):  <Return>
Enter same passphrase again:  <Return>
Your identification has been saved in /home/pi/.ssh/id_rsa.
Your public key has been saved in /home/pi/.ssh/id_rsa.pub.
Now copy your public key to the Raspberry Pi:
mymac:~ myname$ cat ~/.ssh/id_rsa.pub | ssh pi@pidisk.local "mkdir -p ~/.ssh && cat >> ~/.ssh/authorized_keys"
At this point, your public key should have been copied correctly to the PiDisk and you will be able to just log into it without typing a password. The first time, you may need to enter a “yes” confirmation, but thereafter you should be able to just log in and execute a command remotely. For example, try this:
mymac:~ myname$ ssh pi@pidisk.local ls /media/pidisk
Music
mymac:~ myname$
13. Load music
So far, you’ve been able to copy files onto the PiDisk with the Finder. For large numbers of files, though, this is not a very robust method. Better to use a program that is designed for copying large numbers of files over the network.
Log into the Pi and install rsync:
pi@pidisk:~ $ sudo apt-get install rsync
Back on your Mac, use TextEdit to create a file (“script”) named pisync.sh. I suggest that you create it in the folder Documents/Scripts, and will assume that in the following.
Paste the following text into the text editor and save the file:
#!/bin/sh
/usr/bin/rsync -a --delete ~/Music/iTunes/iTunes\ Media/Music/ pi@pidisk.local:/media/pidisk/Music
ssh pi@pidisk.local "echo rescan | ~/minimserver/bin/mscript"
This is what each line of this script means:
- The first line is the shebang.
- The second lines uses rsync to copy your whole iTunes music folder to the Music folder on the pidisk.
- The third line causes MinimServer to rescan the library so that new files show up in your controller app.
If your music is not in iTunes an iTunes library, then you will need to modify this script. For example, this version copies a music library located on an external hard drive named “DataHD” to the PiDisk:
#!/bin/sh
/usr/bin/rsync -a --delete /Volumes/DataHD/Music/ pi@pidisk.local:/media/pidisk/Music
ssh pi@pidisk.local "echo rescan | ~/minimserver/bin/mscript"
You can also use multiple rsync commands to copy files from multiple locations. If you do this, you will need each rsync command to write to a separate sub-directory of the PiDisk music folder. Here is an example:
#!/bin/sh
/usr/bin/rsync -a --delete ~/Music/iTunes/iTunes\ Media/Music/ pi@pidisk.local:/media/pidisk/Music/iTunes
/usr/bin/rsync -a --delete ~/Music/Samples/ pi@pidisk.local:/media/pidisk/Music/Samples
/usr/bin/rsync -a --delete /Volumes/DataHD/Music/ pi@pidisk.local:/media/pidisk/Music/Main
ssh pi@pidisk.local "echo rescan | ~/minimserver/bin/mscript"
If you need help customizing your rsync script, please ask in a comment below.
As shown above, the rsync command won’t print very much out. When you run the script the first time, you will be able to see it is working by taking a peek at the PiDisk file system in the Finder. If you really want to see everything that rsync is doing, add “‐‐progress” after “‐‐delete” e.g.
/usr/bin/rsync -a --delete --progress ...
Note that the “‐‐delete” means that any files that you delete from your library will also be deleted from the PiDisk. This also means that if you copy any files into the Music folder using the Finder, they will be deleted the next time you run this script. This is most likely what you want, but if not, remove “‐‐delete” from the commands.
To run your file transfer script, open Terminal and type:
mymac:~ myname$ sh ~/Documents/Scripts/pisync.sh
rsync will scan the library on your Mac’s hard drive and start copying files over. The first time, it might take a while…. I get a transfer speed of about 10 MB/sec, consistent with the Raspberry Pi’s 100 MB Ethernet port. That means 36 GB per hour or somewhat over a full day to transfer a Terabyte. Fortunately, you only have to do this once – once initialized, the script will only copy new files each time.
(If this is all too slow for you, you could try initializing the drive directly on your Mac with software that enables it to access an ext4 drive, like ExtFS.)
14. Set up automatic updates
To set up automatic nightly synchronization from a Mac, we will use launchd. (On Linux, you will probably use cron. On Windows, sorry but I have no idea.) You can do this by creating a “plist” file:
mymac:~ myname$ sudo nano /Library/LaunchAgents/com.hifizine.pisync.plist
Paste the following text into the editor. Edit it to change “myname” (two locations) to your username:
<?xml version="1.0" encoding="UTF-8"?>
<!DOCTYPE plist PUBLIC "-//Apple//DTD PLIST 1.0//EN" "http://www.apple.com/DTDs/PropertyList-1.0.dtd">
<plist version="1.0">
 <dict>
  <key>Label</key>
  <string>com.hifizine.pisync</string>
  <key>Program</key>
  <string>/Users/myname/Documents/Scripts/pisync.sh</string>
  <key>StartCalendarInterval</key>
  <dict>
   <key>Hour</key>
   <integer>05</integer>
   <key>Minute</key>
   <integer>00</integer>
  </dict>
  <key>UserName</key>
  <string>myname</string>
  <key>GroupName</key>
  <string>staff</string>
 </dict>
</plist>
Press Ctrl-O to write the file, hit return at the confirmation prompt, and then press Ctrl-X to exit the editor.
Now tell launchd to use it. (The “sudo” in the following command is important: without it, the command will appear to succeed, but your script will run only if you are logged in.)
mymac:~ myname$ sudo launchctl load /Library/LaunchAgents/com.hifizine.pisync.plist
This is all that should be needed. Every morning at 5AM, launchdaemon will run your file transfer script. So if you add some files to your music library and wait until tomorrow, you should see that the files appear on the PiDisk and in your control app.
Here are some additional commands that you may find handy. To see if the command is loaded:
mymac:~ myname$ sudo launchctl list | grep hifizine
-	0	com.hifizine.pisync
To run the command immediately:
mymac:~ myname$ sudo launchctl start com.hifizine.pisync
If it’s already running, you can stop it with:
mymac:~ myname$ sudo launchctl stop com.hifizine.pisync
To unload it so it doesn’t run at all:
mymac:~ myname$ sudo launchctl unload /Library/LaunchAgents/com.hifizine.pisync.plist
If you want to see what the script has done, add the following to the plist file, just before the last “</dict>” (replace “myname” with you user name):
  <key>StandardOutPath</key>
  <string>/Users/myname/Documents/Scripts/pisync.out.txt</string>
  <key>StandardErrorPath</key>
  <string>/Users/myname/Documents/Scripts/pisync.log.txt</string>
Then you can open those files and see what the script has been doing.
15. Additional tips
Any time you need to reboot the PiDisk from your Mac, open Terminal and enter:
mymac:~ myname$ ssh pi@pidisk.local sudo reboot
If you need to shut down the PiDisk (recommended before removing power), open Terminal and enter:
mymac:~ myname$ ssh pi@pidisk.local sudo shutdown now
Then unplug the micro-USB power connector.
Wrapping up
And… that’s a wrap! I’ve been using the PiDisk for a few months now and it has barely skipped a beat (see below). If you’ve followed along, you now have a complete networked music system based on two Raspberry Pis. Total cost is in the 200’s range.
For those who are scratching their heads about what exactly you DO with a PiDisk, please refer to the earlier article “How to STREAM Tidal to the Raspberry Pi.” That article shows you how to set up a control app – on Android, iOS, and Mac OS X. The music library (your files) are served by the PiDisk, while TIDAL is streaming in from the Internet.
How does it sound? Way better than you would think for the cost. But here’s the thing: the sound is determined by the player, not the server. And, you don’t have to use the Raspberry Pi streamer that I described in earlier articles. You can use anything you like, as long as it’s aUPnP renderer. I’ve now added my BDP-103 to BubbleUPnP Server, so if I am sitting near the home theater (which also happens to be where the fireplace is located, and it’s been quite a cold winter in Australia), I can send audio to the BDP-103 and play it through the HT system. Or, if you have a high-end player, you can send audio from the PiDisk to it, and the sound will be just as good when using a PiDisk as when using any other server.
The only time things have gone really wrong with the PiDisk was when I tried to have it transcode from FLAC to WAV – a requirement for JPlay Streamer. The PiDisk actually failed and I had to swap another board in. I haven’t had time to investigate further. The moral of the story is: don’t push it. The Pi is a neat device that can do a surprising amount of useful stuff, but don’t expect it to do too much. If you do what is in these articles: it works.
All in all, I’m very pleased with this new playback “ecosystem.” I can add new streamers in any room of the house, as well as stream to the existing networked playback devices I already have. Networked playback is an exciting development in hifi and it’s becoming more and more widespread. And, as I hope I’ve shown in these articles, you don’t have to spend much to get started, as long you have a bit of time and determination to spare.
An example of the type of compact playback system you can put anywhere once you have a PiDisk set up!


I have the set-up you outlined in your first article: computer audio on the Mac. Thanks for posting the UPnP -related articles since then. I have found them very informative and helpful as I contemplate a move to UPnP, mainly because of what the controllers can offer compared to stand-alone Mac (Mini). But I’m wondering if the sound quality will be as good. In your introductory article you said it was easy to improve on iTunes by getting a better player. I went for Amarra and it was a significant improvement. In wrapping up this article you say: ‘The sound is determined by the player, not the server’. That’s left me a little confused about what ‘the player’ is. I’m assuming that it doesn’t include the DAC as you’ve recommended having an external one and it would therefore be part of the Audio System the ‘player’ connects to. Is the Pi with DIGI an example of what you mean by ‘the player’? With a Mac is it the audio-processing part that is ‘the player’? I understand that Amarra takes over these processing duties and that’s how it is able to be a ‘better player’. Will a Pi provide sound quality on a par with what Amarra gives me? If not are there any other similarly priced UPnP renderers which would? As I only need it for audio duties I’m ruling out a Blu ray player. Also my preference is to connect to my DAC via coax or toslink rather than USB – just what a Pi with DIGI offers!
Hi Philip, I was loose with my terminology, by “player” here I meant the UPnP renderer and DAC attached to it. Given that this particular article is about a cheap Pi-based server, I was trying (!) to say that it doesn’t matter to sound quality that it’s a cheap Pi-based server. I am currently using (i.e. listening as I type) an Allo DigiOne digital card on a Pi (with Volumio) driving my RME ADI-2 Pro via SPDIF. The server is an ODroid HC1, which I’ve described in my last two articles. I think it sounds very good, I find myself using direct USB connection to the computer much less often.
An alternative to the UPnP setup I’ve described in these articles is Roon, which is more seamless although at higher cost.
Hi John. I appreciate your swift response. Thanks to your pioneering work and excellent guidance notes I can take this step-by-step. One day I’ll be able to play music without having the computer on but for now I can try out a Pi streamer with USB hard disc and see how that compares to Amarra sound. Would you say that the extra investment for the Allo DigiOne board is warranted/worth it? Almost all of the files that make up my music collection (aka library!) are CD- quality (16/44) –and a good deal of it is ‘classical’ (so without dynamic range compression). I’m guessing that eliminating jitter is always a good thing regardless of the file’s bit or sample rate? If I’m wrong about that then the Hifiberry Digi+ may be enough for me. Lastly, have you found that the teething issues with the RPi3 when it was released have now all been sorted and that you can recommend it?
Hi Philip, I’m using a Raspberry Pi 3B+ with Wifi with no issues running Volumio or Ropieee (for Roon). I haven’t actually compared the different digital cards in any way, although there are other reports on the web. You could maybe use USB to your DAC until you get comfortable with the software/network setup, then decide how much you want to spend on a digital card? The landscape here is changing quite quickly too.
Superb documentation of an exciting solution!
For the past few months I have been streaming FLAC files from my Win7 computer using Foobar2000 and BubbleUPnP, to a ChromeCast Audio with optical output line-in to my old hi-fi receiver, which does the DAC and has hi- & lo-pass filtering to my subwoofer and bookshelf speakers. It sounds really great. BUT! My 9yo gets on the damn computer to play Roblox or YouTube videos. Half the time he logs me off or shuts the computer down or something; another half of the time he’s using it when I want to get on there and manage my music files; and a third half of the time his play makes too much noise to listen to anything in the family room.
This past week we moved the computer to the back office, where it should have been the whole time. Blessed peace in the family room!. But now suddenly the music server is no longer in the same room as the stereo equipment.
I would LOVE to move the music-server duties of the computer to a small, dedicated device. I’ve never played with a Raspberry Pi before. But I work with Linux in my day job, and have used BubbleUPnP on Windoze. Your excellent instructions make it all seem very accessible.
One question:
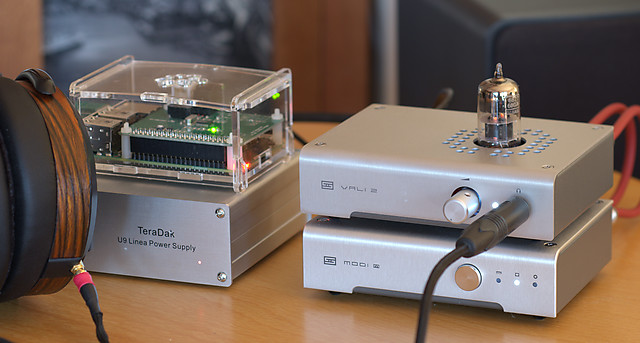
What is the clear plastic case that you have around the pi, in your photo’s? Makes a quite elegant stack with your power supply: old-school looking equipment. Did that come with a specific pi kit? Or was it a separate accessory, or something?
Thanks for sharing your work! I can’t wait to get started.
Hi Jim, if you work with Linux I expect you will have no issues implementing this. You will probably be able to suggest some improvements 🙂 The case pictured in this article is the case from HifiBerry for their digital board which I described here: https://www.hifizine.com/2015/10/pifi-how-to-network-your-mac-music-system-with-the-raspberry-pi-and-hifiberry-part-1/, the power supply is a TeraDak linear supply, but these days I just use a Meanwell switching supply with an Allo DigiOne card. [Edit added for clarity:] That however is the renderer, the PiDisk itself (photo in Part 1) is housed in a plastic case I got from eBay.
Hi John,
thanks a lot for such detailed descritpion !
Is it possible to publish same guide (of 3rd page) for user don’t have MAC/Linux machine ? 2 previous pages were done using Putty app releatively easy, but at 3rd I stucked… Or, if it’s really necessary to have Linux behaviour – how to get Linux shell features but running in Windows app ?
I understand there’re really different architectures , but anyway – is it achievable to get same result without MAC ?
And assuming all this hard work – how to get final URL to listen MY music over internet? There are lot of external players, like VLC, accepting simple URL..
Thanks again !
Thanks again
Hi Michael, specifically, you are getting stuck with the rsync part?
Hi John,
thanks for the prompt response !
Actually, before rsync…
I created SSH keys (using Puttygen) , what’s the directory and file name (RPi) where I should create the file ? ~/.ssh/authorized_keys” ? ( in the same directory where’s Music directory located ?)
Why you used this command instead of copying and renaming existing file ? I was able simple copy file to the X:\ssh\ and rename it to “authorized_keys” (from PC to mapped drive)…
And general question.. Why do we need to use external PC ( Mac in your case) to synchronize music files ? There is a RPi in the permanently powered mode, not PC, I thougth it the the goal – to load all the job to RPi.. I agree it’s little bit complicated to RPi to copy huge amount of data, but why to do it at single portion ? Anyway, only one file played at the same time, so music may be transfered to RPi/Music/ from large storage (also networked archive) file by file, or, directory by directory, and then deleted after playing done. No need to synchronize whole music storage… RPi need to scan the storage for known music, and then to re-scan nightly, without transfereing.
Selection (to transfer) may be random, on directory of file name basic…. I think RPi is available to do this job.
What do you think ?
BR
Hi Michael, the key file goes into the home directory of the user e.g. /home/droid/.ssh
So… these articles assume that you have a Mac with a library, but you don’t want to keep the Mac turned on all the time. Hence syncing the library to the Pi. The automatic nightly sync is useful if you update the library frequently but not essential, as you can manually update it. I’m looking into a different solution for library syncing that will work on Windows as well.
I’m not sure I understand the rest of your question. If you have a NAS already then things would probably be different. Some NAS devices will allow you to install a DLNA server or even minimserver, in which case you may not need the Pi at all. Another way to do it would be to use say Volumio and mount your NAS using the web interface. However then a. you have to use the web interface and b. it doesn’t seem to work very well with large libraries. The combination of things I’ve written here works well together.