How to Network your Mac music system with the Raspberry Pi and HiFiBerry – Part 1
In my introductory article, Computer audio on the Mac – getting started, I introduced the audiophile new to computer music to ripping and organizing a music library using iTunes on the Mac. Taking the next step is fairly straightforward, and involves using a better music player. I list several in the above-linked article. It’s impossible to make a specific recommendation, as everyone will have different priorities. But all of the players listed have a free trial period, and offer features and sound quality beyond what you get with iTunes.
I’m now going to take a bit of a right turn, and look at the Mac-based music system in a different way – in terms of networked playback. Some time ago, Joe Quinn introduced us to networked music playback in Using Apple’s AirTunes (AirTunes is now called AirPlay). I’ve used AirPlay on and off to stream music to an Airport Express, but wondered about more flexible options. The recent availability of small inexpensive Linux computers, exemplified by the Raspberry Pi, suggested that there had to be a way to do something here that is fun yet inexpensive.
The push to finally do something about this came when I was contacted by HiFiBerry, who make a number of add-on audio boards for the Raspberry Pi. They offer a DAC, a digital output board, and a 20W Class D amplifier. Combine one of these boards with a Raspberry Pi and some free or almost-free software, and you can put together a neat little networked audio streamer for a bit over a hundred dollars, and with very good sonic results.
In this short series of articles, I’ll put together a little music streamer – which I’ll call the PiStreamer – and explain to the Mac-based audiophile how to get started using it. In this first article, I’ll list the parts and show how it’s put together. Part 2 will explain how to set up the network architecture, and Part 3 will cover some additional topics.
Note that some patience is needed to get things running well. Please follow my instructions carefully – and have some fun in the process!
- What you need
- Assembling the hardware
- Setting up the card
- Connecting and starting up
- Configuration and initial test
- Concluding remarks
What you need
Here’s the shopping list:
- A Raspberry Pi 2 Model B. This is the second generation version of the Raspberry Pi, introduced earlier this year (2015). You can get it from the suppliers linked at that page, or in Australia, from GPIO Australia. [Note: as of March 2016, the third-generation Raspberry Pi 3 is not a good choice at this time as there are still “teething” issues.]
- A HiFiBerry Digi+ with output transformer, which costs $40, and a matching case, which comes in black or seethrough.
- A micro SD card. This is what you install the operating system on, and which the Raspberry Pi uses as its memory. An 8 GB card is fine. It’s easiest to buy one that comes with an adapter for regular SD slots, so you can just plug it into your Mac to program it. I used a Sandisk card like this one from Amazon.
- A 5V power supply. The simple way to go here is to get one a recommended power supply from the same place you get your Raspberry Pi 2. If you want to spend more on a linear supply, I currently use one of these.
You will need an Ethernet router and a spare Ethernet cable, at least to get started. If you don’t have access to a hard-wired network connection, you might not be able to get this going.
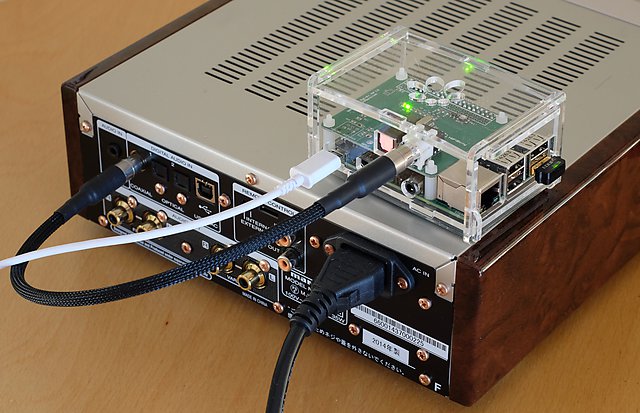
Assembling the hardware
Once you have your hardware bits in hand, you can put it together. It’s pretty simple. Here are the parts: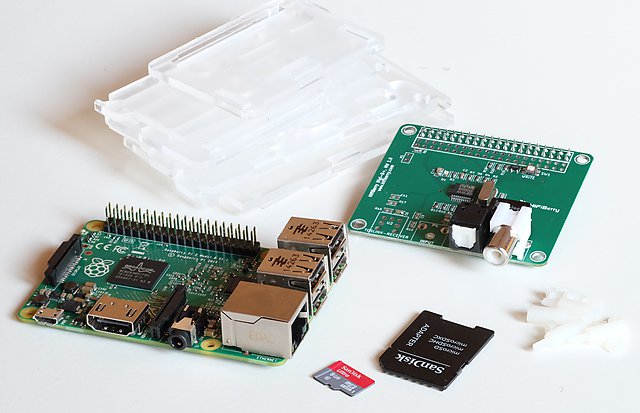
Now, these are electronics circuit boards, so it is possible to zap them with a static electricity discharge. You don’t need to go to extreme lengths, but don’t do this right after dragging your feet around on new carpet. Touch your hand to some metal appliance, like a fridge or hifi system, to make sure you are not “charged up” before opening the anti-static bags that the boards come in. Then screw the four nylon spacers into the Raspberry Pi board, push in the HiFiBerry Digi+ board, and tighten the nylon nuts (don’t use too much force).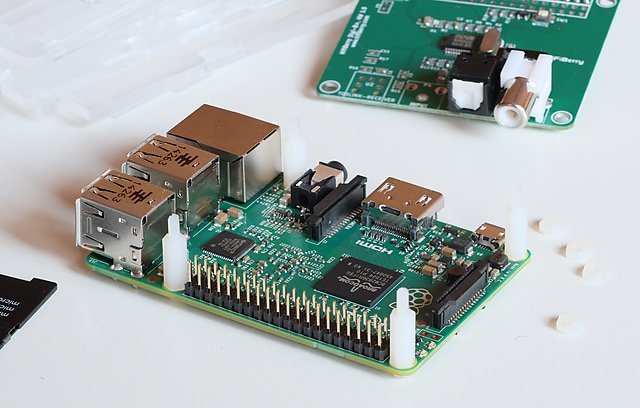

The case just snaps around the two boards:
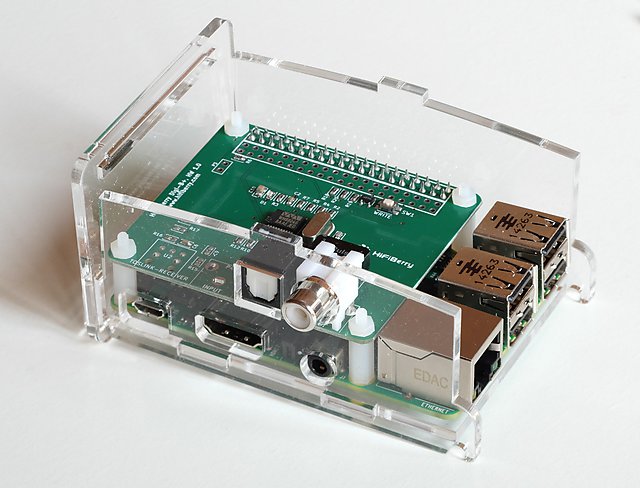
HiFiBerry have a nice video if the above is not clear enough.
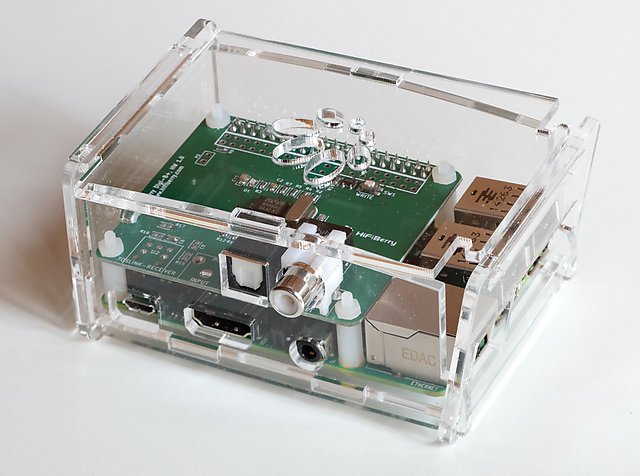
And that’s it!! You have built your streamer. It has three types of digital output: SPDIF, TOSLINK (optical) and USB. Which one you will use just depends on your DAC and setup. Below, I’m going to assume that you use SPDIF to start with, as it’s the most likely to work well most often. (How well USB works does seem to depend on the DAC, for unknown reasons).
Setting up the card
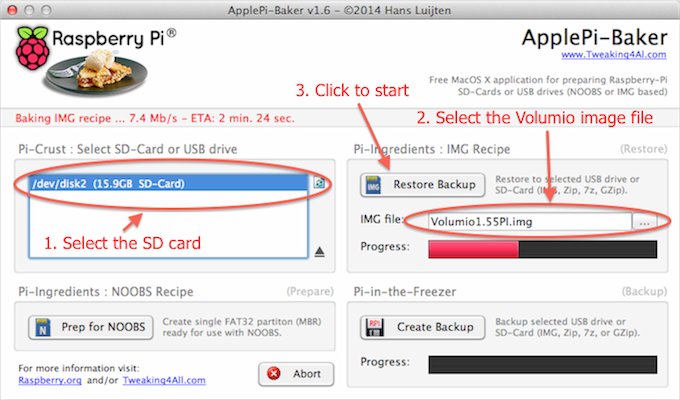
You will need to download the operating system and software from the Volumio Get Started page. While you are at it, download and install Apple Pi Baker as well.
Now you will need to write the software to your SD card. Unzip the volumio download (if your browser didn’t already do it). Plug the micro SD card into the SD adapter, and plug that into the SD card slot of your Mac. (If your Mac does not have an SD card slot, you will need to use an external USB card reader.) Start Apple Pi Baker, and follow the steps shown in this screenshot:
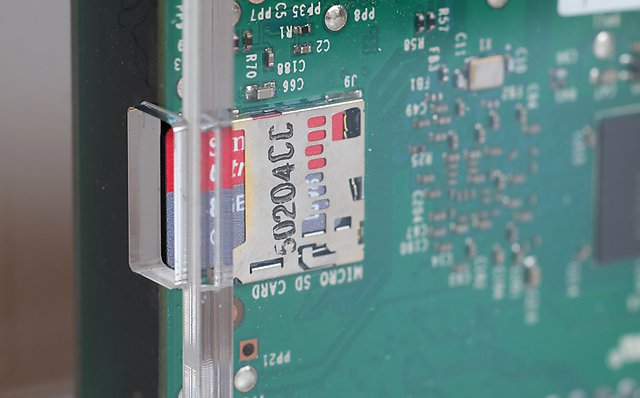
When the progress indicators show completion, go back to the Finder and eject the SD Card (it will be called “No Name” or something like that). Remove the SD Card from your Mac, take out the micro SD card, and insert it into the slot on the Raspberry Pi. The contacts of the card are on the board side, as shown here:
Connecting and starting up
Make connections to the PiStreamer as follows (and in this order):
Ethernet. Just plug one end of an Ethernet cable into the RPi, and the other end into a spare port on your Ethernet router.
Audio output. Connect your DAC to the HiFiBerry Digi+ using the RCA or optical connections. (We will look at USB in the next instalment.)
Power. Plug the micro-USB cable into the socket. The small red LED on the end of the board near the microSD slot will turn on, and will then start flashing. A small green LED will also start flashing shortly after.
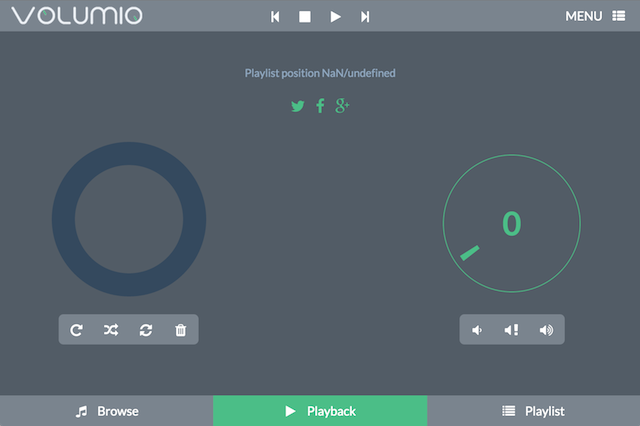
Wait for a full minute after plugging in the power, then in the address bar of a web browser on your Mac or an iPad (*), type “http://volumio.local”. (You might like to make a bookmark for that page now, so you don’t need to keep typing the address.) You should get this screen:
(*) This won’t work on an Android tablet. More on Android in a future instalment.
Configuring and audio smoke test
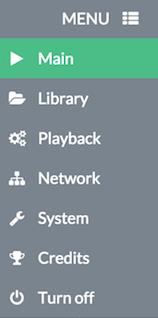
All of the configuration options are accessed from the menu at the top right:
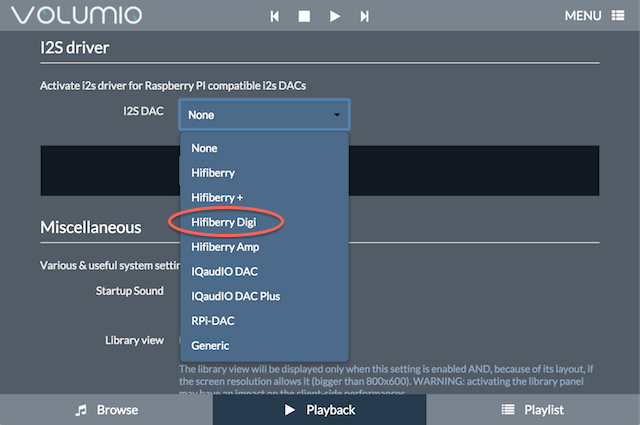
Go to the System menu and under I2S driver, select “Hifiberry Digi,” and then click Apply:
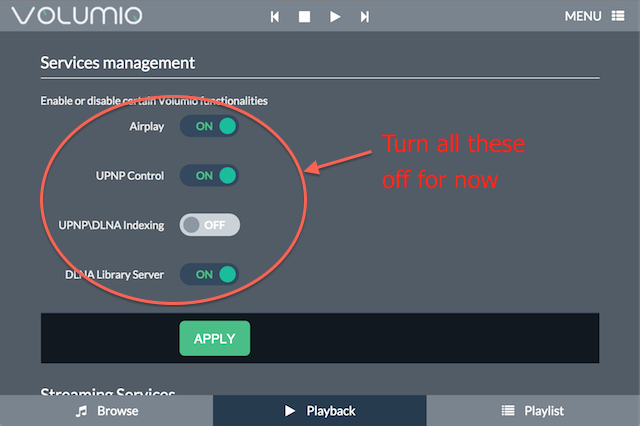
You will get a message saying that you need to reboot. Before you do that though, go back up the page and disable all the extra services (we will re-enable some of those later). Then click Apply:
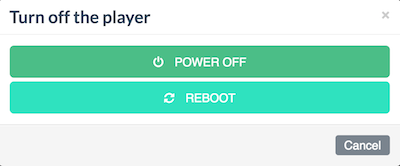
Go to the main menu and select Turn Off, then choose Reboot:
Wait a full minute, then type “http://volumio.local” into the address bar of your browser again (or click on the bookmark you made).
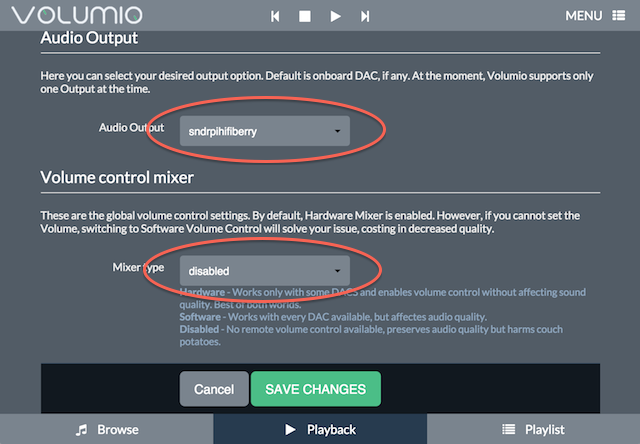
Once you get back to the main screen, go to the Playback menu and under Audio Output select “sndrpihifiberry”. Under Volume control mixer, select “disabled.” Then click Save Changes.
You will get a message about the MPD daemon being restarted. Wait another full minute (at least) before proceeding. This time, if your DAC has a signal sync indicator, you should see it come on.
Now it’s time for the “smoke test”!
Turn the volume on your stereo down LOW. Copy a few music files onto a USB stick and plug it into the RPi2. You should see “Updating” in the lower left of the screen. When that changes to “Browse”, click on it. You should see a list that includes USB. Click there, and you’ll see a list of music files:
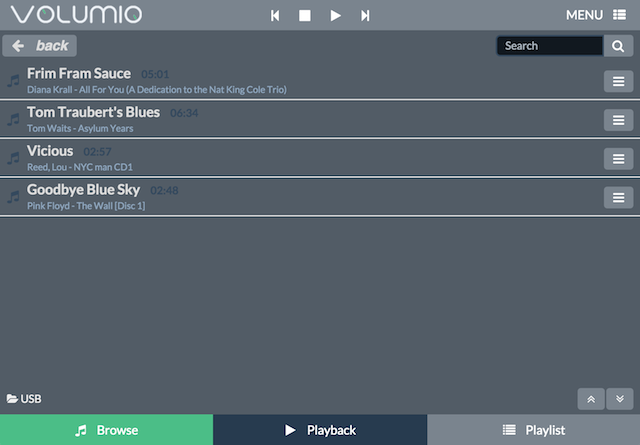
Click on a file name to play it, and slowly turn up the volume. You can use the playback screen, shown in the first screenshot above, to skip through the file.
Concluding remarks
Success? (I sure hope so!) At this point, you have confidence that you can play music from the PiStreamer. If you like, you can load more music onto the USB stick, or even plug in a USB hard drive. However, the library navigation interface in volumio is not very sophisticated, and at any rate, the main focus of these articles is about networking your Mac music system. In Part 2, I will continue with actually making the PiStreamer into a networked player with a better user interface.
I’ll preempt the followup articles by noting that this little box has made me rethink a few things about my home audio setup. The astonishingly low cost, coupled with excellent performance, means that these little audio “end points” can be put anywhere in the house and selected from a tablet as the audio player. While I haven’t yet written about its capabilities, I think there’s no reason every Mac user shouldn’t just get one to play with.

Acknowledgments
HifiZine and the author gratefully acknowledge the support of the following companies and individuals:
- HifiBerry, for providing the Raspberry Pi add-on board (DIGI+) and case used in this article.


John
Your choice of topic is most timely … I feel my Squeezebox Touch is living on borrowed time and believe it is time to DIY a solution. I was reading today about max2play software and their excellent SBT like interface. It would be nice to continue using Logiitech Media Server software as it really seems bullet proof. Will you be using these elements in your next part of the series
Looking forward to the next instalment.
Dave
HI Dave, sorry for the long delay, our email notification from the server wasn’t working… I wasn’t planning to use LMS or max2play but will look into it for a future article. Thanks for the pointer!
I am personally invested in this idea, being the proud owner of a Raspberry Pi A+ and Hifiberry DAC+. I have combined these two items, along with a Lepai LP-2020A+ type-T mini amp and an Overnight Sensations speaker kit from Parts Express, to create a Sonos clone in the sub-$200 range. However, two days ago, I ordered a reburbished Airport Express at $70, and will be replacing the Raspberry Pi and Hifiberry DAC with the Airport Express. Between driver issues, SD write performance, and general tweaking time, I’ve spent waaay too long on this project. I’ll be using my Hifiberry for some other projects that I have in mind, but with the Airport Express being cheaper than the Pi/Hifi combo – not to mention, MUCH more plug-and-play – I’ll be sticking with my Airport Express.
Nice write-up, though. It’s a fun project!
Colin
Hi Colin, thank you for your comment. The Airport Express is a decent solution for Airplay at 44.1 kHz, but I find it a bit limited/ing, hence the effort to document an RPi setup. I wonder about one thing that you’ve said, “SD write performance” – this should not be an issue at all. I wonder if you are writing music files to the SD card?
Brilliant!
All components are now on my Xmas list.
Alex
Nice article! Here are some alternatives that I employ in case a reader wants to play with options.
I too have a Pi (B+) and a HifiBerry Digi+.
I use Windows for downloads and SD card creation ( http://sourceforge.net/projects/win32diskimager/ )
On the Pi, I run the PiMusicBox version of Linux ( http://www.pimusicbox.com/ ) which includes the Mopidy music server ( https://www.mopidy.com/ ). Mopidy can see all my local FLAC files on my NAS drive plus my Spotify premium playlists etc. plus my favorite webradio ‘stations’. On my Android tablet, I run the Mopidy Mobile app which lets me control the Pi music server remotely over WiFi.
By the way, it’s possible that reader Colin’s issues with “SD write performance” have to do with the SD card specs. I had lockup problems with inexpensive generic SD cards that went away when I switched to a SanDisk Ultra class 10 card. Linux will be doing some I/O on this card since it does hold the operating system and possibly a paging file.
Lots of fun here!
Hi Tim, thanks for your comment and the additional info and links! I’ll look at those too.
Is it possible to program the RaspberryPi to digitally filter the signal and act as an active crossover?
I would need three channels out, and would have an amp channel for each (woofer, midrange, tweeter) with no passive crossover .
Similar to the mindsp.
Colin
Hi Colin, I’ve seen reference to it but not looked into it in any detail. In theory, there’s no reason why not.
Any idea when we might expect Part 2?
Thanks!
Hi Steve, actually it’s been written for a while, I just have one little thing I felt I needed to check out and add. I’ll try to get to it this week. Thanks for the reminder!
I’m interested in part 2 as well 🙂
Hi, sorry for the slowness, Part 2 is here: https://www.hifizine.com/2016/02/pifi-how-to-network-your-mac-music-system-with-the-raspberry-pi-and-hifiberry-part-2/ . Thanks for giving me a bit of a push, pse let me know if you find it useful 🙂
Interesting. Thank you for this post. I might try to set up this at some point to connect my DAC. My question is if the unit has to be connected to the router all the time or once every this is set up can be disconected to take it to another room.
Hi Oscar, you can use a Wifi dongle and set it up on the Network page in the Volumio web interface.
Hi I have reading you’re articles what updated hardware would I need in 2021?