Virtualizing Roon Server
In my last article on running Roon Server on the ODroid H2, I initially spent some time worrying about whether this little computer would be powerful enough for Roon. It turned out to be just fine.
That led me to wonder whether I could virtualize Roon Server. I don’t mean desktop virtualization, where you run a foreign operating system and desktop on your regular computer – for example, to run Windows on a Mac or Linux on Windows – but server virtualization, where the resources of a physical server are divided up between some number of virtual machines (VMs), each acting as though it were a real physical server.
This article summarizes the results of my virtualization experiments on Roon Server using the ODroid H2 and an Intel NUC. It’s in two parts, the link to the second part is at the bottom.
Contents
Why virtualize?
The most obvious benefit of server virtualization is that a shared physical box can be used to run services that might otherwise each demand a dedicated machine. What’s more, each service can be allocated a slice of the compute pie that best suits it: low-power services get a small slice, higher-power services get a bigger slice. Overall, we need less hardware and get better resource efficiency.
Another benefit is hardware independence. For example, in the earlier article, I installed Roon Server on Ubuntu Linux on the ODroid H2 but it wasn’t possible to install Roon ROCK because ROCK requires “Legacy BIOS boot” – which the CPU in the H2 doesn’t support. With virtualization, I can install ROCK on the H2! That will be covered in a follow-up article.
Once you have a virtualization server, it also becomes easier to experiment. For example, I have virtual machines (VMs) running for both Roon Server and Roon ROCK. It’s easy to clone a VM for the purpose of running an experiment, or to quickly make a backup copy of a whole VM.
Hardware and software
I’ve been trying out a virtualized Roon Server on two different machines: the ODroid H2 already mentioned, and an Intel NUC8i5BEH. This particular NUC is the best bang-for-the-buck in the current (8th gen) NUC lineup, and is about three times faster than the H2. Either consumes a low amount of power, with the H2 typically consuming a bit less when both are running the same load.
The virtualization platform I’m using is Proxmox VE (PVE). It combines several Linux technologies and adds a nice web interface. It’s free to use with some limitations on access to the latest updates. Follow the instructions on the installation page to set up your server with it.
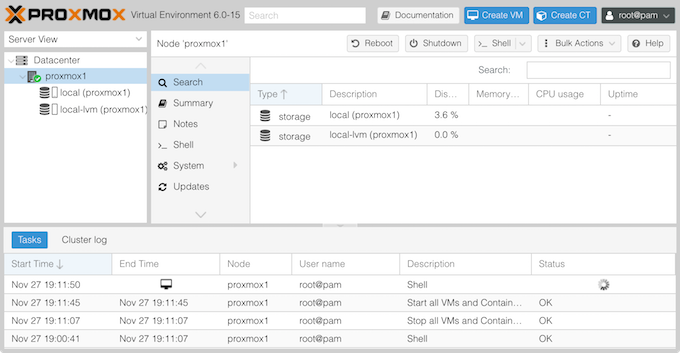
The PVE configuration interface is accessed through a web browser. In my case, I gave it the hostname proxmox1.local, so I access it using the address https://proxmox1.local:8006:
The >_ Shell button opens a new window with a web-based shell on the PVE host. The first to-do item for a new PVE installation is to update apt sources as per this section of the PVE documentation. Then:
 root@proxmox1:~# apt update && apt upgrade -y
 root@proxmox1:~# apt install -y avahi-daemon curl lm-sensors
 root@proxmox1:~# sensors-detect
The last command is for temperature monitoring. It will ask a lot of questions; I accepted the default answer for all except the last, “Do you want to add these lines automatically to /etc/modules? (yes/NO),” when I answered YES. Enable it with:
root@proxmox1:~# /etc/init.d/kmod start
The graphs in this article come from Netdata. It’s installed on the host with:
root@proxmox1:~# bash <(curl -Ss https://my-netdata.io/kickstart.sh)
Netdata is accessed with a web browser – in my case, at http://proxmox1.local:19999.

Creating a Roon Server VM
This section describes the steps I took to set up Roon Server in a virtual machine.
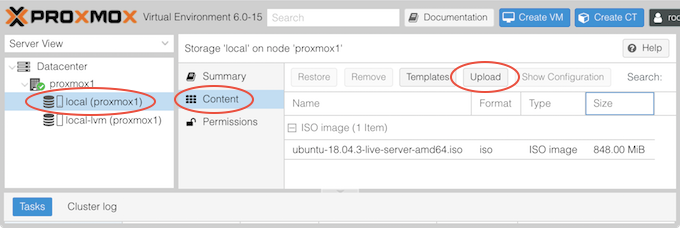
1. Upload Ubuntu Server
Download Ubuntu Server. Then navigate to local -> Content and upload it to the PVE host:
2. Create a VM
Click on the Create VM button. Use the following parameters, leaving others at the defaults:
- General. The VM needs a name. I used “roon-vm”.
- ISO. For ISO Image, select the uploaded Ubuntu Server ISO.
- System. Leave at defaults.
- Hard Disk. Set Bus/Device to SCSI and Disk Size to 16 GiB.*1
- CPU. Set Cores to 2.*2
- Memory. Set Memory to 2048 MiB.*2
- Network. Leave at defaults.
Select the new VM in the left sidebar and click on Hardware to verify its configuration:
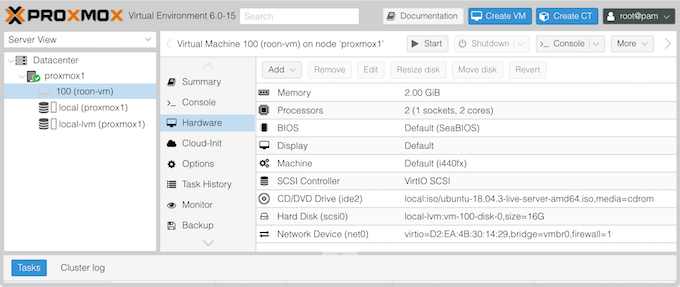
*1. With a 50,000-track library, Roon’s internal database is about 5 GB in size and there’s about 6 GB left unused. Set this higher for a very large library.
*2. This can be easily changed later if needed.
3. Install Ubuntu Server
Click on the Start button, then on >_ Console to open a console window on the VM. Step through the Ubuntu Server installer, selecting “Use an entire disk” to install to the 16 GB virtual drive. I usually install openssh, as the browser-based console doesn’t always work that well for copy and paste. None of the offered “snaps” are needed.
When installation completes, reboot, and when asked to remove the installation medium, do so in the Hardware panel of the VM: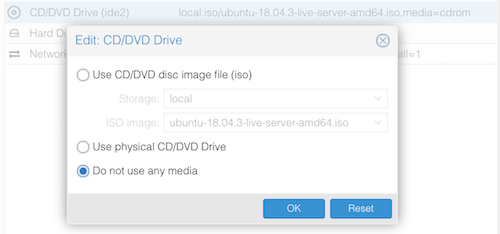 Once booted, log in with the console and update the guest OS:
 roonuser@roon-vm:~$ sudo apt update && sudo apt upgrade -y
 roonuser@roon-vm:~$ sudo apt install -y avahi-daemon
4. Set up an attached drive (optional)
If there is a hard drive attached to the physical server, the Roon VM can be given access to it by following the instructions at Physical disk to KVM. (Note: these first commands are run on the host, not in the Roon VM.) After this is done, the VM’s hardware configuration will include a line like this:
![]()
Reboot the Roon VM and open a new console or use ssh to log in. If the drive isn’t already formatted, format it now and mount it at (say) /media/music. To access it directly from your computer, share it via Samba. See sections 2 through 5 of the Droidisk article. Note that the drive will have a slightly different name to usual:
roonuser@roon-vm:~$ sudo fdisk -l
...
Disk /dev/vda: 3.7 TiB, 4000787030016 bytes, 7814037168 sectors
...
Device     Start        End    Sectors  Size Type
/dev/vda1   2048 7814037134 7814035087  3.7T Linux filesystem
5. Install Roon Server
Install Roon Server on the VM using the instructions on the Roon website
 roonuser@roon-vm:~$ sudo apt install -y ffmpeg cifs-utils curl
 roonuser@roon-vm:~$ curl -O http://download.roonlabs.com/builds/roonserver-installer-linuxx64.sh
 roonuser@roon-vm:~$ chmod +x roonserver-installer-linuxx64.sh
 roonuser@roon-vm:~$ sudo ./roonserver-installer-linuxx64.sh
6. Configure Roon
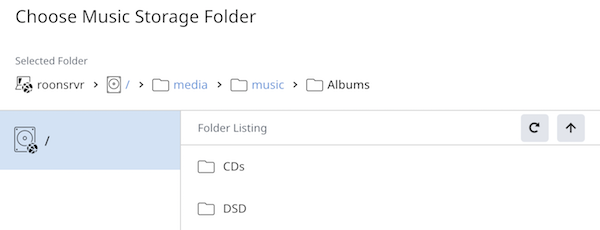
Start Roon UI on a computer and use Settings to disconnect from the current Roon server, then connect to the new server and configure the music storage. In my case, since I’m using an attached drive that I previously loaded music onto, it already has a copy of my music library on it:
Initial load tests
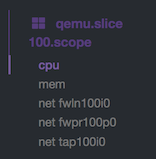
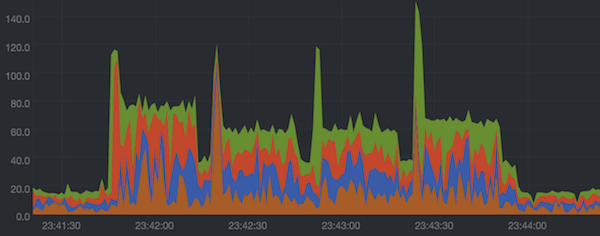
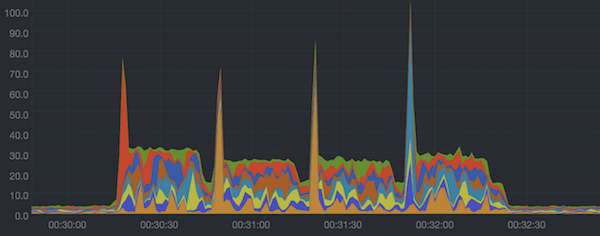
Since a key advantage of virtualization is effective resource allocation, I thought it would be useful to get some insight into how much CPU and memory Roon Server uses in different scenarios. I will display the “all cores” CPU graph for the Roon VM, which can be found by locating the VM by ID in the Netdata menu:
Note that it’s important to check the scale at the left of the graphs, as the graphs auto-scale.
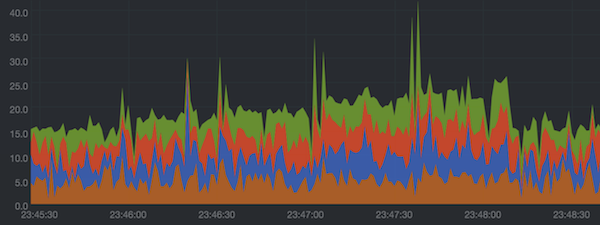
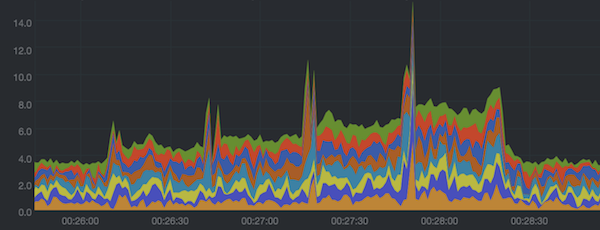
File playback, no oversampling
These graphs show CPU usage of the Roon VM while playing back FLAC files with bit depth/sample rate of 16/44, 24/96, 24/192 and 24/352, with no oversampling or other DSP. These are synthetic test files generated with sox. Each file is 30 seconds long, and the first starts playback about 30 seconds after the start of the graph.
These graphs are with the files located on a network drive. When playing back from a direct-attached disk, the load is very slightly lower.
ODroid H2
The Roon VM on the H2 “idles” at about 16%, and increases to a load of about 24% while playing back the 352.8 kHz file. These percentage figures are relative to a single core – that is, full use of all four cores would be 400%.
NUC8i5BEH
The Roon VM on the NUC idles at about 4% and increases to about 8% for 352.8 kHz playback. These percentage figures are relative to a single logical core – that is, full use of all eight logical cores would be 800%.
File playback, oversampling to 768 kHz and 128k-tap convolution filter
Turning on some DSP like cross-feed and parametric EQ increased CPU load only a little. To get Roon working harder, I turned on over-sampling to maximum using the precise linear-phase filter (the most compute-intensive one). Feeding my RME ADI-2 Pro, this meant that Roon oversampled all files to 768 kHz. For good measure, I added a 128,000-tap convolution filter generated by rephase.
ODroid H2
The H2 runs about 80% of a core while playing the 44.1 kHz file. Peaks during initial load were up to about 150%.
NUC8i5BEH
The NUC runs about 32% of a logical core while playing the 44.1 kHz file, with peaks during initial load up to about 100%.
Memory usage
Roon generally seemed to reserve the full 2 GB of allocated RAM, but used 1.2 to 1.4 GB.
roonuser@roon-vm:~$ free -m
              total        used        free      shared  buff/cache   available
Mem:           1993        1218         220           0         553         619
Swap:          2047          35        2012
Still, memory is cheap, and Linux uses spare memory for disk cache, so giving the VM more memory may make things a bit snappier.
To be continued…
This article continues with more load tests and concluding thoughts in Part 2.
Acknowledgements


Netdata is a great tool! I decided to give it a whirl and see if I could reproduce some of your results.
Per the netdata instructions, I did a
sudo /etc/netdata/edit-config apps_groups.conf
added this line
roon: *Roon* *RAAT* *ffmpeg*
and restarted netdata. With Volume-leveling, but no other DSP active, Roon takes up ~6% of a core on the H2. There’s a brief spike to ~26% at the start of each track (and smaller spikes at random other times), but those last less than a second. Doing searches, calling up metadata on artists and albums, … none of those things seem to lead to a significant spike in CPU usage.
For comparison, netdata and its plugins take up about 4% of a core — not negligible compared to Roon. Since I run roon as a non-root user, I can get the same information by monitoring the CPU usage by user.
Total usage is about 12%. A little less than you found, but not by much.
One thing puzzles me: my graphs are a lot ‘spikier’ than yours. Is there a “smoothing” setting that I’ve missed?
Cool, you are ahead of me on configuring Netdata, I’m still on the out-of-the-box settings 🙂 My guess on the “spikiness” is that perhaps Netdata is sampling the load of the VM at a lower rate? I assume this is configurable but haven’t looked into it. There is a display setting for bezier smoothing but I don’t think that’s it.
“Cool, you are ahead of me on configuring Netdata, I’m still on the out-of-the-box settings ”
Not by much .
Another experiment: adding an album.
The default setting for “Background Audio Analysis Speed” is “Throttled”. This chews up ~35% of a core on the H2. Unfortunately, it’s also reeeeeeaaaaly sloooooooow. Changing the setting to “Fast (3 cores)” causes the temperature (which is usually around 39℃ on the passively-cooled H2) to rise to 66℃, as the CPU usage jumps to 240% of a core. But it’s also really fast: by the time I had checked the temperature and returned to look at the CPU usage, it had finished processing the album.
The NUC gets very hot and bothered when I do that 🙂
Hi,
I’m having a problme installing Roon Rock on either KVM or VMware. When it get’s to the menu where I have to choose to install it no longer takes keyboard input. I’ve tried with multiple different VNC clients (in addition to virt-manager / vmware console).
Anyone seen that?
Cheers,
Casper
Hi, you need to use USB passthrough to attach a physical keyboard to the Rock VM.
The latest article may help (although using Proxmox, it’s KVM under the hood) – https://www.hifizine.com/2019/12/virtualizing-roon-rock/