Virtualizing Roon ROCK
While I’ve previously virtualized Roon Server, Roon also provides an “appliance” called ROCK, the Roon Optimized Core Kit. This is a minimal Linux installation that Roon recommends be installed on a dedicated Intel NUC. I wondered whether it could be virtualized as well.
So I tried it and got stuck, until I found a very helpful thread on the Roon community forum here. Armed with this information, I was able to complete my virtualized ROCK installation. This article summarizes the results of my virtualization experiments with Roon ROCK.
Contents
Appliance?
In computing, a computer that performs a specific and dedicated task, and nothing else, is known as an appliance. Analogous to, say, a washing machine, which washes your clothes and does nothing else. So, we take general-purpose computing hardware (CPU, memory, storage), put it in a physical form that matches its task, and load software onto it that will do only that task. For example, a gaming console like the Xbox, which plays games and does nothing else.
Roon has the Nucleus, a computer that acts as a Roon server and does nothing else. It runs a stripped-down Linux called Roon OS and is intended as a solution that you buy pre-configured and ready to go. It’s also fanless and therefore very quiet (as long as you don’t put a hard drive in it.) You can, however, also install the software that runs on the Nucleus on your own hardware – that’s ROCK.
ROCK is therefore what is known as a software appliance. It will turn a general-purpose piece of computing hardware into a special-purpose… well, appliance. You can’t log into it, you can’t install other programs onto it, and you can’t plug in a screen and expect to see a desktop. The only way you can interact with it is through the Roon UI and a simple web interface for some low-level configuration tasks.
Interestingly, the term software appliance often implies that the appliance is virtual and comes packaged as a prebuilt virtual machine. Whonix, for example, comes as a pair of virtual appliances that you load into VirtualBox.
The hardware/software platform
I’ve installed virtualized ROCK on two different machines: an ODroid H2 and an Intel NUC8i5BEH. The NUC is a more powerful machine, but is comparatively lacking in on-board storage options.
The virtualization platform I’m using is Proxmox VE (PVE). It combines several Linux technologies and adds a nice web interface. It’s free to use with some limitations on access to the latest updates. Follow the instructions on the installation page to set up your server with it.
The PVE configuration interface is accessed through a web browser. In my case, I gave it the hostname proxmox1.local, so I access it using the address https://proxmox1.local:8006:
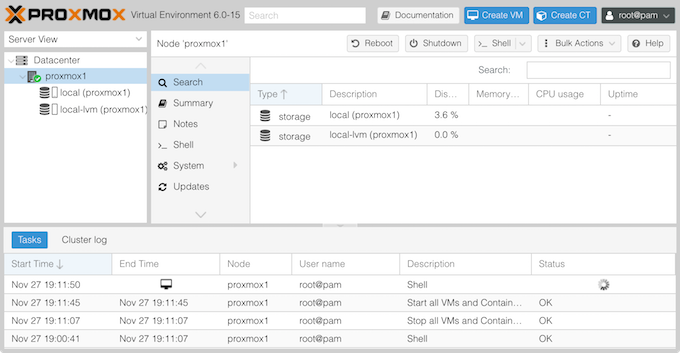
The >_ Shell button opens a new window with a web-based shell on the PVE host. The first to-do item for a new PVE installation is to update apt sources as per this section of the PVE documentation. Then:
 root@proxmox1:~# apt update && apt upgrade -y
 root@proxmox1:~# apt install -y avahi-daemon curl lm-sensors
 root@proxmox1:~# sensors-detect
The last command is for temperature monitoring. It will ask a lot of questions; I accepted the default answer for all except the last, “Do you want to add these lines automatically to /etc/modules? (yes/NO),” when I answered YES. Enable monitoring with:
root@proxmox1:~# /etc/init.d/kmod start
The graphs in this article come from Netdata, which must be installed on the PVE host. Despite the fact that ROCK is an appliance and you can’t log into it, you can still get loads of useful information from the VM via Netdata. It’s accessed with a web browser – in my case, at http://proxmox1.local:19999.

Creating a ROCK VM
This section describes the steps I took to set up Roon ROCK in a virtual machine.
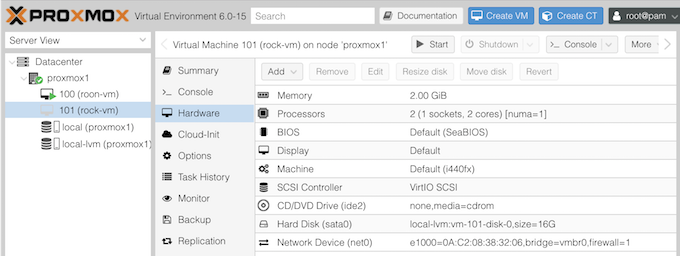
1. Create the VM
In PVE, click Create VM. Use the following parameters, leaving others at the defaults:
- General. Give the VM a name. I used “rock-vm”.
- ISO. Select “Do not use any media.”
- System. Click on the Advanced checkbox (near the bottom) and check BIOS is set to SeaBIOS.
- Hard Disk. Set Bus/Device to SATA and Disk size to 16 GiB.*1
- CPU. Set Cores to 2.*2
- Memory. Set Memory to 2048 MiB.*2
- Network. Set Model to Intel E1000.
At the end, click on Finish. Don’t start the VM yet! Check your hardware configuration carefully, as if the drive is not set to SATA or the network card is not set to Intel E1000, the ROCK installer will fail.
*1. With a 50,000-track library, Roon’s internal database is about 5 GB in size. Set this higher for a very large library.
*2. This can be easily changed later if needed.
2. Connect a bootable USB stick to the server
Usually, installing a VM in ProxMox means uploading an ISO disk image. I couldn’t make this work with ROCK. Instead, here is the workaround:
- Download ROCK and burn it to a USB stick with Etcher.
- Unplug the USB stick from your computer and plug it into the server.
- In the Hardware section of your VM configuration panel, click Add and then USB Device:
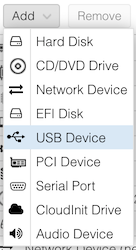
Select the USB stick and then click Add: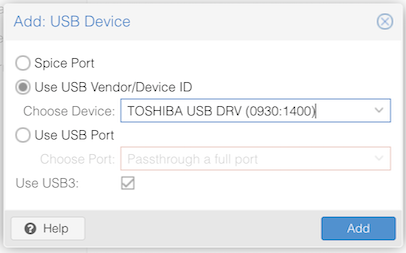
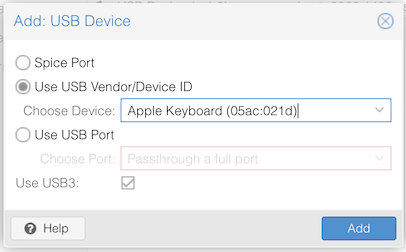
3. Connect a USB keyboard to the server
This is a bit unusual. Connect a USB keyboard to a USB port on the server. In the Hardware section of your VM configuration panel, add it to the VM:
4. Boot the VM
Click on the Start button, then on >_ Console. You may see some messages about failure to boot, but wait until the ProxMox logo shows up with “Press ESC for Boot Menu” in the lower right corner. Then press the Escape key. You should see a menu like this:
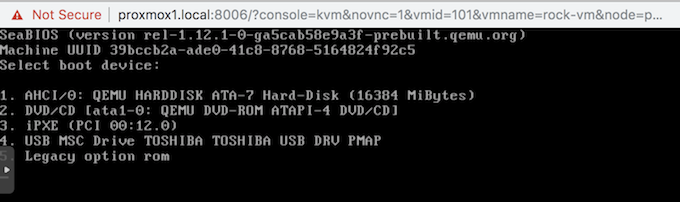
Press the number that corresponds to the USB stick (4 in this case). With any luck, you will shortly be in the ROCK installer.
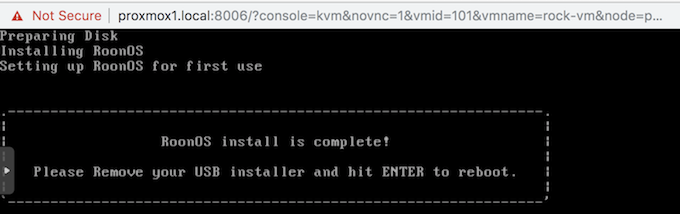
5. Run the ROCK installer
This bit is a little weird: the ROCK installer messages appear in the PVE console window, but responses have to be typed on the keyboard that is physically attached to the server. Select the options to install ROCK, to install on the QEMU hard disk, and then confirm. Finally, press Enter to reboot.
6. Shut down and reboot
In the Hardware panel of the VM, select the USB stick and click the Remove button. Do the same for the keyboard.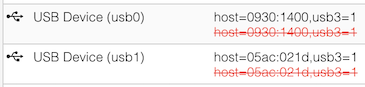
Unplug both from the server. Then drop down the Shutdown menu and select Reboot.
7. Open the ROCK web UI
ROCK advertises itself on your local network, so you should be able to access it at http://rock. Alternatively, open a console window on the VM, then open your web browser at the address displayed in the console.

You will need to install the missing codecs.
Open Roon UI on your computer (or tablet or phone) and use the Settings to disconnect from your current Roon server, then connect to ROCK.
Storage for ROCK
There are three options for music storage.
Network share
If you have networked file storage, add it in Settings → Storage. It could be a NAS, or a Mac or PC with file sharing turned on. Note that one of the issues with some off-the-shelf/commercial NAS is that Roon may not get immediate update notifications when you add files, according to Roon’s CTO in this post.
In a virtualized environment, I think this option does make the most sense. After all, you can think of a network file share as a virtualized hard drive.
USB-attached drive
While I’m not very keen on having USB drives attached to a server, this method is actually very convenient.
- Connect a USB drive to the server. It can have music already on it – a distinct advantage of this method, in fact, is that you can load music onto the drive beforehand.
- In the Proxmox Hardware pane for the VM, drop down the Add menu and choose USB Device. Select the attached drive and click Add.
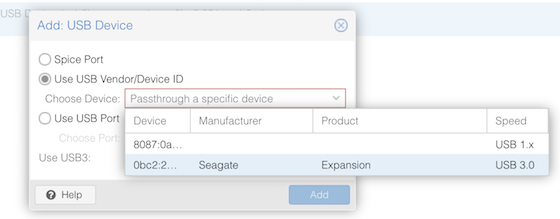
- In Roon UI, go to Settings → Storage and choose a location on the drive:
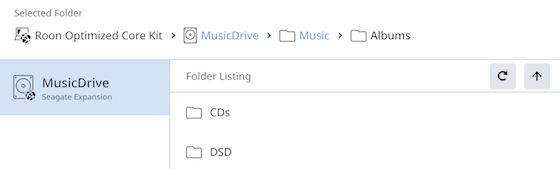
The USB drive can be accessed from other computers with Samba, as described here.
Internal drive
As an experiment, I set up a drive for ROCK connected via SATA to the ODroid H2. (The issue with the NUC is that it’s limited to a 9 mm sized drive, which don’t exist in capacities larger than 2 TB except as a frightfully expensive SSD.)
The drive is made available to the ROCK VM with disk passthrough. I do have reservations about this, as ROCK seems to have drivers for SATA only and Proxmox don’t recommend passing through a drive as SATA. I copied a bit over a TB of data onto it and it’s been stable so far.
The following is based on the instructions at Physical disk to KVM. On the PVE host, locate the drive
root@proxmox1:~$ lshw -class disk -class storage
...
     *-disk:0
          description: ATA Disk
          product: ST3000LM024-2AN1
          serial: WCK3KS5E
          ...
root@proxmox1:~$  ls -al /dev/disk/by-id/
total 0
drwxr-xr-x 2 root root 660 Dec  1 20:48 .
drwxr-xr-x 8 root root 160 Dec  1 20:48 ..
lrwxrwxrwx 1 root root   9 Dec  1 20:48 ata-ST3000LM024-2AN17R_WCK3KS5E -> ../../sda
...
Now that we know the drive ID, pass it through with (101 is the ID of the VM):
root@proxmox1:~$  qm set 101 -sata1 /dev/disk/by-id/ata-ST3000LM024-2AN17R_WCK3KS5E
update VM 101: -sata1 /dev/disk/by-id/ata-ST3000LM024-2AN17R_WCK3KS5E
Check that the new drive is present in the Hardware panel of the VM:

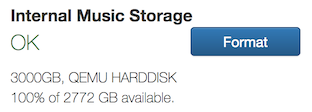
Reload the ROCK web UI. You should see:

Click on Format, and a few clicks later:
In the Roon UI, go to Settings → Storage and enable internal storage:

Set up your computer to access the internal storage using Samba, as described here. Now you can drag and drop albums onto it. To copy a large amount of data, you may want to use something more robust such as rsync. For example, on my Mac:
mymac:~ me$ rsync -a /Volumes/DataHD/Music /Volumes/Data/Storage/InternalStorage
Here, “DataHD” is an external drive attached to my Mac and “Data” is the mount point for ROCK. By the way, if you’re wondering if ROCK can use more than one internal drive, it seems that it cannot.
Load tests
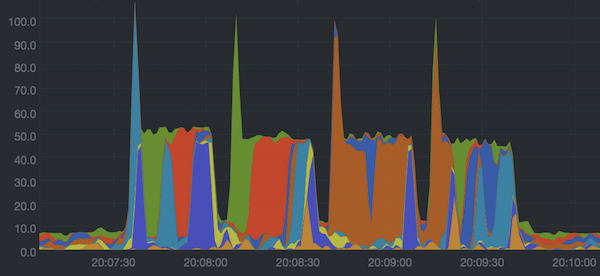
Running some tests and monitoring CPU load gave very similar results to the virtualized Roon Server. For example, here is the CPU usage of the ROCK VM running on the H2 with upsampling to 768 kHz and convolution with a 128,000-tap filter:

It’s pretty much the same as the graph I obtained earlier for virtualized Roon Server. Interestingly, though, the ROCK VM does seem to use a bit more CPU.
Here is the CPU usage of the ROCK VM running on the NUC while upsampling to DSD256:
Again, the ROCK VM seems to use slightly more CPU than the virtualized Roon Server, although it’s not significant. I didn’t feel it was worth conducting further tests of this nature – all the numbers summarized in the previous article should be pretty close for the ROCK VM as well.
Conclusion
Once some oddities in the installation procedure are dealt with, virtualized ROCK seems to run about the same as Roon Server on an Ubuntu VM. It does have some “appliance like” convenience features:
- There’s no need to update the OS separately.
- An attached (internal) drive is formatted for you and automatically exposed as a Samba share.
- A connected USB drive is found automatically, made available as music storage and exposed as a Samba share.
One slight worry is that ROCK makes its internal database accessible for unrestricted access via Samba, so it seems that it would be very easy for anyone on your network to (accidentally or deliberately) mess with your ROCK installation.
At this point, I’m ambivalent about whether I prefer ROCK or Roon Server in a virtualized setting. Items 2 and 3 are irrelevant if you use network storage for your music. A factor in favor of virtualizing Roon Server is that it can be run in a container instead of a VM, which is “lightweight virtualization” with very low overhead, whereas ROCK cannot.
If you’d like to try virtualized ROCK yourself, instructions are above. Please post in the comments below if you do.
Acknowledgements


Worked perfectly! Steady as a ROCK! (pun intended… ♂️)
Worked perfectly!
Easy and steady as a ROCK! (pun intended… ♂️)
This tutorial was quite helpful! Was able to get it running on KVM, couple of notes:
– I had to ensure to use Q35 UEFI instead of BIOS
– In the UEFI configuration, Secure Boot must be disabled, otherwise it would not boot the installer on the USB stick
– The disk partitioning would fail with a disk size under 64GB
PERFECT!
This tutorial was quite helpful and detail.
Can someone tell me the defferent between rock OS and Nucleus OS,thanks.
Hi Sir,
I’m going to stick my nose in here and ask by “rock OS,” do you mean the operating system that runs ROCK? If so, that would be Roon OS, Roon’s own Linux distribution tailored to their needs as an audio server.