Droidisk – Playing music
This is the second and final part of this short series on Droidisk – an inexpensive music server based on the ODroid HC1 single-board computer (SBC).
This article continues right where Part 1 left off. We will be installing additional software that turns the droidisk from a simple file server into a full-fledged music server!
Sections in Part 2:
- But first… something completely different
- 6. Install Java
- 7. Install MinimServer
- 8. Install MinimWatch
- 9. Install BubbleUPnPServer
- 10. Play music!
- Wrapping up
- Appendix A – old BubbleUPnPServer install
But first… something completely different
Up until now, all of my articles about these little music servers (whether based on the Raspberry Pi or the ODroid HC1) have generally assumed that a Raspberry PI is being used as the renderer. However, there are lots of other things you can use. For example, an Android tablet or phone running BubbleUPnP (*) makes a really neat little renderer and controller all in one. Here, for example, is a Nexus 7 with a Topping NX4 DSD being used this way:
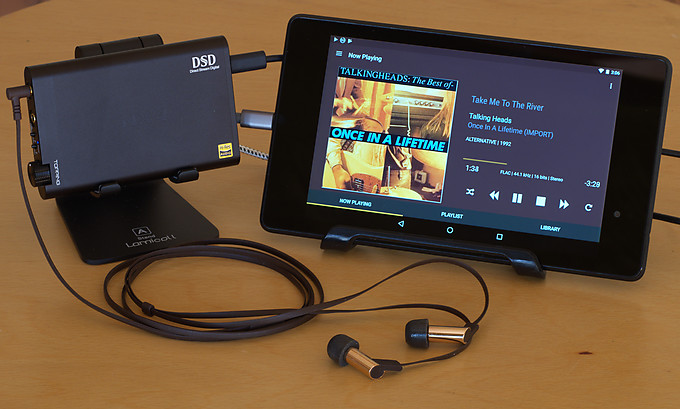
You just need an OTG adapter, a USB DAC and the USB cable to suit it. The “catch” here is that you will need to unplug the Android device now and then to charge it. (Well, I have not figured out how to charge and use OTG at the same time – from googling a bit, it seems that only a few tablets support this.) Also, to avoid unnecessary battery drain, quit BubbleUPnP completely when not using it.
Caveats aside, this is a really neat little headphone (or IEM in this example) listening station!
(*) By that I mean the Android app not the server program that will be installed later in this article. And please do support the BubbleUPnP author by buying a licence.
6. Install Java
Java will be used by both MinimServer and BubbleUPnP Server. For Ubuntu 16, install it with the following command (it may take a few minutes to run):
droid@droidisk:~ $ sudo apt-get install -y openjdk-8-jre-headless
For Ubuntu 18:
droid@droidisk:~ $ sudo apt-get install -y openjdk-11-jre-headless
Confirm successful Java installation:
droid@droidisk:~ $ which java
/usr/bin/java
droid@droidisk:~ $ java -version
openjdk version "10.0.2" 2018-07-17
OpenJDK Runtime Environment (build 10.0.2+13-Ubuntu-1ubuntu0.18.04.4)
OpenJDK Server VM (build 10.0.2+13-Ubuntu-1ubuntu0.18.04.4, mixed mode)
(A reminder: most of the commands in this article can simply be copied and pasted from this article into your Terminal window. You don’t have to re-type them.)
7. Install Minimserver
The following is based on http://minimserver.com/install-linux-mserver.html.
Go to http://minimserver.com/downloads/index.html and click on the MinimServer download next to “Linux ARM hard float:” – as of this writing it is named MinimServer-0.8.5.2-linux-armhf.tar.gz. You will get a message asking for a donation – please do send a few quid to the developers to thank them for their efforts!
Locate the downloaded file and drag it over to the droidisk. This will upload it! Then on the droid, move it to your home directory and install (note that this is being done as the “droid” user – no “sudo”):
droid@droidisk:~ $ cd
droid@droidisk:~ $ mv /srv/droidisk/MinimServer-0.8.5.2-linux-armhf.tar.gz .
droid@droidisk:~ $ tar xf MinimServer-0.8.5.2-linux-armhf.tar.gz
droid@droidisk:~ $ minimserver/bin/setup

MinimServer desktop integration is not available
MinimServer automatic startup is disabled

Do you want to change these settings (y/n)?
y
Enable automatic startup for MinimServer (y/n)?
y
Acquiring root privilege for system configuration update...
[sudo] password for droid: droid
MinimServer automatic startup has been enabled
droid@droidisk:~ $ minimserver/bin/startc

MinimServer 0.8.5.2, Copyright (c) 2012-2017 Simon Nash. All rights reserved.
autoUpdate: installed package 'minimserver-0.8-update-120'
Enter command (? for help):
autoUpdate: relaunching
>MinimServer 0.8.5.2 update 120, Copyright (c) 2012-2017 Simon Nash. All rights reserved.
starting MinimServer[droidisk]
Enter command (? for help):
>Enter content directory, or null to continue:
#/srv/droidisk/Music
MinimServer[droidisk] is running
>exit
stopping MinimServer[droidisk]
MinimServer[droidisk] is stopped
droid@droidisk:~ $ sudo reboot
Wait a minute and then check that MinimServer has started up:
mypc:~ myname$ ssh droid@droidisk ps -ef | grep minim
droid 832 1 0 23:01 ? 00:00:00 /bin/sh /home/droid/minimserver/bin/startd init
droid 835 832 2 23:01 ? 00:00:02 java -jar /home/droid/minimserver/lib/mserver.jar --launchrc --set watch.view=log --nohup
You can also check the status of MinimServer by opening this link in your web browser: http://droidisk:9790.
8. Install MinimWatch
To configure and control MinimServer from your computer, use the MinimWatch program. Go to the MinimServer downloads page again, download MinimWatch for your platform, and install it. Then run it – you will get a minim in the menu bar with a dropdown menu like this (if most of the menu is greyed out, select the Refresh option):
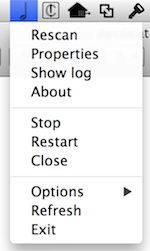
This menu remotely controls the MinimServer running on the Droid. If you add files to the Droidisk, for example, you can select Rescan to have MinimServer re-index the library. If you have trouble with MinimServer not finding the drive when it boots, open Properties and set a value for the DelayStart parameter.
When the droidisk starts up or reboots, the MinimWatch icon will go grey, then come back white. If it stays red after a reboot, there is a problem.

9. Install BubbleUPnPServer
(The procedure described here supersedes an older more complicated method.)
Log into the Droidisk:
mypc:~ myname$ ssh droid@droidisk
Install BubbleUPnPServer:
droid@droidisk:~ $ sudo add-apt-repository ppa:bubbleguuum/bubbleupnpserver
More info: https://launchpad.net/~bubbleguuum/+archive/ubuntu/bubbleupnpserver
...
Fetched 2,356 kB in 6s (373 kB/s)
Reading package lists... Done
droid@droidisk:~ $ sudo apt-get install -y bubbleupnpserver
Reading package lists... Done
...
Created symlink /etc/systemd/system/multi-user.target.wants/bubbleupnpserver.service → /lib/systemd/system/bubbleupnpserver.service.

To configure BubbleUPnP Server from this machine, connect to http://localhost:58050 with your Web Browser
droid@droidisk:~ $
Open a web browser on the address http://droidisk:58050. I strongly recommend that turn off the option on the initial screen that allows you to access your file over the Internet. (You can always turn it on later if you wish.) You can now configure BubbleUPnP Server as described in my earlier article How to Stream TIDAL to the Raspberry Pi – skip over the first sections about software installation as you have already done that here.
10. Play music!
At this point, you have a functioning music server! In order to play music, you will need to install a controller app on your phone, tablet or computer, as explained in the article How to stream TIDAL to the Raspberry Pi. But remember again that you don’t have to stream to a Raspberry Pi – you can use anything that acts as a DLNA renderer, like other streamers, Blu-ray players, etc. As shown in the photo at the top of this article, an Android tablet (or phone) running BubbleUPnP is also a great endpoint you can use.
Wrapping up
And… that’s a wrap! You may also want a more robust method of loading music files onto the server. For that, and an easier way to log in to the droidisk, see the article PiDisk – syncing the music library.
Have fun! Let me know how you go in the comments below.
Old BubbleUPnPServer Installation
[This is the original method I used to install BubbleUPnPServer. It has been superseded by a much simpler procedure. I’m keeping it here for now just in case.]
Log into the Droidisk:
mypc:~ myname$ ssh droid@droidisk
Create a directory for the download and change to it:
droid@droidisk:~$ mkdir bubbleserver
droid@droidisk:~$ cd bubbleserver
Download and unzip BubbleUPnP Server:
droid@droidisk:~/bubbleserver$ wget http://www.bubblesoftapps.com/bubbleupnpserver/BubbleUPnPServer-distrib.zip
...
2018-02-05 23:10:40 (791 KB/s) - ‘BubbleUPnPServer-distrib.zip’ saved [2867985/2867985]

droid@droidisk:~/bubbleserver$ unzip BubbleUPnPServer-distrib.zip
Archive:  BubbleUPnPServer-distrib.zip
  inflating: BubbleUPnPServerLauncher.jar
  inflating: LICENCE.txt
  inflating: bcprov-jdk16-146.jar
  inflating: launch.bat
  inflating: launch.sh
Launch it for the first time. This will make it download the “real” server program:
droid@droidisk:~/bubbleserver$ sh launch.sh

Feb 05, 2018 11:11:20 PM com.bubblesoft.bubbleupnpserver.launcher.Main main
INFO: data dir: /home/droid/bubbleserver
...
INFO: starting BubbleUPnP Server 0.9-update27...
logging to file enabled
[main (1) ] INFO - 0:00:00.17 - Main : starting BubbleUPnP Server 0.9-update27...
...
Now press Ctrl-C on the keyboard to kill the process. What’s needed now is to start the BubbleUPnP server as a daemon aka a server process. To do this, create and edit a new script file, /etc/init.d/bubbleserver:
droid@droidisk:~/bubbleserver$ sudo nano /etc/init.d/bubbleserver
Paste the whole of the following into the script file, then press Ctrl-O to write the file, hit Return at the confirmation prompt, and press Ctrl-X to exit the editor.
#!/bin/sh

### BEGIN INIT INFO
# Provides:          bubbleserver
# Required-Start:    $remote_fs $syslog
# Required-Stop:     $remote_fs $syslog
# Default-Start:     2 3 4 5
# Default-Stop:      0 1 6
# Short-Description: BubbleUPnP Server
# Description:       SImple start-stop script for BubbleUPnP server.
### END INIT INFO
set -e

NAME=bubbleserver
PIDFILE=/var/run/$NAME.pid
DAEMON=/usr/bin/java
DAEMON_OPTS="-Xss256k -Djava.awt.headless=true -Djava.net.preferIPv4Stack=true -Dfile.encoding=UTF-8 -classpath /home/droid/bubbleserver -jar /home/droid/bubbleserver/BubbleUPnPServerLauncher.jar -logLevel OFF"

export PATH="${PATH:+$PATH:}/usr/sbin:/sbin"

case "$1" in
  start)
        echo -n "Starting daemon: "$NAME
	start-stop-daemon --start --quiet --background --make-pidfile --pidfile $PIDFILE --exec $DAEMON -- $DAEMON_OPTS
        echo "."
	;;
  stop)
        echo -n "Stopping daemon: "$NAME
	# start-stop-daemon --stop --user 1000 --quiet --oknodo --make-pidfile --pidfile $PIDFILE
	kill -9 `cat $PIDFILE`; rm $PIDFILE
        echo "."
	;;
  *)
	echo "Usage: "$1" {start|stop}"
	exit 1
esac
Make it executable:
droid@droidisk:~/bubbleserver$ sudo chmod a+x /etc/init.d/bubbleserver
Check that it starts:
droid@droidisk:~/bubbleserver$ sudo /etc/init.d/bubbleserver start
Starting daemon: bubbleserver.
droid@droidisk:~/bubbleserver$ ps -ef | grep bubble
root      1036     1 30 15:32 ?        00:00:09 /usr/bin/java ... -jar /home/droid/bubbleserver/BubbleUPnPServerLauncher.jar
root      1048  1015  0 15:32 pts/0    00:00:00 grep bubble
Install it so that it starts when you boot:
droid@droidisk:~/bubbleserver$ sudo update-rc.d bubbleserver defaults
Now reboot:
droid@droidisk:~/bubbleserver$ sudo reboot


Perhaps you could say, again, what the role of BubbleUPnP Server is in this setup.
If I understand correctly its function is to turn a vanilla UPnP renderer into an OpenHome renderer. (It also does transcoding for ChomeCast, but you’re not using ChromeCast here and MinimStreamer provides integrated transcoding ability for MinimServer.)
* Volumio 2.x (in your previous writeup of a Raspberry Pi as a renderer) is an OpenHome renderer, so doesn’t need BubbleUPnP Server.
* In this writeup, you’re using BubbleUPnP on an Android tablet as an OpenHome CP/renderer. Does that require BubbleUPnP Server?
Hi Jacques, to stream Tidal to Volumio, you need to use BubbleUPnP Server (at least, I can find no way to do it without). For the Android tablet running the BubbleUPnP app, I don’t think you do. The Android tablet is intended as an example of other renderers that you can use, since I’ve mostly talked previously about using an RPi. Hope that helps, let me know how it works out for you if you put a server together 🙂
“Hi Jacques, to stream Tidal to Volumio, you need to use BubbleUPnP Server (at least, I can find no way to do it without).”
There are Tidal, Qobuz and GMusic plugins for upmpdcli. They are optional installs:
apt-get install upmpdcli-qobuz upmpdcli-tidal upmpdcli-gmusic
You’ll also need to configure these by hand in upmpdcli.conf.
The Volumio people have long-promised a GUI for this, but I wouldn’t hold my breath.
Thanks Jacques, that’s good info. I gather there are some differences but I’ll try it sometime.
It appears that the Tidal UI in Volumio is there now but requires a paid subscription. At any rate, the BubbleUPnPServer install is the best approach as it will work with any DLNA renderer.
John, I wanted to say this has been a great help! In a few hours I was able to go trough P1 and P2, right now I’m playing some Tidal tracks trough my Odroid and Rpi3 right now!
BubbleUNpn seems a little crowded, but we will see how we get along. Any tips for streaming Sportify with this config (Odroid w/ minim + renderer)?
Thanks again!
Hi Seb, glad you found it useful 🙂 I think for Spotify you need to use the Volumio web interface and install the Spotfy plugin there (requires a premium subscription IIRC).
How did you link the Nexus 7 and NX4 together??? So the music’s played on the Nexus 7 and then decoded through the NX4?
Links to anything you used to link them please! Thanks!
Trying to setup a small music system on my desk at work
Thanks!
Hi, I used a USB OTG adapter and a regular USB to micro-USB cable. You will find these on Amazon, eBay etc.