PiDisk – adding the music services
This is the second part of a short series on PiDisk – an inexpensive music server based on the Raspberry Pi.
- Part 1: An inexpensive music server – introduces the concept of the PiDisk and sets it up as a basic file server.
- Part 2: Adding the music services (this article) – adds MinimServer and BubbleUPnP Server to the PiDisk so that it is a functioning music server (including streaming TIDAL and/or Qobuz).
- Part 3: Syncing the music library – explains how to automatically synchronize your music library to the PiDisk over the network, and concludes with a few additional tips.
This article continues right where Part 1 left off.

PiDisk on left, PiStreamer with HifiBerry DIGI+ output card on right
As before (in Part 1), there will be an occasional reference to doing something on a Mac. The server itself has nothing to do with the Mac, but you do have to do various things on a regular computer and I’ve assumed in these articles that it’s an Apple Mac. It’s just a pragmatic decision.
Sections in Part 2:
- 7. Install Java
- 8. Install MinimServer
- 9. Install MinimWatch
- 10. Install BubbleUPnP Server
- 11. Back up your image
- Wrapping up (Part 2)
7. Install Java
Java will be used by both MinimServer and BubbleUPnP Server. Install it with the following command, and type “Y”when prompted. This may take a few minutes:
pi@pidisk:~ $ sudo apt-get install oracle-java8-jdk
Confirm successful Java installation:
pi@pidisk:~ $ which java
/usr/bin/java
pi@pidisk:~ $ java -version
java version "1.8.0_65"
Java(TM) SE Runtime Environment (build 1.8.0_65-b17)
Java HotSpot(TM) Client VM (build 25.65-b01, mixed mode)
(A reminder: most of the commands in this article can simply be copied and pasted from this article into your Terminal window. You don’t have to re-type them.)
8. Install Minimserver
The following is largely based on http://minimserver.com/install-raspbian.html.
Go to http://minimserver.com/downloads/index.html and click on the MinimServer download next to “Linux ARM hard float:” – as of this writing it is named MinimServer-0.8.4-linux-armhf.tar.gz. You will get a “nagware” message asking for a donation – please do send a few quid to the developers to thank them for their efforts!
Open a new window in Terminal on your Mac. Copy the downloaded file to the Pi using the following command. You don’t have to type the full file name, but just the first few characters and then the Tab key for auto-completion. Make sure you have the command syntax correct! The colon and tilde at the end of this command are important. When prompted for a password, enter “raspberry”:
mymac:~ myname$ scp Downloads/MinimServer-0.8.4-linux-armhf.tar.gz pi@pidisk.local:~
Go back to the Terminal window that you are using to connect to the Pi. Unzip the download (you don’t have to type the full name of the file, just enter the first few characters and then press the Tab key for auto-completion):
pi@pidisk:~ $ tar xf MinimServer-0.8.4-linux-armhf.tar.gz
Install MinimServer – note that this is being done as the “pi” user – no “sudo”:
pi@pidisk:~ $ minimserver/bin/setup

Migrating autostart configuration
Acquiring root privilege for system configuration update...

MinimServer desktop integration is not available
MinimServer automatic startup is enabled

Do you want to change these settings (y/n)?
n

pi@pidisk:~ $ minimserver/bin/startc

MinimServer 0.8.4, Copyright (c) 2012-2016 Simon Nash. All rights reserved.
autoUpdate: installed package 'minimserver-0.8-update-87'
Enter command (? for help):
autoUpdate: relaunching runtime
>MinimServer 0.8.4 update 87, Copyright (c) 2012-2016 Simon Nash. All rights reserved.
starting MinimServer[pidisk]
Enter command (? for help):
>Enter content directory, or null to continue:
#/media/pidisk/Music
MinimServer[pidisk] is running
>exit
stopping MinimServer[pidisk]
MinimServer[pidisk] is stopped
pi@pidisk:~ $ sudo reboot
Wait a minute and then check that MinimServer has started up:
mymac:~ myname$ ssh pi@pidisk.local ps -ef | grep minim
pi         564     1  0 06:59 ?        00:00:00 tail -n 1 -f /home/pi/minimserver/data/minimserver.pipe
pi         565     1  0 06:59 ?        00:00:00 /bin/sh /home/pi/minimserver/bin/startd minimexec
pi         566   565  1 06:59 ?        00:00:05 java -jar /home/pi/minimserver/lib/mserver.jar --set watch.view=console --noprompt --nohup
And that’s it! Open a UPnP controller (BubbleUPnP or Kinsky). You should be able to select “MinimServer[pidisk]” as the library and play music from it.
9. Install MinimWatch
To configure and control MinimServer from your Mac, use the MinimWatch program. Go to the MinimServer downloads page again, download MinimWatch for OS X, open the .dmg file, and drag the MinimWatch application to your Applications folder. (Although I have not tried it, I expect the procedure will be similar for Windows or Linux.)
Before running MinimWatch, quit the instance of MinimServer running on your Mac (if there is one). Then run MinimWatch – you will get a minim in the menu bar with the same dropdown menu as when you ran MinimServer before:
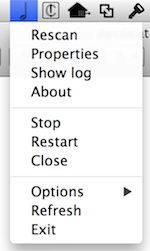
This time, however, the menu remotely controls the MinimServer running on the Raspberry Pi. If you add files to the PiDisk, for example, you can select Rescan to have MinimServer re-index the library. If you have trouble with MinimServer not finding the drive when it boots, open Properties and set a value for the DelayStart parameter.
You can see what happens on a reboot by forcing one now:
mymac:~ myname$ ssh pi@pidisk.local sudo reboot
The MinimWatch icon will go grey, then come back white. If it stays red, there is a problem.

10. Install BubbleUPnP Server
Log into the PiDisk:
mymac:~ myname$ ssh pi@pidisk.local
Create a directory for the download and change to it:
pi@pidisk:~ $ mkdir bubbleserver
pi@pidisk:~ $ cd bubbleserver
Download and unzip BubbleUPnP Server:
pi@pidisk:~/bubbleserver $ wget http://www.bubblesoftapps.com/bubbleupnpserver/BubbleUPnPServer-distrib.zip
...
2016-06-18 15:19:50 (288 KB/s) - ‘BubbleUPnPServer-distrib.zip’ saved [2867985/2867985]

pi@pidisk:~/bubbleserver $ unzip BubbleUPnPServer-distrib.zip
Archive:  BubbleUPnPServer-distrib.zip
  inflating: BubbleUPnPServerLauncher.jar
  inflating: LICENCE.txt
  inflating: bcprov-jdk16-146.jar
  inflating: launch.bat
  inflating: launch.sh
Launch it for the first time. This will make it download the “real” server program:
pi@pidisk:~/bubbleserver $ sh launch.sh

Jun 18, 2016 3:22:16 PM com.bubblesoft.bubbleupnpserver.launcher.Main main
INFO: data dir: /home/pi/bubbleserver
Jun 18, 2016 3:22:17 PM com.bubblesoft.bubbleupnpserver.launcher.Main main
INFO: first time setup: downloading BubbleUPnPServer.jar, please wait...
Jun 18, 2016 3:22:40 PM com.bubblesoft.bubbleupnpserver.launcher.Main main
INFO: downloaded BubbleUPnPServer.jar successfully
Jun 18, 2016 3:22:42 PM com.bubblesoft.bubbleupnpserver.server.Main initDataDir
INFO: data directory: /home/pi/bubbleserver
Jun 18, 2016 3:22:42 PM com.bubblesoft.bubbleupnpserver.server.Main run
INFO: starting BubbleUPnP Server 0.9-update19...
logging to file enabled
[main (1)                    ] INFO     - 24:00:00.59  - Main                        : starting BubbleUPnP Server 0.9-update19...
...
Now press Ctrl-C on the keyboard to kill the process. What’s needed now is to start the BubbleUPnP server as a daemon aka a server process. To do this, create and edit a new script file, /etc/init.d/bubbleserver:
pi@raspberrypi:~ $ sudo nano /etc/init.d/bubbleserver
Paste the whole of the following into the script file, then press Ctrl-O to write the file, hit Return at the confirmation prompt, and press Ctrl-X to exit the editor.
#!/bin/sh

### BEGIN INIT INFO
# Provides:          bubbleserver
# Required-Start:    $remote_fs $syslog
# Required-Stop:     $remote_fs $syslog
# Default-Start:     2 3 4 5
# Default-Stop:      0 1 6
# Short-Description: BubbleUPnP Server
# Description:       SImple start-stop script for BubbleUPnP server.
### END INIT INFO
set -e

NAME=bubbleserver
PIDFILE=/var/run/$NAME.pid
DAEMON=/usr/bin/java
DAEMON_OPTS="-Xss256k -Djava.awt.headless=true -Djava.net.preferIPv4Stack=true -Dfile.encoding=UTF-8 -classpath /home/pi/bubbleserver -jar /home/pi/bubbleserver/BubbleUPnPServerLauncher.jar -logLevel OFF"

export PATH="${PATH:+$PATH:}/usr/sbin:/sbin"

case "$1" in
  start)
        echo -n "Starting daemon: "$NAME
	start-stop-daemon --start --quiet --background --make-pidfile --pidfile $PIDFILE --exec $DAEMON -- $DAEMON_OPTS
        echo "."
	;;
  stop)
        echo -n "Stopping daemon: "$NAME
	# start-stop-daemon --stop --user 1000 --quiet --oknodo --make-pidfile --pidfile $PIDFILE
	kill -9 `cat $PIDFILE`; rm $PIDFILE
        echo "."
	;;
  *)
	echo "Usage: "$1" {start|stop}"
	exit 1
esac
Make it executable:
pi@pidisk:~ $ sudo chmod a+x /etc/init.d/bubbleserver
Check that it starts:
pi@pidisk:~ $ sudo /etc/init.d/bubbleserver start
Starting daemon: bubbleserver.
pi@pidisk:~ $ ps -ef | grep bubble
root      1036     1 30 15:32 ?        00:00:09 /usr/bin/java ... -jar /home/pi/bubbleserver/BubbleUPnPServerLauncher.jar
root      1048  1015  0 15:32 pts/0    00:00:00 grep bubble
Install it so that it starts when you boot:
pi@pidisk:~ $ sudo update-rc.d bubbleserver defaults
Now reboot:
pi@pidisk:~ $ sudo reboot
Wait a minute, then open Safari on the address http://pidisk.local:58050. You can now configure BubbleUPnP Server as described in my earlier article How to Stream TIDAL to the Raspberry Pi, and use one of the controllers listed in that article to access your library and TIDAL (or Qobuz).
11. Back up your image
An SD card is not generally considered a very reliable storage medium, it’s probably a good idea to back it up at this point. Shut down your Pi:
mymac:~ myname$ ssh pi@pidisk.local sudo shutdown now
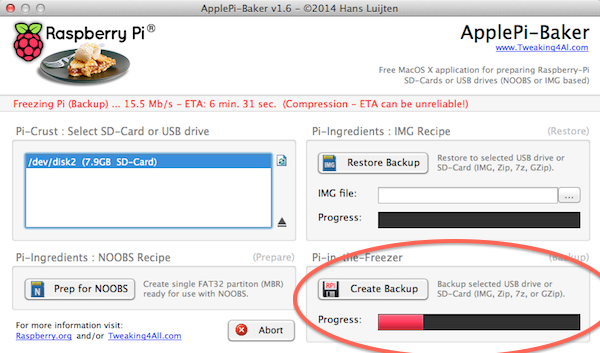
Then unplug the power, remove the SD card, and insert it into your Mac. Use the same program that you used to write it in the first place to make a backup copy. For example, in ApplePi Baker on the Mac, press the “Create Backup” button.
Once that’s done, eject it from your Mac, put it back in the Raspberry Pi, and reapply power. In future, you will be able to restore the backup image to another SD card that is the same size or larger.
Wrapping up (Part 2)
At this point, you have a functioning music server! With the help of a controller app (some of my favorite choices were given in this article), you can play back audio from your music library on the PiDisk to the Raspberry Pi streamer, as well as stream Tidal and play it on the streamer.
However, the method of loading files onto the PiDisk (dragging and dropping from the Finder) is not very good for a lot of large files. What we really want is an automated and network-aware method of doing so.
Until the next installment then.


Great article John, thanks for sharing.
As BubbleUpnp is an openhome renderer, you can use the truly excellent Lumin app (iOS, andriod) as the control point, which is far the best app I have come across for this function.
Looking forward to your last article.
Regards,
Milan
Hi Milan, thank you for the comment, indeed Lumin app is my preferred controller choice on my iPad, I should perhaps add some links to the article.
Why do you need BOTH Minimserver AND BubbleUPnP Server on the pidisk? How are they distributing the tasks? (serving music, rendering it)
Thanks,
Jim
Hi Jim, minimserver is the actual music server, and BubbleUPnPServer acts as a proxy that enables Tidal (and Qobuz) streaming as well as acting as an OpenHome renderer. However nothing stays the same and comments on more recent articles indicate that these are now possible in some ways e.g. https://www.hifizine.com/2018/07/droidisk-playing-music/#comments. With that said, this is still how I run my music server as it delivers what I need (and I know it works), although I now use the ODroid HC1 (per the linked article) instead of a Raspberry Pi.
Ok, thanks. I’ll be sending to my Chromecast Audio, and I know BubbleUpnP works (currently using it on my Win7 desktop), so I’ll stick with the initial instructions.
This is exciting! Although, literally 5 mins ago I clicked “purchase” on Amazon for my first Raspberry Pi — it’s disappointing to think I should have stopped here first and learned about an ODriod HC1. 🙂 I’ll go read that article now.
Hi Jim, the Pi did work fine 🙂
IT WORKS!!!
🙂 🙂 🙂 🙂
Thanks for much for this. Couple notes:
* I screwed up my fstab configuring Samba. Since I’ll be using rsync or similar for copying music to the drive, I backed out the changes and purged Samba. Seems an unnecessary step.
* Your instructions have bubbleserver set to start on boot, but not minimserver. Oversight?
* My USB is an old Western Digital “My Book” that I’ve had lying around the house for years. It’s NTFS. I figured I’d have to install drivers for it: but no, the Pi just mounted the USB automatically when I plugged it in! Pretty brilliant.
(I have a 3 B+)
This is fun. And so great to have the family room stereo back. Thanks again.
Hi Jim, cool, glad it’s working for you 🙂 I thought the default setting for minimserver was for automatic startup, but at any rate you can enable it by running minimserver/bin/setup, selecting y then y.
Interesting that NTFS mounted automatically… True, Samba is not necessary if using rsync to load up files. I have an article on using Resilio Sync for that nearly ready to go, which is a nice way to do it.
New article here, please let me know if you try it on your Pi 🙂 https://www.hifizine.com/2018/12/syncing-a-music-library-to-a-droidisk-or-pidisk/
HI John,
Thank you very much for the great explanation for setting up an Minimserver. I am happy all the day. Great job. Good to understand as well for somebody who has no glue from Linux. The only what did not work was the implementation of the automatisation process you described at part 3.
The command you have written doesn’t work for me.
But anyhow. I am so impressed that such a small devices streams my music to my Linn DSM.
Greetings from the heart of Europe
Dietmar
Hi Dietmar, glad it worked out for you! You could look at the article https://www.hifizine.com/2018/12/syncing-a-music-library-to-a-droidisk-or-pidisk/ for a different approach to syncing a library.
Dear John, I ‘m glad I found Hifizine and your DIY articles are excellent. I’m hoping you can steer me in the right direction. I’ve been looking for a way to make my own wireless music pre-amp processor that has the following features:-
1. Ability to incorporate 2.1 channels with a sub-out XO set at 80Hz. (Adjustable XO would be cool).
2. The ability to match L,R and Sub levels.
3. Integration with Spotify and Tidal where streaming can take place directly to the unit and controlled from a phone app such as 4Stream. Is this app free ? – Is it intuitive and easy to use ?
3. The option to stream from a mobile device or tablet via AirPlay or Bluetooth (Is AptX available/).
4. Any new way to stream music from a mobile/tablet via Wifi in a lossless manner ?
I could then use this with an outboard mini 2 channel class-D amp. Would be awesome to integrate the amp module too so it all sits in one nice little case.
Your input and advice will be appreciated.
Hi, I suggest get a Raspberry Pi and try Volumio and other distros for yourself 🙂 You can use USB to output to a DSP crossover with USB input, or get an SPDIF HAT like the HifiBerry to output to a crossover with digital input.
Hi.
Is there a way to run the RPi sever without adding an external drive?
Thanks
I’m not sure what you mean, if you had a large enough SD card you could store the music files on that. Or you could use something that has an “internal” drive like the ODroid HC1/HC2 – https://www.hifizine.com/2018/02/droidisk-an-inexpensive-compact-music-server/
HTH (?)
Hi John,
I have a NTFS drive (Maxtor M3 1TB) with 20GB FLAC files. Prompted by commenter Jim Hardy above I set up a pidisk skipping the formatting step. I used Buster lite. It worked apart from the pidisk has no content – the 20 GB of FLAC files aren’t showing up. When I copied some files across via Finder as recommended they do appear as content for pidisk and are available through Minimserver. If I plug the drive back into Mac the 20GB of FLAC files are there. I’ve searched for answers but no luck. Any ideas before I start again with a new drive formatted as ext4? I using RPi 3B+ so assume the USB has enough current for the Maxtor drive? regards Philip
Correction to my post: 200 GB of FLAC files. Wanted to use disk with these already stored rather than a new blank disk to save time having to transfer large amount. Additional point: there is a large question next to pidisk icon in Finder window though I can still connect as registered user.
Hi Philip, I’ve never used an NTFS formatted drive with the Pi. What path does the drive mount at – and is that what you added to minimserver?
Hi John, thanks for your reply. Not quite sure exactly how I did it but the existing FLAC files are now showing in Mac Finder as content of the pidisk and I can point Minimserver at the folder with FLAC files. This website seemed to provide the solution: https://raspi.tv/2012/how-to-mount-and-use-a-usb-hard-disk-with-the-raspberry-pi. Particularly cd /media pidisk then ls -l to show the top level directory. One drawback is that pidisk can’t be accessed if I unplug ethernet from router. I assumed that ethernet connection wouldn’t be required as RPi3B+ had wifi capability. I will investigate further.
Hi again, if I recall correctly you would use raspi-config to set up the Wifi. Bear in mind that Wifi is much less suitable than Ethernet for a server, even if it seems to be working there is high and variable packet latency. But I suppose it can’t hurt to try 🙂 (Sorry for the slow response.)
Thanks for your reply John, which I just spotted. My pidisk has been wired to router since February and is ‘out of the way’ so based on your advice I’ll leave it there. I’m having trouble installing Bubbleserver though. Java is installed (Minimserver running fine) and I’ve been following instructions on developer’s website but no luck to date.