How to Network your Mac music system with the Raspberry Pi and HiFiBerry – Part 2
In this, the second in this series of articles, I’m going to show you how to set up networked playback with your PiStreamer. (If you haven’t already, please read Part 1 to set up a Raspberry Pi with HifiBerry DIGI+ card first, as this article won’t make much sense otherwise. Part 3 will cover some additional topics.)
Networked music playback can be a bit… confusing. It’s not all that hard to do, but there are so many options and things that only partly work, that it can be a frustrating time if you start completely from scratch. I’m going to assume that you already have:
- A “PiStreamer” box, already set up as described in Part 1. (Please note: As of March 2016, the third-generation Raspberry Pi 3 still has “teething” issues. I recommend sticking to the Raspberry Pi 2 as described in Part 1.)
- An iTunes library running on a Mac.
- An iPad or laptop that you can use to control playback.
If this is your first time through this article, I suggest reading it all the way through. If you’ve come back to look for a specific section, here are the quick-links:
- System architecture
- The renderer
- The server
- The control point
- Playing music
- Going high-res
- USB DACs
- Concluding remarks
- Appendix A: Starting MinimServer automatically
- Appendix B: Enabling volume control
System architecture
The system architecture we are going to use in this article looks like this (there are other ways to do it, but I think this is the most straightforward):
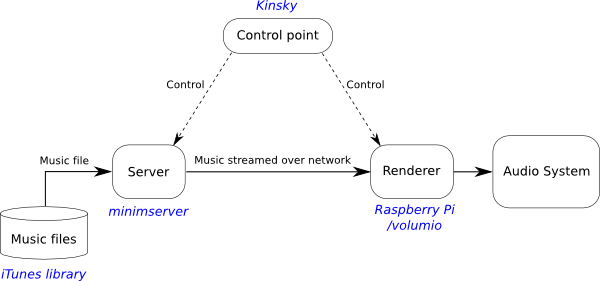
At the right is the renderer – this is the thing that actually plays audio. In our case, that is the PiStreamer running the volumio software, set up as described in Part 1 of this series. (If you haven’t already read that article, please jump there first, as the rest of this article won’t make any sense otherwise.)
At the left side is the server, which indexes the music files and sends them on command to the renderer. In this article, I am going to use a free program called MinimServer, which you can download and install on your Mac. (You can run it on other things too.) Most likely, you will run it on something like a Mac mini, which you can leave on all the time.
Finally, at the top is the control point, which is the user interface that controls music selection and playback. It sends commands to the server and renderer to make music playback actually happen. In this article, I will use a free program called Kinsky, which you can download and run on either a Mac or an iPad.
The following sections will show you how to set up each of these.
The renderer
As mentioned above, you will already have the renderer from Part 1. We need to make a small configuration change. Go to the Volumio web interface (either enter “volumio.local” into the URL bar of your browser, or click on the bookmark that you set up in Part 1 as suggested). Drop down the main menu (top right) and go to the System page. There, enable these services:
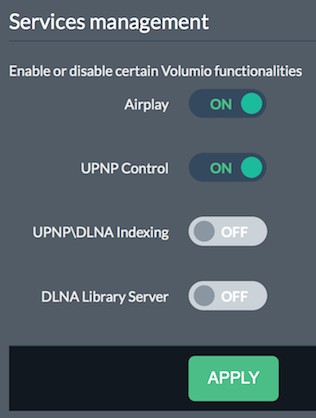
Then click “Apply.”
The server
I’m assuming you already have an iTunes library on a Mac. It’s probably best if it’s a machine like a Mac mini that you can leave on all the time. However, it could also be your laptop – it doesn’t really matter, as long as it’s turned on while you play music.
I’m not going to use Apple’s iTunes sharing. Instead, your existing iTunes library will just be used as music file storage, and a different piece of software called MinimServer will deliver (“serve”) those files over the network. Follow these steps:
- Go to the download page for minimserver and download the MinimServer install file for Mac OS X. (You don’t need the MinimWatch file.)
- Double-click to open the downloaded .dmg file.
- Drag the MinimServer application to your Applications folder.
- Navigate to your Applications folder, control-click on the MinimServer application, and select “Open” from the menu. At the next dialog asking you if you are sure you want to open it, say “Yes.”
- If you get stuck with any of the above, please see the MinimServer OS X installation page.
If that all went well, you should see a little note icon in the menu bar. (The note with an open circle is called a minim, by the way. It represents a note two beats long.) Pop down the MinimServer menu:
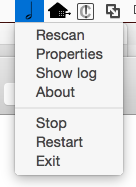
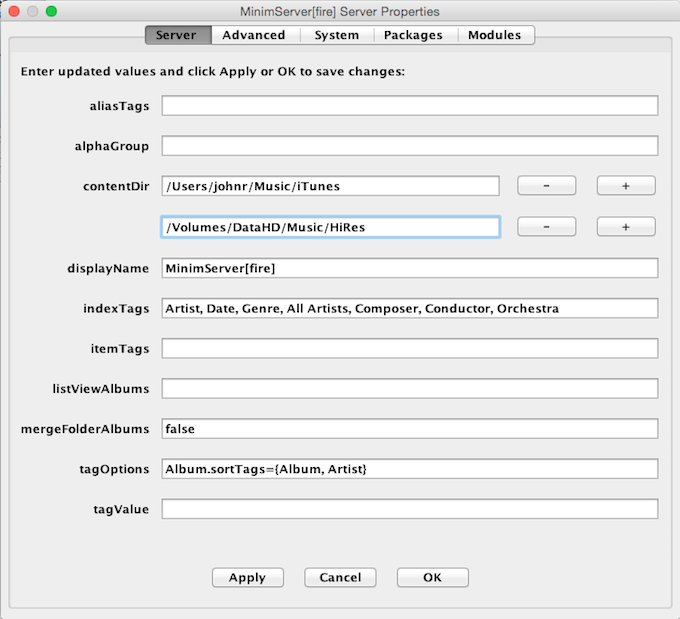
Select “Properties.” The only configuration that should be needed is to add an entry to the contentDir property. Here I’ve added my iTunes library:
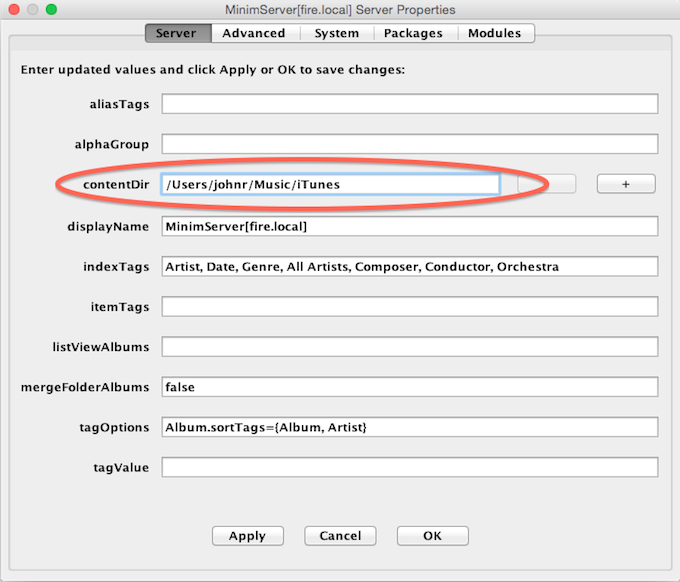
(You should be able to simply type the same thing in but substitute your username for mine. If you have located your iTunes library somewhere other than the default location, such as on an external drive, you will need to enter the correct path to it.)
The control point
The control point is the user interface that sends commands to the server and renderer to make control playback. I suggest starting with Linn Kinsky (which is free). You can install Linn Kinsky on your iPad from the App Store, or download Kinsky from here and install it on your laptop.
Start Kinsky on either your iPad or laptop. (The screenshots that follow are from the Mac version, because it’s easier to take screenshots, but the iOS version is almost the same.) Here’s the start screen:
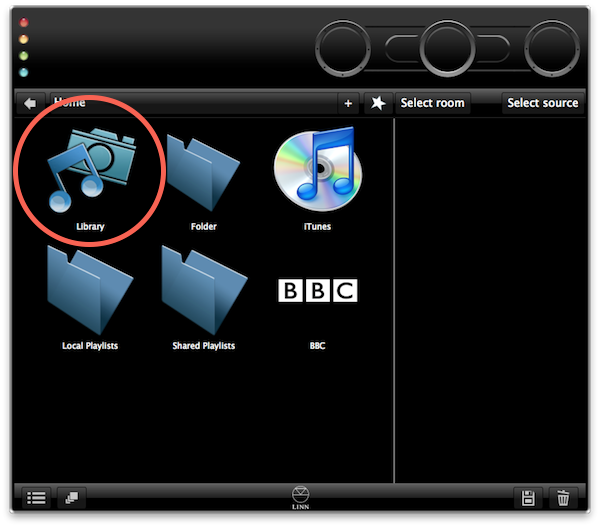
From here, we need to select the library and navigate it. Double click on “Library” at the top left, to see:
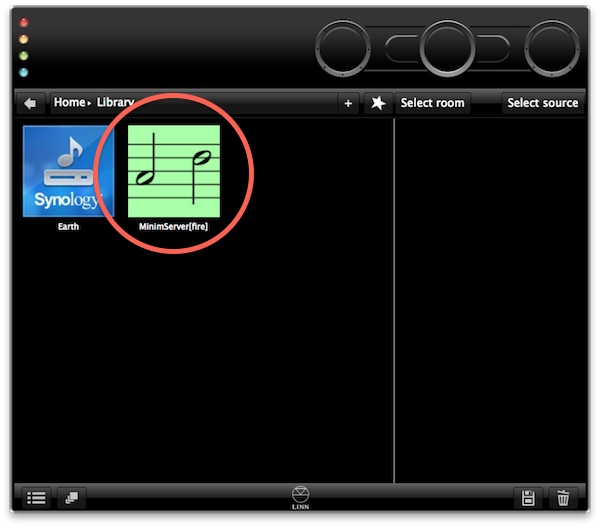
In my house, there are actually two uPNP servers running. We might look at the Synology one later, but for now, double-click on “MinimServer[fire]” (where in your case, “fire” will be the name of the computer that you are running MinimServer on). You will get to the top level of the library, which provides any number of ways of navigating the library:
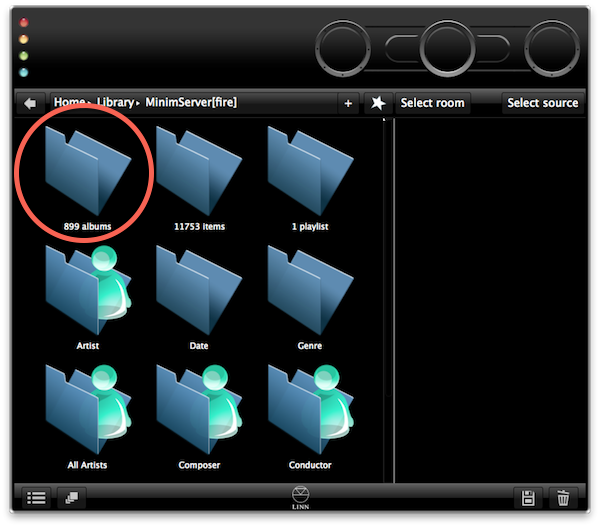
I find it easiest to just navigate by album, so if you double-click on that, you can then scroll through the library by album:
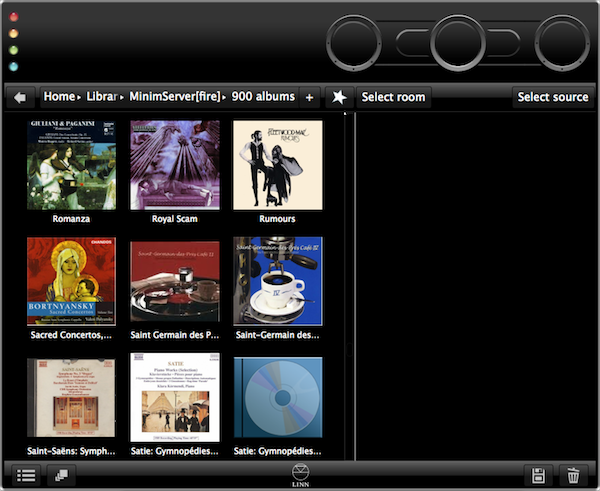
(I’ll admit that the Kinsky interface isn’t the zippiest once the library grows a bit, but I find it’s good enough. See Part 3 for some alternatives. In the example, you can see that there are some albums displayed without artwork – this is different from iTunes and I haven’t had a chance to really look into it yet.)
Play music
Now you need to set the destination for music playback. Pop down the “Select room” menu and select Volumio from the list:
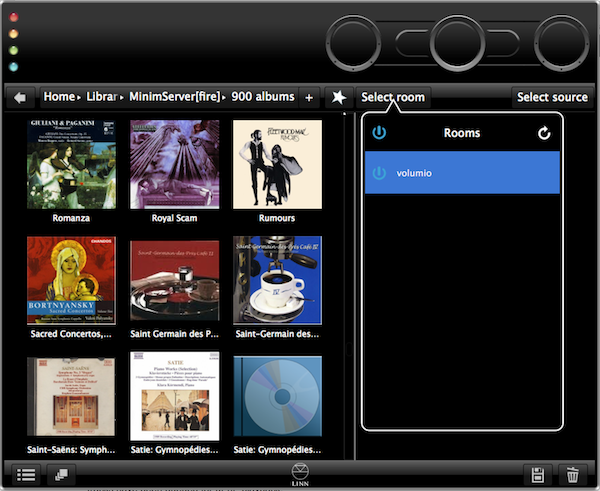
(You might be surprised – as I was initially – to find several devices listed here. Things like TVs and AVRs might appear here.)
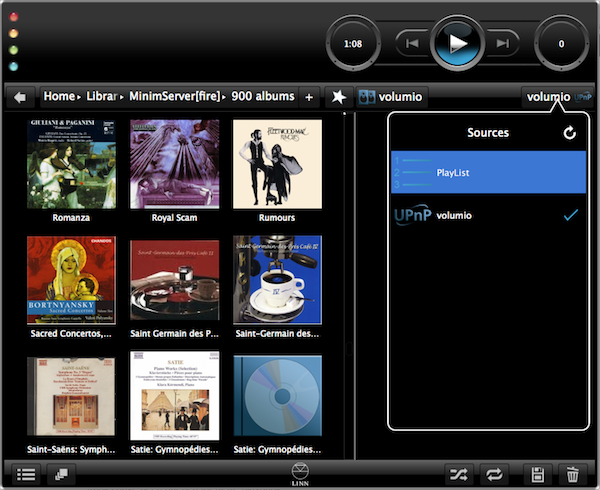
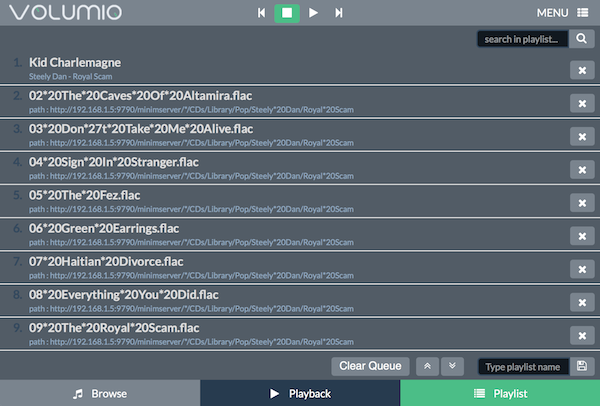
The final setting is the menu at the top right, which in all screenshots up to now was labeled “Select source”. After selecting volumio just above, however, it will have changed to “volumio”. Confusing, I know, but if you drop it down, you will see that there are two options, one called “PlayList” and one called “volumio”. Select the “PlayList” option (I find this works better):
OK, it’s time to play some music (finally)! Right-click on an album in the album list, and select the “Play now” option. The playlist on the right will update to show the list of tracks now in the playlist:
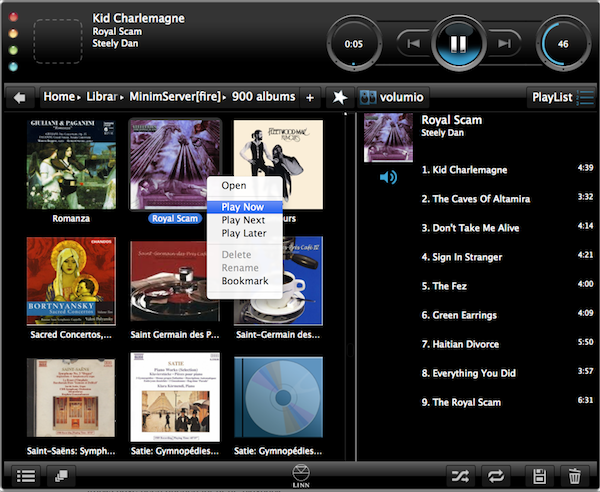
And… you should hear music coming out from your speakers! (Or headphones, or whatever you have connected to the output from the Raspberry Pi.) You can check the Volumio web interface to see that the tracks have been queued for uPnP playback:
And that’s it! You don’t need to do anything more. If you want to investigate, there are ways to change the way that MinimServer indexes and displays your music library to uPnP control points. You may also find that the interface is not as powerful as the music player that you are used to – for example, lack of or limited search, slower scrolling, and so on. I’d agree… but, on the other hand, you don’t have to be anywhere near a computer to do this, and you can send music to any PiStreamer anywhere in the house, and…..
Going high-res
iTunes is not able to handle high-resolution files very well. There are various workarounds, but I never really spent a lot of time figuring it out. Fortunately, with this setup, it’s very simple to add high-resolution albums to your PiStreamer playback. First, create a folder somewhere to store your high-res files. (You may already have some high-res files in a folder, in which case you can use that. Otherwise, create the folder and put some 44.1 kHz albums into it for testing.)
Drop down the MinimServer menu and go to its Properties again. At the right of contentDir, click on “+” and enter the path to the folder containing the high-res files. Here’s mine (the high-res files are on an external drive, hence the name starting with “/Volumes/”):
Click OK, then pop down the MinimServer menu again and (just to be sure) select “Rescan.” Go back to Kinsky and you should see the high-res albums in the album list, mixed in with the albums from your iTunes library.
How well does high-res playback with the PiStreamer work? Great! With the HifiBerry DIGI+, 192 kHz is no problem. With a sufficiently-capable USB DAC and a wired network connection to the Raspberry Pi, I was able to play DxD (352 kHz).
What about DSD? Well, for DSD playback to work, all three of the components in the system architecture diagram above need to “understand” DSD. In our setup, MinimServer (the server) and volumio (the renderer) do, but Kinsky (the controller) does not. So, DSD playback doesn’t work with the setup just described. However, with a different controller, it can work. In the next article in the series I will describe the use of BubbleUPnP for Android, which will enable DSD. (Note: for DSD playback, the DAC must be connected via USB.)
USB DACs
I suggested in Part 1 that you start with the SPDIF connection from the HifiBerry DIGI+ board to your DAC. I have found the SPDIF output to be more reliable than a USB connection. It’s not that USB doesn’t work, it’s just that with some DACs the USB hasn’t worked as well. (I really don’t know why.) Once you have the PiStreamer working, try a USB connection if your DAC has one – just connect a USB cable from one of the RaspBerry Pi’s USB ports to the DAC’s USB input.
In the Volumio web interface, go to the Playback menu. Drop down the menu next to “Audio output” and you should see your USB DAC listed there:
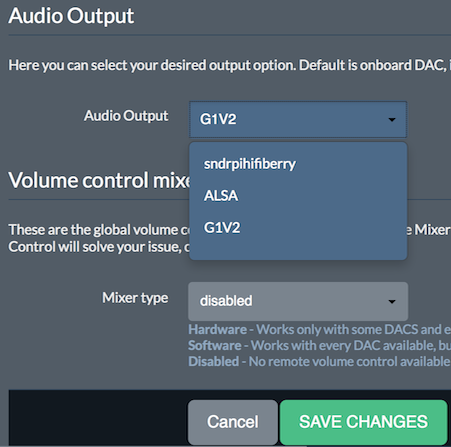
(In this example, the USB DAC identifies as “G1V2”.) Select your USB DAC, then click “Save Changes.” Wait a full minute, and then try playing audio again.
Concluding remarks
That’s it for this instalment! If you’ve followed through the steps above (and in Part 1), you now have a functioning networked Mac music system.
In Part 3, I’ll cover some miscellaneous topics, including more controllers, Airplay, WiFi, and using an Android tablet.
Appendix A: Automatically starting MinimServer
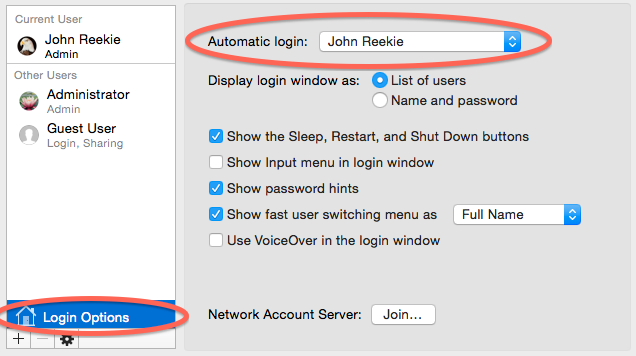
If the computer that you installed MinimServer on is a dedicated music computer, you may wish to have MinimServer automatically start up when it boots. (Note: I do not recommend this for a computer that has important files on it, and a laptop in particular, as it requires that you auto-login, which is very poor security. For a music server with nothing much critical on it, it doesn’t matter.)
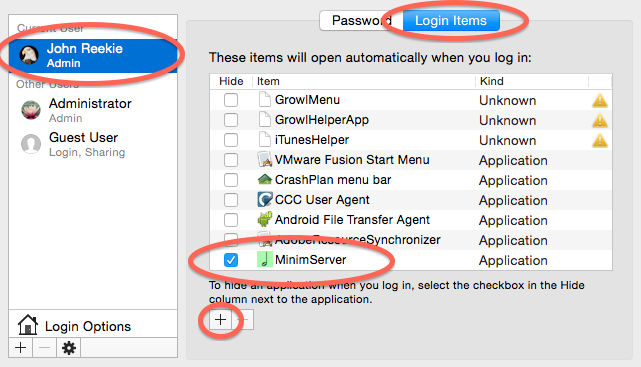
First, enable auto-login. Go to System Preferences, then Users & Groups. Click on “Login Options” and select your account near the top:
Next, select MinimServer to start automatically. Click on your username at the left and select the Login Items tab. Down near the bottom, click on the “+” icon and select MinimServer from the Applications folder. It will appear in the lst at the right. Click on the checkbox to enable it for auto-startup:
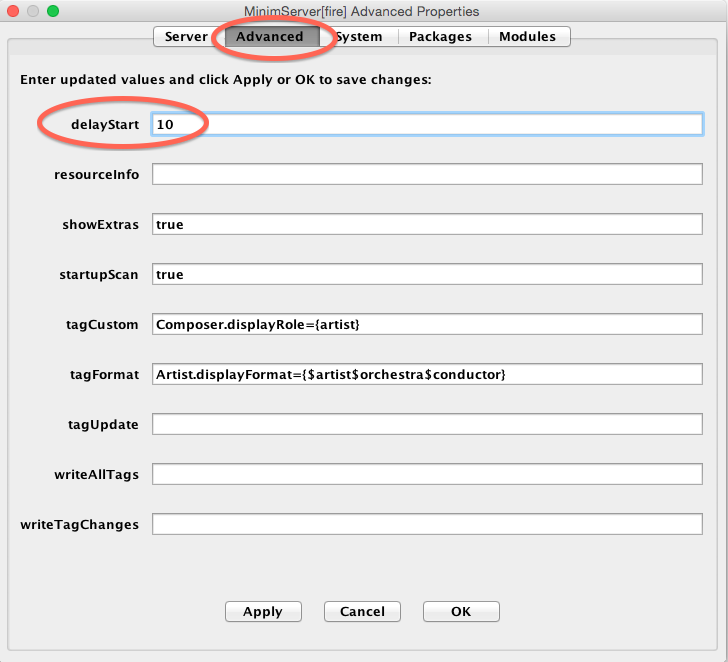
I have read that sometimes there can be an issue with MinimServer not finding the music files when it starts (which could happen if you had the files on a network drive, for example). I didn’t have any issues with this, but if you do, go to the MinimServer Properties and on the Advanced tab, set a startup delay:
Appendix B: Enabling volume control
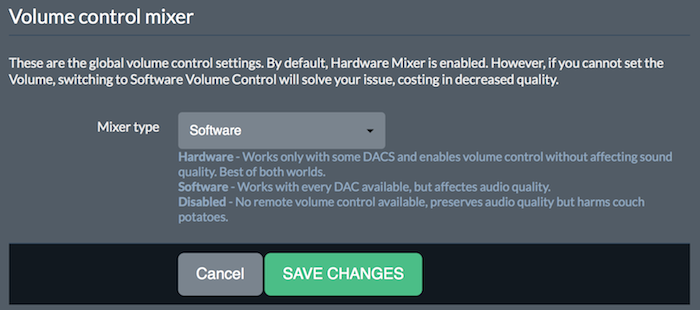
In Part 1, I recommended disabling volume control. This makes sense if the PiStreamer is connected into a system with a separate volume control. However, if not, you will want to enable volume control. Open the Volumio web interface and go to the Playback screen. Scroll down to “Volume control mixer,” select “Software,” and click “Save Changes.”
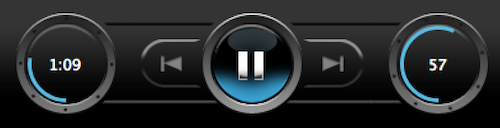
In Kinsky, you will see that the volume control widget is now enabled (on the right here, set to 57):
Acknowledgments
The author gratefully acknowledges the support of the following companies and individuals:
- HifiBerry, for providing the Raspberry Pi add-on board (DIGI+) and case used in this article.
- Patrick Dillon, for reviewing and commenting on the article prior to publication.


Have a growing music library which is 50%/ 50% split between Hi-Res and on hi Res FLAC files. Even have a small number of DSD albums. My music library is located on Synology DS415play NAS. The computer is Mac Book Pro, and the phone is Android Galaxy S3. I recently bought RPi3 and most like will buy Hifi Berry DAC and Digi +. I intend to listen to music with headphones connected to the headphone amp.
Given my system architecture and the above article, it seems to me there should be no issue getting a nice system up and running. Would like to know if you have any suggestions or changes to the article that in my particular case might help me out. Thanks
Hi Timothy, the only issue that I see there is that there are still teething issues with the RPi3. I’d suggest a RPi2 at this point in time. BubbleUPnP is a nice Android app for the controller (I use it regularly on my Nexus 7) and MinimServer have various installer packages for Synology so I would imagine there is one to suit your DS415play. (I have not installed minimServer on my Synology because I’ve set up another RPi as the music server… article forthcoming!) I would recommend the DIGI+ with external DAC over an onboard DAC.
Thank you, J.R. moving forward. DAC and Pi are on the way. Decided to be the Guinea pig with Pi 3 that way I might be able to add my experience in case others wish to avoid / adopt. Will post updates as soon as get my system installed and hopefully, running. Appreciate the articles yo have written on this and other topics.
Hi again Timothy, RuneAudio is running fine on the RPi 3 – http://www.runeaudio.com/download/
Hi. Two questions. First, does the Rasberry Pi support wireless capably? Second, why couldn’t I simply use a 128 GB micro SSD card with it and load all of my music onto the card in addition to the OS (I have a humble music collection)?
Hi Greg, you can if you like. See Part 1. [Update] With regard to wireless, I have now posted some notes in Part 3 – https://www.hifizine.com/2016/06/network-mac-music-system-with-the-raspberry-pi-and-hifiberry-part-3/#wifi
What I’m not entirely certain about here is the need for some of the additional server software. When I turn on Airplay Volumio shows up as a streaming device in iTunes and I use that (or the Remote App on my phone) to control the audio. Is the server really necessary?
Hi Danny, that is a really good question. It hits on a point that I haven’t explicated at all well in these articles. I had to think a bit to try and unravel my assumptions. As per the diagrams, there are several parts to a networked music system. You can group the things that work together and call them an “ecosystem.” The Apple music ecosystem consists of iTunes, Remote, and any player device that has Airplay on it, either officially or unofficially as in the case of Shairplay.
What I’ve been focusing on here is the “UPnP ecosystem.” MinimServer, the UPnP part of volumio (upmdpcli I believe), the various controller apps. This is a more “open” system that is a lot easier for anyone to be part of, including commercial streamers. It also allows higher sample rates (Apple’s Airplay is limited to 44.1 Hz), different controllers, different servers, different players, etc. In the next series of articles (first one just put up), I’m setting up a Raspberry Pi as the server so no computer is needed at all. But with all that open-ness comes some confusion (I found it confusing anyway), which is really why I thought I might try to provide a specific example of how to set up a system of this type.
There are more of these ecosystems. Commercial ones that I have zero knowledge of like Sonos and BlueSound. Squeezebox and Logitech media Server – there are Raspberry Pi distributions that support that, like picoreplayer and Max2Play. More recently, there is Roon, which seems to have rapidly evolved into much more than just “music metadata” and which I hope I will be able to write about in future articles.
So to answer your question, no, you don’t have to install the server software (MinimServer) or use other apps if you are happy with the Apple ecosystem. If you’d like to experiment with something else, however, this article is one approach. And yes, I should have thought about this more earlier and made it clearer 🙂 Thank you for the question.
For example, Qobuz and hi-res files make me try this solution…
But I would have preferred implantations with Volumio (for Qobuz streaming, and to mount my music server).
Any change in thoughts about using the newer Raspberry Pi 3?
Hi, I’ve been using the Rpi3 as my pidisk (server) and haven’t tried it recently as the player with the HifiBerry card. I see there is a new release of volumio, I would guess that it works fine with the Rpi3 but haven’t tried it.
Hi John,
I followed your advises and my Hifiberry reads my iTunes files. But there is still one problem Kinsky makes playlists from an album, but playing stops after each track. In Volumio under Queue I only see the current track.
I have MinimServer 0.8.4. update 99
Kinsky for mac 4.4.5.0
I hope you have a solution!
Thanks
Jan Aukes
Hi Jan, do you have “Playlist” mode selected in Kinsky?
A better solution is actually in fact to use BubbleUPnPServer and Kazoo, as I described in the more recent article here: https://www.hifizine.com/2016/06/how-to-stream-tidal-to-the-raspberry-pi/ (you don’t have to do the Tidal part, it is still an improvement just for playing files from minimServer).
Two questions:
1) Why would you need the HifiBerry DIGI card at all if you are going to be using the USB output?
2) Why don’t you use the Pi itself as the music server? Just plug in a hard drive that contains your music files (or a USB memory stick) into one of the USB ports on the Pi and set up Volumio to use this as the music source (just make sure you are powering the Pi with a charger that provides more than 2 amps or your hard drive won’t work). Volumio will still allow you to stream from Internet music sources but it will take music files directly off the hard drive/USB memory stick.
Hi,
1. You don’t need it. However, USB from the Pi hasn’t always been that reliable (see notes in the USB DACs section above) – with that said, it does seem to have improved a lot – at least with the gear I have on hand – in the 2 1/2 years since I wrote this article. Right now I’m listening to an RPi 3B+ feeding a Topping NX4 DSD via USB and networked with Wifi.
2. You can do that if you want to but it doesn’t really help if you want to have centralized music storage and multiple Volumio/whatever destinations. IOW I don’t really think of that as a networked music system. Also, AFAIK you can’t stream Tidal that way. There’s definitely merit though in having a Pi run as the music server and there are a couple of later articles on that. However my preferred solution now is an ODroid HC1.