MOTU Microbook II
One of the drawbacks of inexpensive audio interfaces, when used for acoustic measurement, is that there is no precise and repeatable input gain setting. While this is an acceptable trade-off for cost, it can be, every now and then, rather inconvenient. For example: you may want to run a nearfield measurement of a sub and then return to an in-room measurement; if only you could precisely set and reset the gain to do this. Unfortunately, precise input gain is typically only found on more expensive audio interfaces – so my eyebrow shot up when I noticed the press releases for the MOTU MicroBook II advertising the “digitally-controlled analog gain” on the microphone input.
I waited quite some time to get one, and eventually did from the venerable Turramurra Music on Sydney’s North Shore, almost by accident. I was in there to get the Focusrite Scarlett 2i2 that I reviewed in our last issue, and they happened to have just gotten the MicroBook II in. So I walked out that day with two interfaces under my arm. In retrospect, this may be an example of the good side of the Impermanence of Technology; I had just paid less than my old (and now sold for a song) Roland UA-25EX a few years ago, and gained a whole lot of interesting functionality. Read on for more….
A note on this review: my interest here is the use of the MicroBook II as a measurement and diagnostic accessory for the two-channel hifi enthusiast. If your interest is in using the MicroBook II with a DAW (Digital Audio Workstation) and/or for audio recording, please note that while I expect you will find useful information in here about the MicroBook II, I won’t specifically be testing those aspects in this review.
Getting acquainted
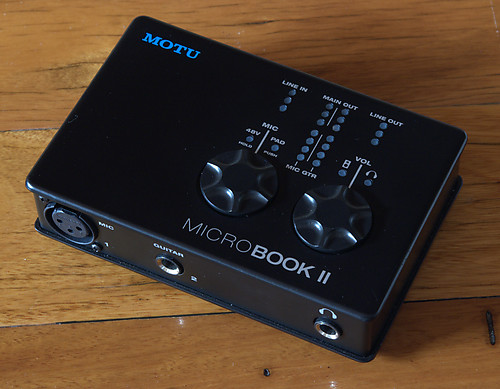
The MicroBook II makes a good first impression. It’s nestled within a foam… cave… within the box. Taking it out and setting it on the desk, it reminded me of the black ship belonging to Hotblack Desiato, from Hitchhiker’s Guide to the Galaxy. “Every time I press one of these black controls, labelled in black on a black background, a little black light lights up black to let me know I’ve done it.” OK, it’s not quite like that, but even if you’re not a HHGTTG fan, hopefully you get it – it’s black.
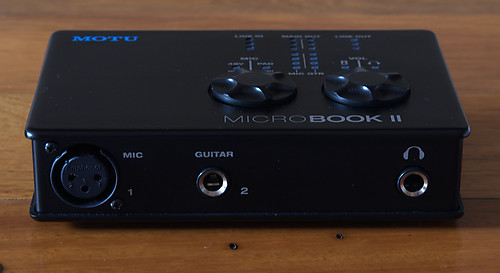
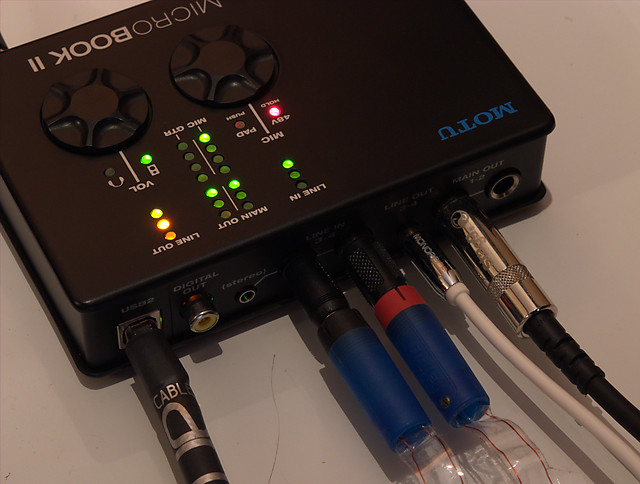
The front panel of the MicroBook II is fairly straightforward, with XLR and TRS jacks for the two inputs for microphone and “guitar,” and a 1/4″ headphone output socket.
The back panel is a little more crowded, with a mix of inputs and outputs in different plug sizes. Apart from the USB connector, there are two balanced TRS output jacks for outputs 1 and 2, a stereo (unbalanced) minijack for outputs 3 and 4, a pair of TRS jacks for inputs 3 and 4, and a stereo minijack also for inputs 3 and 4. There is a lone RCA jack for the S/PDIF output.

The star of the show, from the outside anyway, is the top panel, which has two “soft” rotary controls and an array of LED indicators and meters. The left control adjusts the gain of the microphone input. It can be pressed to turn on a 20 dB attenuation pad, and held down to turn phantom power on and off. The right control adjusts output gain, of either the main output, the headphone output, or both. You select between these options by pressing on it.
I love these rotary controls – I’ve been using the MicroBook as a headphone DAC/amp for a bit of late-night listening lately, and to adjust volume you just kinda flick your finger around on the control. It’s a very touchy experience. When performing acoustic measurements though, I wish there were an indicator of the setting without having to look at the computer.
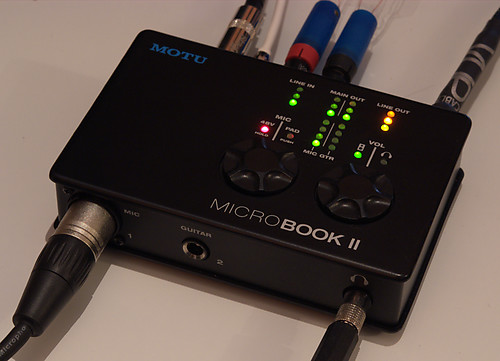
The LED meters are useful for what they are, but you do have to learn them, as there are several different types. The mic and guitar inputs have a 4-LED display, with two green, one orange, and one red, which come on at around -40, -26, -7 (orange), and -1 dB (red). The main outs have a 3-LED meter for each channel, which come on at about -40 (green), -13 (orange), and -1.4 (red) dB. The Line In and Line Out have a single 3-LED display for both channels, and the headphones don’t rate a meter. There are also two LED indicators for the mic input: for phantom power, and the 20 dB pad.
A surprise with the metering is that the Main Out and Line Out LEDs don’t actually meter the output level – rather, they meter the signal that is being sent to these output channels before processing and volume control. I assume there is a reason for this that makes sense in music-production land, but it isn’t what I expected.
My griping about the meters aside, physically the MicroBook II really works well for me: it’s compact and unobtrusive, has those two easily accessible rotary controls on top, and the metering is useful once it’s understood how it works.
Digging Deeper
Internally, the MicroBook II is a bit more complicated. I have to admit that when I first got it home, it was some time until I could even play an audio file through the headphones – usually the easiest way to check out a new interface. I struggled with it for a while, and eventually realized that I was thinking about it all wrong. A block diagram may help to understand how it works – see Figure 1.
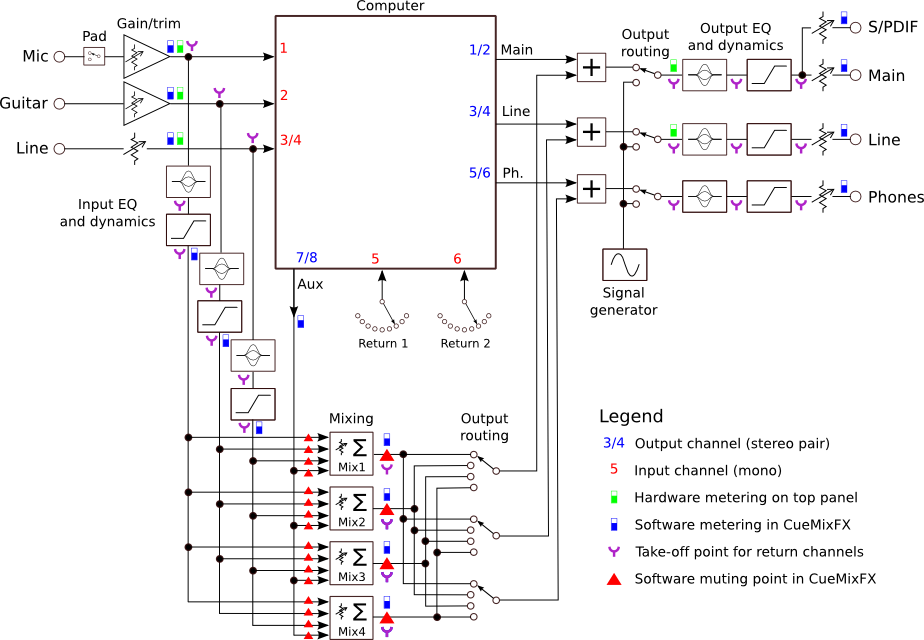
Figure 1. MOTU MicroBook II Block Diagram (click for larger)
The key realization that the diagram shows is that the headphones are a distinct output channel – you have to tell the computer specifically to send audio to channels 5 and 6 to get headphone audio – they don’t “follow” the main outs as in other interfaces.
Let’s cover the diagram in broad sections. At the top center is the computer. What happens in the computer depends on what software you are running – we will see specific examples below. From the computer’s point of view, there are six input channels and eight output channels, all of which can run simultaneously over USB at sample rates of up to 96 kHz (and 24 bits).
At the left are the inputs to the MicroBook itself. There is a single microphone input, a “guitar” input, and a stereo line input. The first two pass through an adjustable gain block, while the line input can only be attenuated. The microphone input also has a switchable 20 dB pad (attenuator), greatly extending its usefulness.
To the bottom of the diagram is the mixer section. There are four separate mixes, each of which mixes the mic, guitar, and line inputs, as well as an Aux pair from the computer (output channels 7 and 8). The mic, guitar, and line signals are each passed through their own EQ and dynamics (compression and limiting) block before being presented to the mixer. Each mix can be selected for any output channel.
To the right are the output channels. Each of channels 1 through 6 pass through a summing block that adds the selected mixer signal to the signal from the computer, a switch to select between audio signal or a test signal, an EQ block, a dynamics block, and finally the output gain control. The S/PDIF output mirrors the main output signal, but has its own gain adjustment.
Finally, there are two additional input channels from the MicroBook to the computer, called the Return channels, which appear as input channels 5 and 6. These channels can be set to receive the signal from any of the locations marked with a little purple “socket” in Figure 1 – as you can see, there are a lot of locations.
CueMixFX
Everything about the MicroBook is configured with the supplied CueMixFX program. Here are some screenshots to illustrate the flavour and overall layout. There are three regions to the CueMixFX window, as shown here:
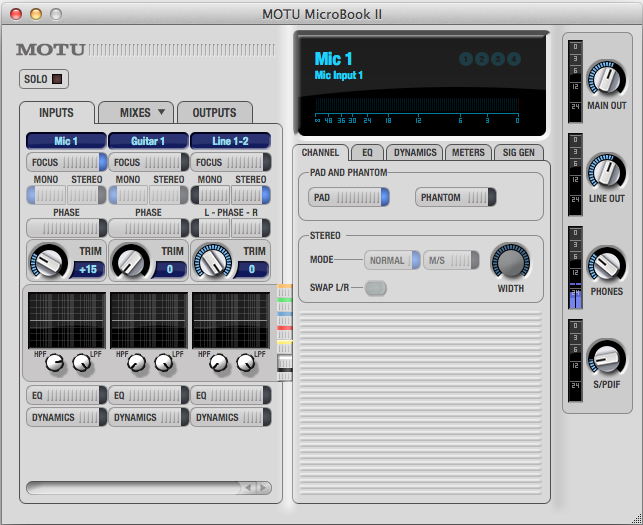
CuemixFX Input Tab
In the left 40% of the screen are the control strips for inputs, mixes, and outputs, each set of which is selected by a tab near the top. In this example, the Inputs tab is selected. In the centre-right portion of the screen is information related to the channel or mix that has the “focus” that has been selected in the left panel – in this example, the mic input. At the far right are the level controls for the outputs: main out, line out, headphones, and S/PDIF.
This screenshot shows the Mixes tab:
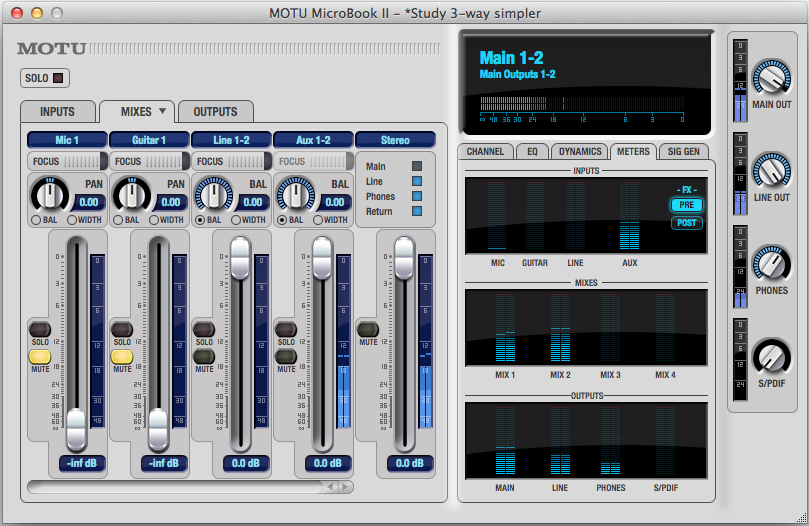
Each of the mic, guitar, line, and aux inputs has its own strip with gain adjustment and mute controls. The line input can be treated as a single stereo pair (as shown here), or as separate mono channels. With the stereo channels, the balance can be panned left and right, or a “width” mode can be used to cross-feed the signal by a variable amount, with a mono mix being the result at zero width. A nice touch in the user interface is that you can rename each mix, to give them more meaningful names than “Mix 1”, “Mix 2”, etc – in this example, I renamed Mix 1 to “Stereo”, as that’s how it’s used in the active crossover configuration discussed later in this article.
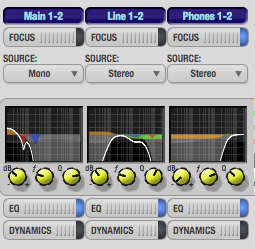
This screenshot shows the Outputs tab:
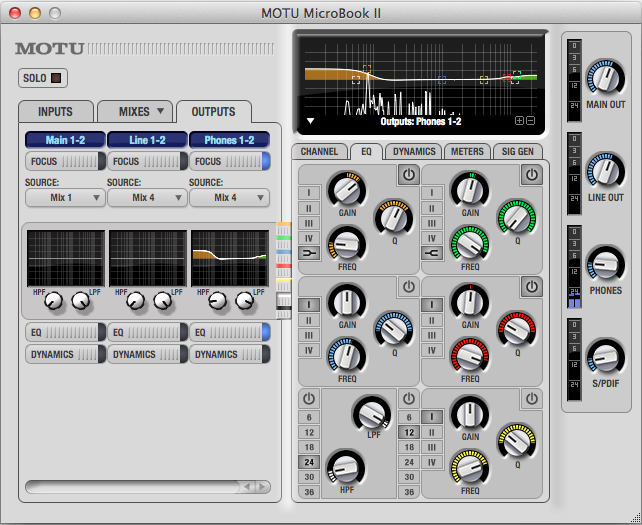
CuemixFX Output Tab
In this example, the headphone output has the focus. In the center-right portion of the screen, I have selected the EQ tab, and so the 7-band EQ controls are shown, along with the frequency spectrum through the headphones in the top section.
The combination of all of these features results in a surprising amount of flexibility. In the Sample Applications section below I’ll work through some specific configurations that I’ve found useful.
Loopback Measurements
I ran a series of tests on the MicroBook II using my standard “simple test protocol for soundcards“. Figure 2 shows the frequency response at 44.1, 48, and 96 kHz sampling rates, as reported by FuzzMeasure Pro, with the main output connected back to the mic input. It’s about a dB down at 20 Hz and at 36 kHz, when operated at 96 kHz sample rate. At 44.1 and 48 kHz sample rates there’s a small peak prior to cutoff.
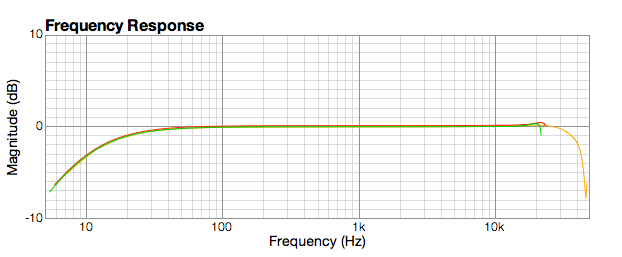
Figure 2. MicroBook II frequency response
Figure 3 shows the harmonic distortion of a 1 kHz sine wave, as reported by the Electroacoustics Toolbox, with the output and input gains set so that 1.0 V RMS is equal to a full-scale digital signal. The THD calculates out at -103 dB. There are some spurious digital noise components visible here, but they are all very low in level – under -120 dB.
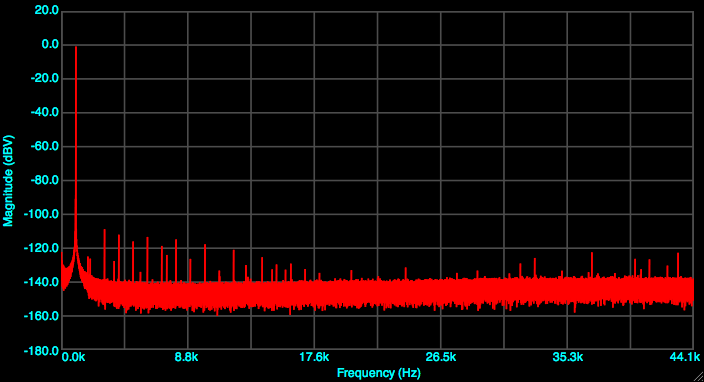
Figure 3. MicroBook II Harmonic Distortion at -1 dB FS
To check inter-modulation distortion, I used the CCIF method with 19 and 20 kHz sinusoids. To avoid clipping in the signal generator, each sinusoid was scaled down to 50%, and the signal then scaled down to -1 dB peak. Figure 4 shows the IMD spectrum of the MicroBook II. The odd-order components are 100 dB down, and the even-order components almost 110 dB down.
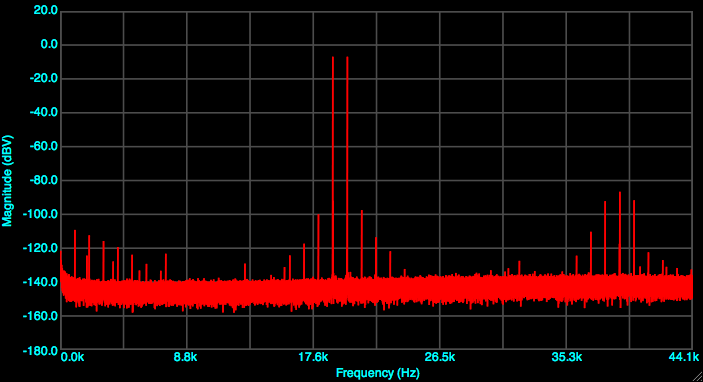
Figure 4. MicroBook II CCITT IMD at -1 dB FS
I believe these results are excellent in general, and especially good for a bus-powered device. The low distortion and general lack of noise makes the MicroBook a good candidate for use as an inexpensive tool for audio-frequency measurements of electronics components as well as for acoustic measurement.
Sample applications
During my time with the MicroBook, I have found it a bit chameleon-like – in a good way – in its ability to adapt to a broad set of uses in an audio system. In this section, I’ll illustrate with some specific configurations. Each configuration can be saved within CueMixFX and reloaded at any time in the future; in addition, the set of configurations can be exported to a file for loading onto another computer.
For acoustic measurement
As noted in the introduction, the key feature that triggered the purchase of the MicroBook II is the digitally-adjustable gain control on the microphone input. MOTU states on their website that it provides “adjustments in approximately 1 dB increments”, which is perfect for many applications in acoustic measurement where a repeatable and known gain setting is needed. Unfortunately, the gain adjustment turns out to be in 3 dB increments, not in 1 dB increments as promised. So I can’t set the preamp gain to, say, 40 dB gain – I have to use 39 dB and adjust something somewhere else. It’s still handy, just not quite what I really wanted. Still, other interfaces in this price range only have an analog knob.
Figure 5 shows the configuration for acoustic measurement. The speaker measurement program feeds a test signal through output channels 1 and 2, and reads the microphone signal on input channel 1. I’ve used this configuration quite a lot recently with FuzzMeasure Pro. With Room EQ Wizard (REW) on the Mac, limitations in the handling of multi-input interfaces in the underlying JavaSound layer means that a workaround needs to be used – this has been working well so far.
On Windows, REW worked without a hitch the few times that I tried it. I also tried some testing with ARTA, and it seemed to work fine. But I am not an ARTA or Windows user in general.
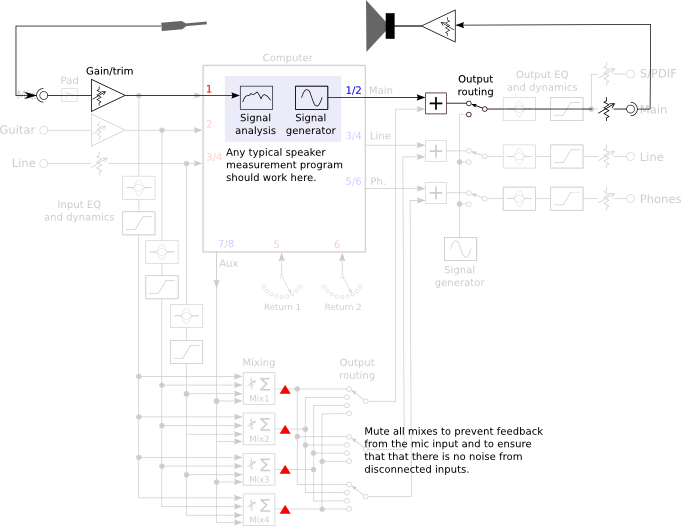
Figure 5. MicroBook II used for Acoustic Measurement
As a multi-channel DAC
Since it has three sets of stereo analog outputs, the MicroBook II can be used as a six-channel DAC. A number of adaptors or adaptor cables will be needed: TRS balanced for the main outputs, stereo 3.5mm for the line out, and 6.5mm stereo for the headphone out. An obvious application for this capability is an computer-based active speaker system, with the music player and crossover being done in software on the host computer. This configuration is illustrated in Figure 6.
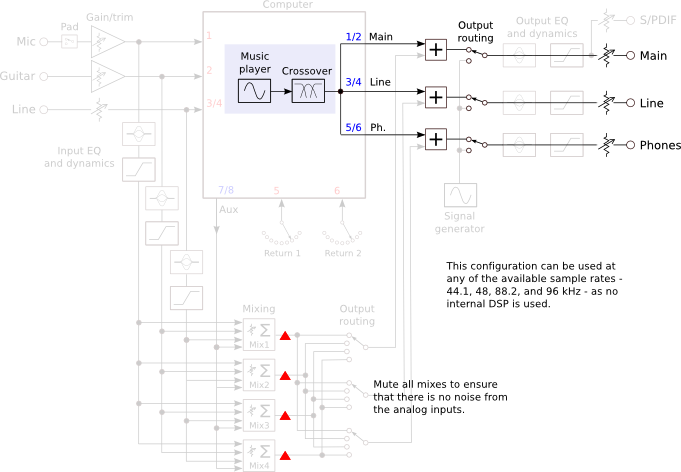
Figure 6. MicroBook II as Multichannel DAC
To try this out, I used the MicroBook II as the multi-channel DAC in a prototype 3-way system, using Pure Music as the music player and active crossover, with FabFilter Pro-Q running as a plugin in Pure Music for equalization. The MicroBook worked well, delivering a clean and noise-free signal in both cases. I won’t claim that it’s a high-end solution – for that, take a look at the Pure Music Supported Soundcards page – but for prototyping or for a budget system, it’s excellent.
This configuration can be combined with the measurement configuration in Figure 5. Pure Music has a “playthrough” mode that allows you to feed the output of the measurement program through Pure Music, and thus the associated crossover and equalization software. Combined with an inexpensive calibrated microphone, you can do all of your design work with just the one box.
As an active crossover
As it turns out, the MicroBook II can also be used as a standalone active crossover. The key feature that enables this is the presence of the EQ block on each output channel, which includes a high pass and low pass filter with selectable slopes. The slopes are all Butterworth – no Linkwitz-Riley.
(Note that – at least on the Mac – the filter slopes were incorrect in early versions, which was apparently an issue with CueMixFX. The version of CueMix FX that MOTU provided me that corrected the problem was 1.6 55864, so if yours is an earlier version you may wish to check for an update.)
To use the MicroBook as an active crossover, I configured it as shown in Figure 7 below. This configuration can only be used at 44.1 or 48 kHz sample rates, as the onboard DSP is inactive at 88.2 and 96 kHz. The music player on the computer must be set to feed the Aux channels i.e. output channels 7 and 8, which is fed into two mixes: Mix 1 passes the stereo signal unaltered, while Mix 2 is set to merge left and right into a mono signal for use with a subwoofer. (Use the “Width” mode on the input channel strip and set the width to zero.) Each output channel is switched to get its signal from Mix 1, unless it’s driving a mono subwoofer, in which case it is switched to Mix 2.
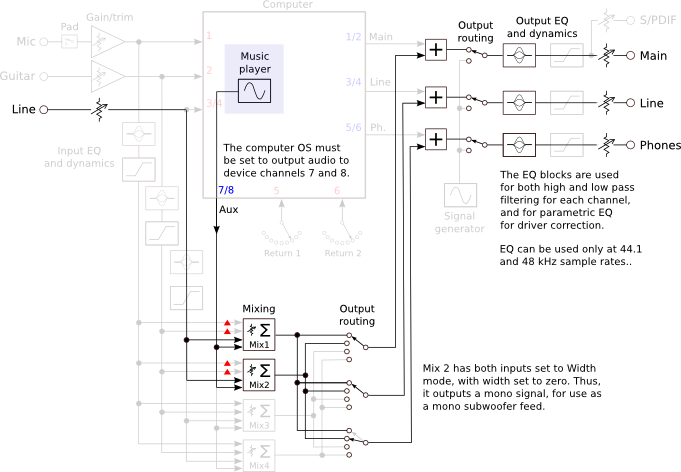
Figure 7. MicroBook II as Active Crossover
There are seven parametric filters on each output channel. Two are the high pass and low pass filters that we use to implement the crossover. That leaves five for driver response correction, two of which can be shelving filters. The peak/notch filters offer a choice of four different types of response, which I have graphed here. I found Type II to be the most useful for this application.
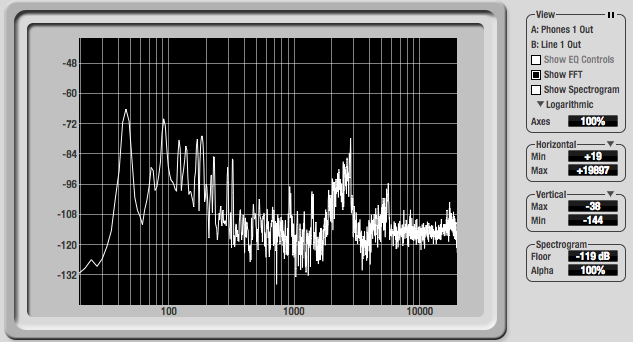
The filter controls on the CueMixFX main screen are small and fiddly to use. There is a way to get a much better interface, which is to use the Return channels and the FFT Analysis window. In the Device Setup menu, select the left and right channels being equalized, and then open up the FFT Analysis screen. Provided that EQ is turned on, the FFT Analysis window shows the EQ curve with grabbable control points for the enabled filters.
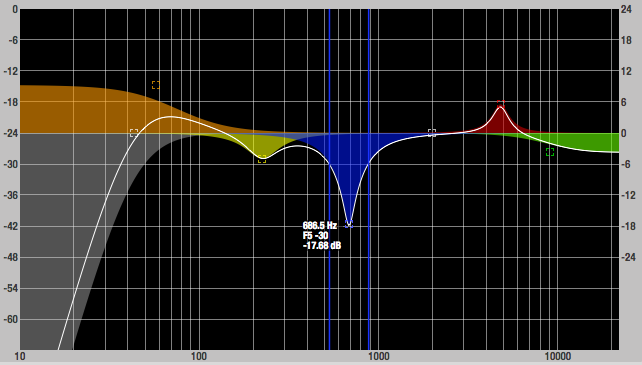
MicroBook II FFT window showing EQ controls
Configured as shown in Figure 7, the MicroBook can also accept an analog input signal on the line inputs. If your source doesn’t have its own volume control, you can control volume with the Trim control on the Input screen. The Line input does have a fairly high signal level and it has no gain (only attenuation), so there may some sources that will not provide enough signal to drive the system to full output. At home, I didn’t find this to be a problem, but if you do, you can work around this using the Dynamics block.
I have to admit, I chuckled to myself for quite a while after figuring out this configuration. I’m currently listening to a small 2-way-plus-sub system in my study using the MicroBook in this configuration. It works just as expected driven by USB from my laptop, using Pure Music as the player (Pure Music makes it easy to send the audio output to the required output channels 7 and 8). For the analog input, I tried a CD player, a Pure i-20 dock with an iPod touch, and a direct connection from the iPod touch to the mini-jack line input. All of them worked fine.
You might be wondering at this point if you can use the MicroBook II as just an analog in-out crossover – in other words, once the crossover parameters are set up, can you just connect the USB port to a power supply and leave the computer out of the picture? And the answer is: yes, you can. With the current version of the firmware (1.04), no computer is needed for the MicroBook to start up and operate with the most recent configuration. I’ve settled on using it this way in the little study system with the iPod touch and Pure i-20 dock, as it’s nice to not have the laptop tethered to the USB cable (it stays cooler as well).
So, here is a tiny box that will do a full 3-way (or 2-way plus sub) active crossover with EQ, with both USB digital input and analog input, for around $250. Compared to a typical DSP crossover, you lose some choices of crossover slopes and the ability to set delays on each channel. But you gain, with the addition of an inexpensive calibrated microphone, the ability to use the same box for doing the speaker/room measurements of the active system at the same time. It may not be true high end but… for a second system or for prototyping with a little take-anywhere box of tricks, it’s just brilliant.
Other applications
Because of its flexibility, I’ve found the MicroBook II useful in ways that I hadn’t anticipated. For example, when measuring the crossover functions in Pure Music for a forthcoming article, I fed one channel’s high and low outputs into the two line inputs. I also created a mix that summed the two inputs and set the mix output as one of the return channels. I was then able to measure the high pass output, the low pass output, and the summed output, with a single sweep in FuzzMeasure Pro.
Monitoring and diagnostic functions
One of the unusual features of the MicroBook II is a set of diagnostic functions built into it. First up is a set of basic test signal generators. Each output channel can be set to output a sine wave, pink noise, or white noise. The main caveat with the sine wave generator is that it can be hard to set the exact frequency that you want.
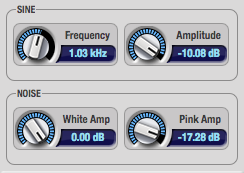
MicroBook II signal generators
The next feature to mention is the soft metering – built into CueMixFX is a metering screen that monitors the signal in a bunch of locations. The locations are shown as the blue bars in the block diagram of Figure 1.
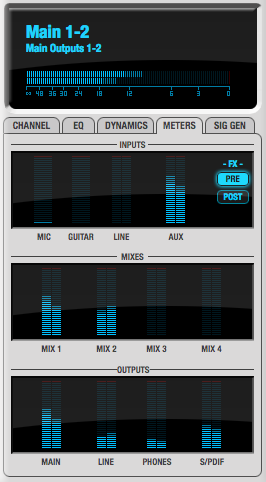
MicroBook II Metering Pane
A more elaborate set of analysis tools is available from the Device menu. You have to first go to the Setup menu and select two signals to send to the computer on the Return channels. The locations that you can select are shown with the purple connector in Figure 1. Once you have done that, you can analyse the signals present at those locations with any of the five tools available: FFT Analysis (with optional spectrogram and EQ control curve), Oscilloscope, X-Y plot, Phase Analysis, and a tuner/frequency meter.
The FFT window displays a single FFT plot of the return channels. There is only one plot, so the two return channels are summed before being passed through the FFT.
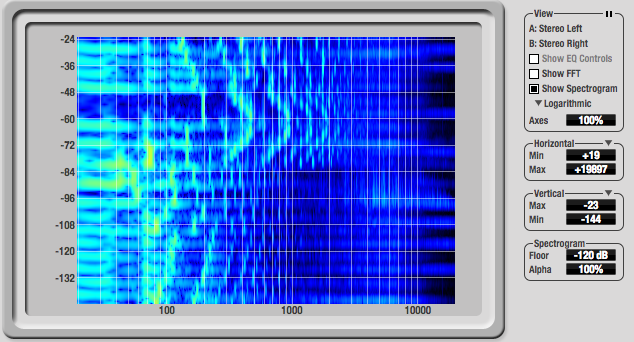
It can also be set to display a spectrogram:
The oscilloscope is useful mostly when passing test signals through the system. Each return channel is displayed independently, although both share the same horizontal and vertical scale.
MicroBook II Oscilloscope window
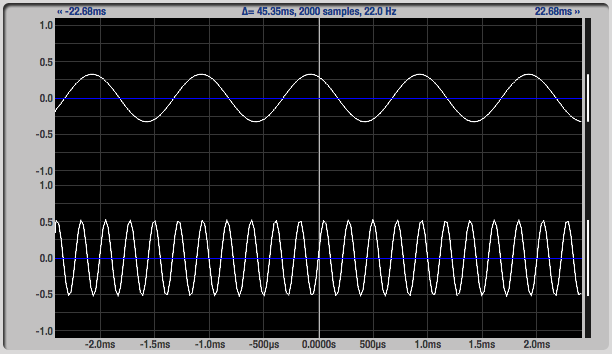
Finally, of the tools that I have used so far, the Tuner window is intended for instrument tuning, but it has a handy frequency meter reading in the top left corner. Now and then, this can be useful – I used it when a measurement program I was using seemed to be generating the incorrect frequency – the frequency meter was a simple way to check it.
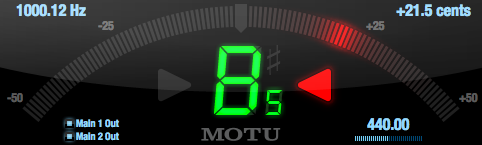
MicroBook II Tuner window
When first reading about the diagnostics tools in CueMixFX, my initial thought was that they wouldn’t be that useful. However, I’ve since changed my mind about that, as just having them there in the audio interface is very convenient and can save starting up another program to add to the others that are already competing to access the audio streams in and out of the computer. Combined with the flexibility of the Return channel selection, they are very useful tools for debugging a configuration or system and checking things like levels and frequency content.
Caveats and limitations
It seems a bit petty to have a whole section for limitations of the MicroBook II, considering that it’s a $250 gizmo that does so much. On the other hand, it’s easy to assume that it does something that it doesn’t. To avoid disappointment, I provide the following notes.
- The gain increments for the microphone input are in 3 dB steps, not 1 dB steps as advertised. While CueMixFX will show 1 dB steps when adjusted on-screen, the actual gain steps only change every 3 dB.
- The EQ and dynamics blocks work only at 44.1 and 48 kHz. While quite reasonable given how DSP has to work, it may come as a surprise. It would have been “nice” if MOTU could have made them work at the higher sample rates but with lower capability – for example, fewer EQ sections.
- The shelving filters in the EQ blocks only have a maximum of +/- 12 dB of gain, although CueMixFX will show +/- 20 dB.
- Like most inexpensive devices, the MicroBook II emits an audible pop when powered on and off. It’s not likely to damage anything, but nonetheless I recommend that your power amps are turned off when connecting and disconnecting the MicroBook.
- On the Mac, in order for the MicroBook to work with Room EQ Wizard (REW), you will need to use the workaround that I have documented here.
It used to be that the MicroBook II didn’t always initialize properly if you boot the computer while the MicroBook is connected. Since the firmware update (to version 1.04), I haven’t been able to reproduce this, so MOTU seem to have addressed this issue.
Finally, there is a learning curve. If you’re the type of person who want to plug it in and have it “just work” then the MicroBook II may not be the best choice for you.
Concluding remarks
The MicroBook II is an audio geek’s Swiss Army knife: an incredibly handy set of tools in a compact package. The role of acoustic measurement interface is fulfilled without fuss – my disappointment with the microphone gain increments notwithstanding – and the multi-channel DAC and standalone active crossover configurations work well and are a dream for a portable prototyping/experimenting tool. The onboard diagnostics are very useful and the extensive soft metering and analysis tools help when trouble-shooting a system and during initial setup. Even just as a simple portable USB DAC/headphone amp, the MicroBook II works well enough if you don’t want to carry a second unit for headphone listening.
While any one of those functions could arguably be better filled by a dedicated unit, having all of them in a single, inexpensive, and compact bus-powered unit makes the MicroBook II a winner in my book. In fact, since I use almost everything on it – the “guitar” input being the only exception – and have found little else to want for (within reason), the MicroBook II is now one of my favorite gizmos. If you’re after a simple plug-and-play unit just for acoustic measurement, check out the Focusrite Scarlett 2i2 that I reviewed in the last issue; but if you don’t mind a learning curve and have an inclination to tinker and experiment, the MicroBook II has a lot packed into it. Definitely worth a look.
Acknowledgements
HifiZine gratefully acknowledges the support of:
- Faber Acoustical, for the use of the Electroacoustics Toolbox
- Super-Mega Ultra-Groovy, for the use of Fuzz-Measure Pro
- Earthworks Audio, for the M30 measurement microphone calibration file


Have you used to the Microbook to do any electronics measurements? Ie with software like Rightmark Audio Analyser, or SpectraPLUS?
Hi Thomas, I tried it as an experiment with a couple of DACs, using Electroacoustic Toolbox (Mac), but nothing analog in-out yet. Of course, this will work only to the extent that the equipment under test has worse performance than the MicroBook. Good question – I’ll try to put together something with RMAA and post on my blog.
I’ve about RMAA and it looks interesting however at least one person (NwAvGuy, http://nwavguy.blogspot.com/2011/02/rightmark-audio-analyzer-rmaa.html) online is very critical of the validity of it’s measurements. His blog bring up several good points, although I don’t know much faith to put in his scathing presentation.
SpectraPlus-SC might be a good program to use as well but it does cost money. However it seems more fully baked and respected as Robert Kozel over at Secrets of Home Theater and High Fidelity (http://www.hometheaterhifi.com/) uses it for measurements. Not sure if it’s the SC version however.
My main goal would be to use it in the same way as Robert. To measure all types of audio components. Distortion, Frequency response, wattage output, etc, etc.
I’d also be using the Microbook II as a mic preamp for REW. The Roland Quad Capture is another audio interface that’s on my radar. The people over at SpectraPlus recommend using it with their software. They report that The Left and Right channels are sampled simultaneously
but they are not combined in any way. Some sound cards will have issues in this regard (particularly the ones built into laptops) but the Roland Quad Capture does not. The Quad Capture has a “Mix” knob on the front panel which allows you to mix the playback audio back into the input stream. Turning this knob to the full off position disables this feature.
So it looks to be a nice cheaper audio interface.
Hi, John! Tell me, what are preamps in MicroBook II? Their model and characteristics. Thanks in advance.
Hi Mickey, I’m sorry but I have no information other than what’s in the specs or in my review article…
John, I have not found how to change the sample rate. This makes CueMix or something else? I work in Reaper. Even if you change the sample rate of the audio settings Reaper, it does not change and remains 48,000 Hz. How to change to 96? Thanks in advance.
Hi Mickey, if you’re on the Mac, perhaps try setting the sample rate in Audio MIDI Setup? On Windows, sorry but I wouldn’t know.
Hi, John. I use Windows, but its setting the sampling rate does not change for Microbook 2 is worth 48 and can not be changed.
Hi,
I was wondering if the microbook II can be used as a standalone mixer? With CueMix FX, it is possible to program internal routing in the Microbook II, without going through the computer. Moreover, settings are retained when the unit is powered off. So what happens if I then plug the unit to a powered USB hub and not a computer? Will the unit route the signals? Thanks
Hi mg7, that’s how I used it for the active crossover configuration described above: “You might be wondering at this point if you can use the MicroBook II as just an analog in-out crossover – in other words, once the crossover parameters are set up, can you just connect the USB port to a power supply and leave the computer out of the picture? And the answer is: yes, you can. With the current version of the firmware (1.04), no computer is needed for the MicroBook to start up and operate with the most recent configuration.”
Great thanks!
Very informative article.
I am looking for an audio interface mainly for acoustic measurements since my new lease Dell and Sony ultrabook portables no longer have an analog line input. My previous lease Dell that had a very good ADC and even a digital output; so this must be progress. The MOTU Microbook II is on my shortlist and so I came across the HiFi Zine website for the 1st time.
I also want at least 2 stereo outputs for experimenting with crossover settings before implementing these in hardware. The equalizer function is also very useful to assess if some extra cut filters are beneficial. I still have my Win95 desktop pc with a demo version of Wavelab and a Turtlebeach Fiji soundcard around for this purpose.
This article describes exactly what I need, so I ordered the MOTU Microbook II today. I even got a special 7% discount (today only) for the coronation of our new king. This 7% represents a dozen of speciality beers (Duvel or Trappist Triple) + 2 servings at the chipshop and a box of chocolates in local value 😉
Hi Peter, thank you for the comment, cheers to you and the new king! 🙂
Hello Thomas,
I have just read your analysis of the Microbook II and just wanted to congratulate you for the outstanding review.
I was looking for a USB audio interface with parametric EQ in the outputs I could use to compensate for room acoustics and it seems this is it. I’m surprised that no one seems to appreciate this capability of the Microbook found in very few audio interfaces.
Thanks!
Hector
Hello Hector. Thank you for your comment. This is one of the best, and you should know since you have been using such electronics since your college years. Please contact me.
Me again. If you are still composing, any new tapes (or CDs for that matter)? Love to hear from you: avta@optonline.net
Hi John,
I would like to use microbook for my 3 way active crossover. My power amp requires 1.5Vrms input level for maximum output power. Do you know what are the maximum voltage levels available on 6 outputs?
thanks
Kerim
Hi Kerim, looking up my notes I have the main outputs at 11.4 dBu (balanced) so that’s about 2.9 V balanced or 1.45 V single ended. That’s just with a cheap meter. Looks like I didn’t measure the other outputs, I’ll see if I can do that today.
Hi again, with a cheap DVM I’m measuring at 0dB FS:
– Main out: 1.42V single-ended (2.82 V balanced)
– Line out: 1.41 V (single ended)
– Headphone out: 1.41V (single ended)
So I’d say that’s probably good enough for your amps, although more gain wouldn’t hurt… (with an active crossover on music material you’ll be reducing the overall levels on each output channel). What amps are they BTW?
Hi John,
Thank you so much for your effort. 1.41V looks pretty good to me, compared to other affordable USB multichannel sound cards which usually don’t go over 1Vrms.
Right now I am using miniDSP which provides only 0.9Vrms levels.
My amp is Rotel RB976, which is 6x60W. 2 channel pairs are driving woofers in bridged mode, while third pair is for tweeters.
Hi Kerim, no worries, glad I could help. Compared to the miniDSP it’s not as flexible in the crossover features but it also has other features like the mic input etc (per review). Oh, and it will do a three-way.
Hi,
This are designed for measurements:
http://www.quantasylum.com/content/Products/QA400.aspx
Happy days
Hi John. Thanks for your awesome review & pointers on using this amazing box.
I initially bought the Microbook II as a backup system for my Track16, used live to run stereo backing & click tracks (3 channel output simultaneously) & then in my home studio. Now the Track16 is the center of my home studio & the Microbook II is my go to for live performance. Powerful little box (I wish it could be powered by my iPad 3 but O well).
My next goal is to set a live mastering chain up through cue mix so I can take a little weight off of mastering plugins when performing with my DAW live. I like to leave things in multitrack mode so I can adjust elements for the room that I’m in.
Anyone else using this box this way?
>>With the current version of the firmware (1.04), no computer is needed for the MicroBook to start up and operate with the most recent configuration.<<
I know it's over three years after this review, but in the off chance than anyone comes upon it searching for Microbook IIc info like I did (the "c" is the latest model), I thought I'd add this small caveat. Based on the quote above, which is from this review, I brought my MBIIc to rehearsal hoping to use it as a stand-alone headphone amp for my in-ears (I plugged a stereo mic into its line 3-4 input). I set up a configuration at home, using CueMix, where it was working fine – essentially just directly connecting the line 3-4 input to the headphone output in the CueMix mixer. As soon as I disconnected from the computer, my in-ears went silent. The config was not retained. I communicated with MOTU about this and they replied: "The MicroBook IIc does not feature any true 'standalone' capabilities. It can operate in class-compliant mode, which means that audio signal to or from a software client (Garageband, iTunes, etc.) can be transmitted through the unit to a non-Mac or -Windows device. For example, connecting the MicroBook IIc's micro USB jack to a power supply enables you to record to/play back from an iPad, iPhone, or other tablet that doesn't support ASIO function."
Hi Rob…
thanx for your caveat! I’ve got the same wish…would like to use it also as a standalone ADC to connect 2 external analog pres to another audio interface via spdif.
Any news? Is it possible now thanx to new drivers or yet impossible?
Thanx in advance,
Vale
Vale, I haven’t visited this thread since my 2016 comment above! Just happened to come back to this page to refresh my understanding of the MBIIc’s routing scheme. I have not used it in several years due to it disconnecting in the middle of a gig (I’m a musician). Disconnection issues continued to happen as I tested it at home.
To answer your question, sorry to say but I have no new info regarding using the MBIIc standalone. My guess is the answer is still no. The latest driver I see for Mac is dated July 2017.
I’m cautiously testing my MBIIc to see if my issues were software-related or just a bum unit. I’m not sure I’ve tried using the inteface since I updated my MacOS from 10.11 (El Capitan) directly to 10.14 (Mojave).
If you can’t use the MBIIc standalone, maybe connecting it to an old iPod or iPhone would make a workable setup for you, since it’s class-compliant. You’d probably need to find an app that will patch the input through to an output.
I guess you can’t edit a post here; I wanted to fix a typo in my message above! But I also wanted to add a PS that this page (which is over seven years old as I type) is quite possibly the single clearest and most concise explanation of the MBIIc’s capabilities I’ve seen anywhere on the net. Kudos to John Reekie for putting it together – the block diagram by itself is gold! MOTU’s manual (actually *two* manuals) do a decent job, but there are several UI quirks in the CueMix FX app that can be confusing, especially with the myriad of mixing & routing options.
I’m a musician and originally used this interface with my midi keyboard and laptop music rig, playing virtual instruments. I set up a separate mix for the headphone output for my in-ear monitors; as John said, this box is unusal in that the headphone output is a separate stream, making this probably the only compact interface I could use. I got a mix from the monitor board through the XLR input and plugged a stereo electret condenser mic into the “line in 3-4” minijack – this for an ambience or “stage” mic. I then programmed my music software (Plogue Bidule) with the OSC commands to control the CueMix FX mixer, and linked those controls to knobs on my midi keyboard. This allowed me to control my in-ears mix as I played. I was so proud of myself for finally getting this to work; it was quite a bear getting OSC communication working! Then the MBIIc disconnects from my laptop in the middle of a show! Now I use my MacBook Pro’s stock headphone output and a standalone box (Rolls PM55P) to work my in-ears.
Anyway, sorry for this long post. I have to say that in August of 2020 I am not aware of any audio interface this compact that offers this many inputs & outputs, along with a built-in DSP mixer with EQ and dynamics. Maybe I’m wrong but I think this little guy is still one-of-a-kind. I hope my issues were just related to my OS version and I can go back to using it!
I haven’t been able to use the MBIIc as a standalone mixer, either, but I’ve used the MBIIc with my iPhone as my personal mixer for keyboard and ambience mic inputs with separate outputs to keyboard amp (keys only) and my in-ear monitors (keys plus ambience). To control routing and mixing, I use my iPhone running AUM (Kymatica), connected to the Microbook via the (powered) Apple USB Camera Connector. AUM sees all inputs and outputs of the Microbook. Never had a disconnect, completely stable for me, as long as both MBIIc and iPhone are directly powered. You can add EQ, reverb and other effects in AUM with low latency. AUM has pretty much all of the mixing capabilities of CueMix FX with the MBIIc. It also has the advantage that it can record each stereo and/or mono input for you to mix later as multitrack at up to 96k, 32-bit floating point. Need to remember to turn off all other apps and transmitter/receivers on the iPhone (Airplane mode) at the gig!