Dayton EMM-6 measurement microphone, calibrated by Cross-Spectrum Labs
Introduction
While relatively cheap measurement microphones like the Behringer ECM-8000 and Dayton EMM-6 are a tempting proposition for anyone interested in making acoustic measurements of loudspeakers or listening rooms, they have an Achilles heel: they aren’t flat. That is, their frequency response, while “flat enough” for casual full-spectrum measurements, isn’t accurate enough for use in speaker design or fine-tuning equalization and in-room system response.
A few years ago, Herb Singleton from Cross-Spectrum Labs (CSL) began offering an inexpensive microphone calibration service. Herb found that calibration of the Behringer ECM-8000 microphone was sufficiently popular that he began to purchase the microphones in bulk and sell them as calibrated units (so, rather than buying an ECM-8000 and shipping it to Herb for calibration, you would just buy the ECM-8000 directly from Herb). Some time later, Parts Express began selling a similar microphone branded as the Dayton EMM-6, and Herb decided to also offer those as a calibrated unit.
Perhaps because it’s not a part of the system per se, the price of a basic acoustic measurement setup can be something of a barrier to audiophiles. So it’s good to know that there’s an inexpensive alternative to a high-quality measurement microphone like the Earthworks M30. In this article I’ll review the CSL-calibrated EMM-6 and compare it to an Earthworks M30 to see how it measures up.
What is “calibration”?
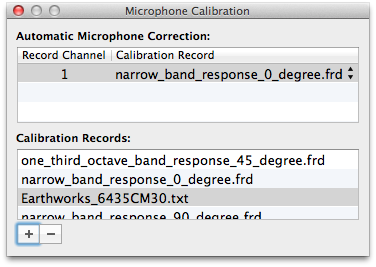
The first thing to explain is what it means to “calibrate” a microphone. Nothing is actually done to the microphone itself. Instead, the microphone’s frequency response is measured and captured as data in a file. This file is then loaded into the measurement software so the software can compensate for inaccuracies in the microphone. Exactly where you do this depends on the program, but the screenshot below shows the calibration selection in FuzzMeasure Pro.
The measurement software corrects the raw response calculated from the measurement sweep using the data in the selected file. For example, if the calibration file says that the microphone is 5 dB down at 20 Hz, then the measurement software will add 5 dB to whatever value it calculates as the acoustic SPL at 20 Hz. The result is a measured response that is the same (or close to) what you would get if you had a perfectly flat microphone. This is great, for most of us! Why? Because it’s much cheaper to get an “inaccurate” microphone with a compensating calibration file than it is to get a truly accurate microphone.
Note that calibration is not something that is done only with inexpensive microphones. The opposite in fact. All measurement equipment must be calibrated, and more expensive microphones like the Earthworks M30 come from the manufacturer with a calibration chart and (recently) an electronic calibration file. Each individual microphone will vary – less for more expensive microphones and more for cheaper ones – and so calibration files must be generated individually for each microphone.
What you get
Herb provides calibrated microphones in two variants, called Basic+ and Premium+. (The older Basic and Premium variants are no longer offered.) What you get, in addition to the microphone and accessories supplied by Dayton, is a printed sheet with the measurements of the microphone plotted, and a set of electronic calibration files. My files came on a CD, but Herb has recently switched to supplying the files on a USB thumbdrive.
In addition to the electronic calibration files, you also get the printed sheet as a PDF document. You can see samples of the full sheet on Herb’s website for the Basic+ and Premium+ levels. Here is the plot of the 0, 45, and 90 degree curves of my EMM-6:
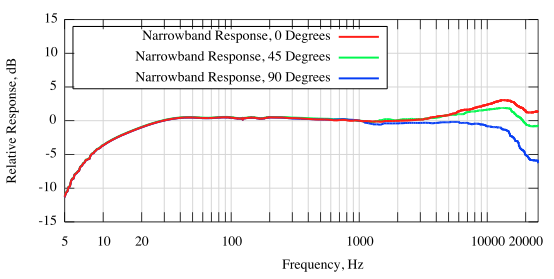
Figure 1. Response plots of my supplied microphone, at 0, 45, and 90 degrees
This particular microphone is quite decent out-of-the-box – another unit I received from Herb had a higher on-axis peak of about 5 dB in the high frequencies. That is why calibration files must be made specifically for each individual microphone.
The Premium+ mic adds a 360 degree polar plot, and a sensitivity reading that can be used for making absolute SPL readings if you know the gain through your measurement system. (If not, you will need a separate SPL meter to get correct SPL readings.) Here’s the polar plot of my EMM-6:
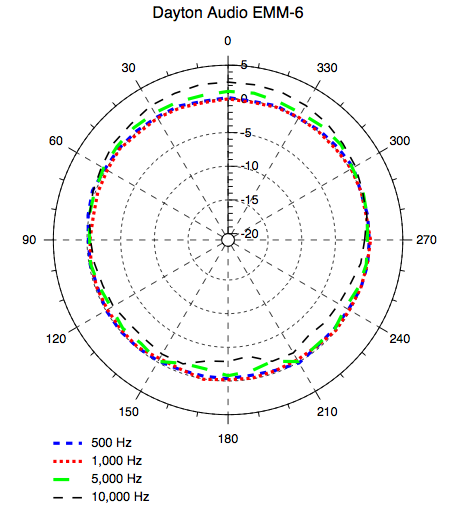
Figure 2. Polar response chart of my EMM-6
Calibration files for angles of 0 (on-axis), 45, and 90 degrees are supplied. Typically, you would use the 0 degree file when performing speaker measurements, with the microphone pointed directly at the speaker, and the 90 degree file while performing room measurements, with the microphone pointed towards the floor or ceiling. We’ll get into that more later.
Herb supplies the calibration files in a narrowband version and a 1/3-octave version. For most purposes, use the narrowband files. Herb says that he supplies the 1/3-octave files for folks that will need to use the microphone with specific gear like certain sound-level meters that will only accept calibration files in this format.
Verifying that the calibration files do what you would expect is simple – just run two measurement sweeps, one with no calibration file selected, and one with a calibration file. For example, Figure 3 plots an uncalibrated response (red) and a calibrated response (green).
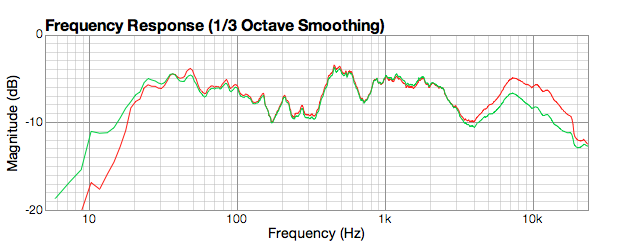
Figure 3. A measurement generated with an uncalibrated microphone (red), versus with a calibration file (green)
Gated measurements
For gated measurements, such as you would do when measuring loudspeakers or loudspeaker drivers, you will most likely use the on-axis (0 degree) calibration file and point the microphone directly at the sound source. By gating the signal, you are ensuring that the only signal that the microphone considers is from the loudspeaker – that way, the on-axis calibration file will fully compensate the microphone’s response. In the case of the files supplied by Cross-Spectrum Labs, you would load the file named “narrow_band_response_0_degree.frd” into your measurement program.
To compare the high-frequency response of the calibrated EMM-6 against an Earthworks M30, I positioned each microphone 20 cm from a cheap “super-tweeter” and ran a measurement sweep gated at 3 ms. Figure 3 shows the measured response from the EMM-6 in red, and the Earthworks M30 in blue. The EMM-6 is slightly less sensitive than the M30, so its plot is scaled up by 1.5 dB.
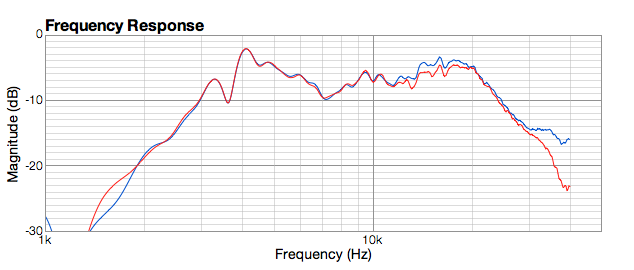
Figure 4. Calibrated Dayton EMM-6 (red) vs Earthworks M30 (blue) on gated measurement
The Earthworks mic measures slightly higher around 15 kHz, and also above 30 kHz – its calibration file extends to 34 kHz so it’s probably the most accurate there. I can’t explain the difference at 15 kHz, but it’s under a dB. Otherwise these two plots are practically identical.
In-room measurements
With an in-room measurement, the direct signal from the loudspeaker is (typically) the loudest, but it is then followed by a long sequence of reflections coming from all directions. Since measurement mics are omnidirectional, they will pick up all of the reflections as well as the direct sound from the loudspeaker. There is, however, a fly in the ointment: the measurement microphone is not exactly omnidirectional. Compared to its on-axis response, a microphone has falling sensitivity as frequency and off-axis angles increase. This can be seen in the polar plot of the Dayton in Figure 2 above, where at 10 kHz, the microphone is down (compared to the on-axis response) about 4 dB at 90 degrees and about 6 dB at 180 degrees.
The Earthworks M30 has a smaller capsule (1/4 inch vs 1/2 inch on the Dayton) and so we might expect it to fall off less off-axis. This is analogous to loudspeakers – you generally expect a smaller tweeter to have better high-frequency dispersion than a larger tweeter. Figure 5 shows the polar plot of the Earthworks M30 (a generic plot from the manual). At 10 kHz, at 90 degrees off-axis the microphone is about 2 dB down; and at 180 degrees, 4-5 dB down.

Figure 5. Typical polar response plot of Earthworks M30
For in-room measurements, it seems that a good compromise is to use a calibration file for the microphone for 90 degrees off-axis, and point the microphone at the floor or ceiling. In this case, the in-room measurement consists of a) the direct signal from the speaker, which is corrected by using the 90-degree calibration file, and b) a long series of reflections coming from all directions, which we might assume to be averaged out over the polar response of the microphone. Note that at low frequencies, the microphones are truly omnidirectional, so it makes no difference which way you point it.
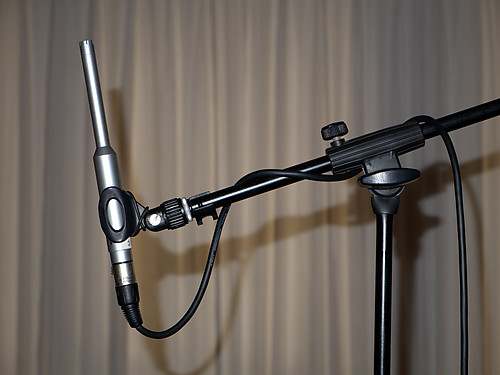
In actual fact, Herb Singleton recommends using a microphone angle of between 70 and 80 degrees – specifically, that the microphone is pointed towards the ceiling but tilted a little in the direction of the speakers (see photo below): “If you’re doing a room measurement for DRC or other purposes (STC or RT60 measurements) what you really should be using a diffuse field microphone (which pretty much no one does) or you should measure at various locations with a free-field mic at various orientations (as recommended in ASTM E336), and then average the responses together. Of course most of us don’t have the time and/or patience to do that, so when I do room measurements, I put the mic in random incidence position (mic facing the source and angled 70-80 degrees with respect to the floor).” (From a post on Home Theater Shack.)
I asked Herb if he could elaborate on the concept of random incidence: “Random-incidence response is basically the same as diffuse-field response, that mic frequency response is designed to be flat in a diffuse field when acoustic waves arrive at the mic in arbitrary directions. A free-field mic is designed for a flat frequency response when pointing at a sound source. When a sound source is largely directional (as in measuring a sound system in a room), the random-incidence response can be simulated by pointing the mic away from the source (hence my recommendation for pointing the mic 70-80 degrees away from a sound source and using the 90-degree correction curve).”
In the past, I’ve done in-room measurements with an M30 pointed roughly towards the speakers, without really considering the polar response of the microphone. To compare this with Herb’s recommendation with the Dayton, I used a speaker containing a JX92s full-range driver, together with a subwoofer. The microphone was 2.4 m away from the speaker and its tip 90 cm height from the floor.
Figure 6 shows the plotted response of the calibrated EMM-6 in red. It was oriented at about 80 degrees, and the 90-degree calibration file named “narrow_band_response_90_degree.frd” was loaded. My normal practice of using the Earthworks pointed between the two front speakers with its on-axis calibration file is shown in the top trace in blue. I used 1/6 octave smoothing because it highlighted the differences best.
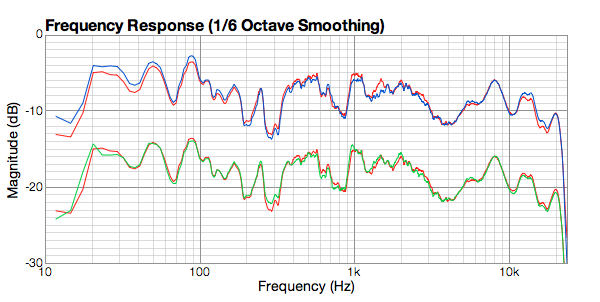
Figure 6. Top: Calibrated EMM-6 at 80 degree position (red), vs Earthworks M30 pointed between speakers (blue); bottom: calibrated EMM-6 at 80 degrees (red) vs EMM-6 pointed between speakers (green)
The differences here are very slight. The Earthworks reads slightly higher between 10 and 20 kHz, as before, and slightly higher at low frequencies, below about 50 Hz. The calibration file from CSL for the Dayton extends down to 5 Hz, whereas the Earthworks calibration file does not go lower than 780 Hz. The Earthworks specification for the M30 simply states that it is “5Hz to 30kHz ±1/-3dB.”
The exact angle of the Dayton EMM-6 does make a slight difference to the levels measured above 10 kHz. Compared to the 80-degree position, at 90 degrees the level above 10 kHz drops by a fraction of a dB, and at 70 degrees it rises by up to a dB. I would be inclined to just set it at 75 degrees (i.e. half-way between 90 and 60) for in-room measurements.
Having done that, I was curious to see how the EMM-6 would compare if pointed in-between the speakers, and with the zero degree calibration file. This is shown in green in the lower pair of traces in Figure 6 – to my surprise it was almost identical to the 80-degree position (used with the 90 degree cal file) shown in red. It’s possible that in a more reflective room there would be more of a difference.
Distortion
I wondered whether the microphones would show any differences in distortion. This might be important to someone who was attempting to quantify distortion in loudspeaker drivers. Since I don’t have a low-distortion reference signal, the best I can do is play a signal through a loudspeaker, and assume that if distortion measured by one mic is significantly higher than the other, then it is the microphone’s distortion that is being observed and not just that of the loudspeaker.
I ran sweeps on a couple of different speakers with the microphone placed 5-10 cm in front of a driver. I also plotted distortion spectra with constant test tones, at frequencies ranging from 20 to 5000 Hz. With these experiments, the M30 generally tended to produce measurements with lower distortion, and this seemed to be mostly significant above 100 Hz. The measured distortion seemed to vary quite a lot with SPL, making any assessment of absolute distortion levels very suspect. What was interesting, though, was that at a level of 96 dB where I ran most of these tests, the M30 tended to show lower even-order distortion, whereas the odd-order distortion of both mics was often fairly similar.
Figure 7 shows an example, with each microphone positioned 10 cm from the phase plug of a Lambda Dipole15 woofer. The second harmonic distortion is shown in the solid lines towards the bottom, and third-harmonic as the dashed lines. You’ll notice the latter are roughly similar, whereas the former is on average about 10 dB lower for the M30.
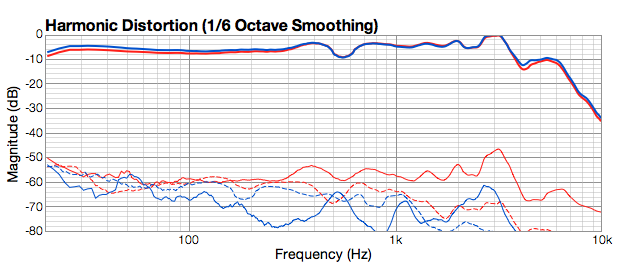
Figure 7. Sample distortion plot for M30 (blue) and Dayton EMM-6 (red)
The main result from these experiments are that different microphones do vary in the distortion that they show at different frequencies and SPLs. This is something to be aware of if attempting to quantify loudspeaker driver distortion – you may be measuring driver distortion, microphone distortion, or a combination of both.
Concluding remarks
Without a doubt, the calibrated microphone from Cross-Spectrum Labs is a true bargain. When used with the correct calibration file and orientation, the CSL-calibrated microphone delivered almost identical results to a microphone that costs much more.
By no means does this mean that an Earthworks mic is a poor purchase. Earthwork mics come with a 15-year warranty, and because of their smaller capsule, they do have a slightly better polar response. They are accurate enough that you don’t really need to use the cal file for most applications. And, there is that ineffable “build quality.” An Earthworks measurement mic is still very much a worthy investment for the professional or very serious hobbyist.
Nonetheless, after having gone through this extensive measurement and comparison exercise (only a fraction of the measurements made are published in this article), I’d have to say that for most audio hobbyists, a calibrated mic from CSL will do everything you need. You’ll also need an audio interface – and I have one or two in for review for the next issue.
Supplier and pricing
- Supplier: Cross-Spectrum Labs
- Product page: Calibrated Dayton EMM-6 microphones
- Pricing: USD75 for Basic+ calibrated microphone, USD90 for Premium+ calibrated microphone
Acknowledgements
HifiZine gratefully acknowledges the support of:
- Faber Acoustical, for the use of the Electroacoustics Toolbox
- Super-Mega Ultra-Groovy, for the use of Fuzz-Measure Pro
- Earthworks Audio, for the M30 measurement microphone calibration file


Thanks for this very comprehensive article John
I now have a high level of confidence that the calibrated microphone from Cross-Spectrum Labs is ideal for my DiY needs, and certainly worth the small premium over a non-calbrated mic, which I now consider would be a penny pinching shortcut.
I have a project to measure acoustic absorption outdoors. I have hi-sensitivity research mics with which I’ll sample the field far from the source. In addition to these “field” mics, I also have to measure the sound pressure right at the source. Since the source is a powerful horn driver, it will probably overdrive the high-sensitivity mics and cause distortion.
For this purpose I bought a Dayton EMM 6 mic. My question is: Is there some sort of interface/preamp box that will allow me to connect the XLR out of the Dayton to the BNC input of the ‘scope? Thanks in advance!
-Andi
Hi Andi, many if not most USB audio interfaces aka “soundcards” designed for recording will allow you to send the (amplified) mic signal directly to the outputs. Look for information about “low latency monitoring.” With a suitable adapter cable you could connect the output to the scope.
However, it would be a lot simpler to just use that same sound card to get audio into the computer and use some software to display/capture/analyze the signal. Why do you need to use a (real) scope?
Hi John, many thanks for your reply!
I am using three scope channels to acquire the signals from the three “field” mics (PCB Piezotronics and ACO Pacific), all with BNC outputs. I would like to use the fourth channel for the reference mic (EMM 6). I like the scope because of its inherent high timebase stability etc. … and also because of its convenience and availability (I do not have funds to buy a multichannel sound card. 🙂 ).
Hi Andi, well, I guess all you really need is a simple mic preamp with phantom power. The Behringer Xenyx 502 comes to mind as a cheap option. However, with all that gear that you have access to, I wonder if there are suitable mic preamps already in there. Perhaps you already have what you need.
Also, I’d check the max SPL specs of the mics you have, the Dayton is specified at (only) 127 dB, a quick look at the Aco Pacific site shows some of their mics have a spec up to 175 dB.
John, I am shamed – you’ve done my homework for me: my ACO 7046 mics are rated to 145 dB, which may make them better candidates than the EMM. (Nevertheless, I wonder how they achieve this with a sensitivity of 50 mV/Pa compared to Dayton’s 10 mV/Pa?)
Thanks again. -Andi
I own a Dayton EMM 6 and use the calibration file supplied for my mic (serial number) via Dayton’s web site. Why is this not mentioned in the article?
Hi Olav, a combination of it not being a review of the stock EMM-6 and the time it would have taken to resolve my concerns about the Dayton cal file. I felt it wasn’t a productive path to pursue.
Hi John,
I would guess that the drop in response above 30kHz (in Figure 4) of the Dayton mic is a result of the microphone’s size. There was some recent videos made on microphone 101 on the eevblog that I found interesting – http://www.eevblog.com/2014/04/12/eevblog-602-introduction-to-microphones/
Chris
Hi Chris, I can’t stand to watch online videos…! In Figure 4 the EMM-6 deviation from the Earthworks above 30 kHz is with calibration. Uncalibrated, and no doubt with capsule size being a significant factor, the difference would be much larger.
There seems to be some misunderstanding of Herb Singleton’s recommendations for mic orientations when he said “with respect to the floor.” The picture (above) of the mic under the “In Room Measurements” heading shows 10-20 degree orientation with respect to the floor. 70-80 degrees would have the mic oriented upwards towards the ceiling.
Furthermore, Herb’s quote above regarding 70-80 degree orientation was speaking specifically of DRC, STC or RT60 measurements. He actually says that in the quote linked to HT Shack.
Frequency response measurements are a different story. Again referring to the HT Shack link from which Herb’s quote was taken, he says this in the sentence before it: “… If you’re trying to measure the freq response of a particular source [e.g. a speaker], measure with the mic pointed at the source (which will minimize the effect of the mic body)…”
For the record, Herb has never advocated pointing the mic at the floor for any kind of measurements. Here is the mic orientation he recommends for various types of measurements (http://www.hometheatershack.com/forums/spl-meters-mics-calibration-sound-cards/15951-cross-spectrum-microphone-calibration-service-usa-26.html#post609630). John Mulcahy, creator of REW, also recommends the same thing (http://www.hometheatershack.com/forums/rew-forum/62260-calibration-error.html#post554918).
Hi Wayne,
“Furthermore, Herb’s quote above regarding 70-80 degree orientation was speaking specifically of DRC, STC or RT60 measurements. He actually says that in the quote linked to HT Shack.”
Correct – the section of the article you are referring to is clearly titled “In-room measurements.”
John
The capsule diameter in the Dayton mic is not 1/2″, it is in fact closer to 1/4″. It is a 6mm capsule, hence the name EMM-6. The M30’s capsule is basically the exact same diameter. Therefore, the difference in HF extension between the two mics cannot be due to a difference in capsule diameter.
Hi Nicholas, fair enough. The barrel of the M30 measures about 7.2 mm diameter whereas the EMM-6 is about 12.1 mm. It (the EMM-6) fits into a half-inch calibrator although needs some tape to close up the gap.