Doing your own DAC mods: a Primer
This is something of a golden age for the budget audiophile. For only a few ducats, the cash-strapped can get a taste of high-fidelity. Enough, at least, to help weather the current economic malaise. It seems every month a new offering appears bringing sound quality that would have cost several times more only a decade ago. Of all these bang-for-the-buck components, I wager none has continued to offer improved sound quality and low cost of entry like the digital-to-analog converter – the blessed DAC.
Even more titillating is the fact that beyond the familiar retail brands and companies offering these amazing devices at competitive prices, there lies another potential store of riches on eBay. Dozens of low-cost direct-from-China DACs delivered to your door for less than a C-Note, including kits that can provide even better performance at the cost of providing your own enclosure, wiring and power supply. The risks are of course higher (to paraphrase Alfred E Nuemann: what, me warranty?), and seller-customer relationship can be practically non-existent.
There is a price to be paid however for this low cost of entry. There’s no free lunch. As we consumers know all too well, for every bargain, price points must be met and compromises made; but for those with an adventurous spirit and a hot iron, there’s some fun to be had. And with just a little bit of investment of time and patience, there’s a chance you can get an even bigger bang for the buck. You may be surprised at just how much better your gear will sound.
Tools
Before you get started, you’ll want to be sure to have these tools handy:
- Soldering iron. We’re not soldering nanochips here, so an inexpensive iron a la Radio Shack will more than get the job done. Mind you, if you’re a green solder slinger be warned: this is a slippery slope and before long you’ll realize that a cheap iron won’t cut it for the long haul.
- Solder. Kester 60/40 is the go-to solder, but is usually only available in bulk. If you’re unsure about investing in a one-pound spool, you can find eutectic solder in 10-, 20-, and 50-ft runs on eBay or Partsconnexion. Cardas Quad is also a great choice in those lengths – it has a very low melting temperature and the small runs are very inexpensive.
- Analog or digital multimeter. A multimeter is a must have for checking AC/DC voltages. Analog can be found inexpensively, but digital is preferable.
- Pliers and cutters: You weren’t planning on pulling those caps out or cutting the leads with your teeth were you? Get a small pair suitable for electronics work.
Moddin’ Time
No question, some mods leave you with a “meh” when it’s all said and done. I did all that for what? Still sounds the same. You furrow your brows wondering if you should have just let things be. Then there are mods that have a pretty good chance of putting a smile on your face, or at least a curious smirk because you know you’re on the right track. I put op-amps and output capacitors amongst the latter.
Op-amps
Op-amps (operational amplifiers), along with output capacitors, are probably the most popular components for the DAC-modding crowd. The solid-state equivalent of tube-rolling, a simple Google search will bring up more op-amp debate threads than you can read in a year. Their popularity may have as much to do with the relatively-inexpensive cost to experiment as with the potential sonic improvements. For as little as $2 you can add another brick to the never-ending road to audio nirvana. And like tube-rolling, the audible gains made are more related to synergy and personal preference; op-amps are high-quality, precision devices to begin with.
If your DAC is on the budget end of the spectrum, chances are it’s using op-amps in the output stage. The number used varies depending on the chip/design requirements. They can be used for the I/V stage, or buffer, or both, etc. There are so many varieties of op-amps that what works for you will be up to trial and error; but it’s best to use those that have been proven compatible/designed for audio – for instance the LM4562 from National Semiconductor which was specifically designed for top-notch audio performance; OPA2604 or 2134 from Burr Brown; any number from Analog Devices, etc.
Subjective impressions are controversial but as a general rule certain families of op-amps have a “house sound.” Burr Brown are sought after for their warmer tones, whereas Analog Devices (AD) lean to the analytical. Before replacing an op-amp be sure to take note of the one your DAC is currently using: there are dual op-amps and single. You want to be sure you’re substituting like for like.
All this being said, swapping op-amps is only viable if they can be swapped from your DAC. With luck they are seated in sockets and are easily removed by popping them out with the aid of a small flat head screwdriver or similar (see picture). If however, they are directly soldered to the board then this mod is likely off-limits without brushing up on your SMD-desoldering skills. Good luck with that.
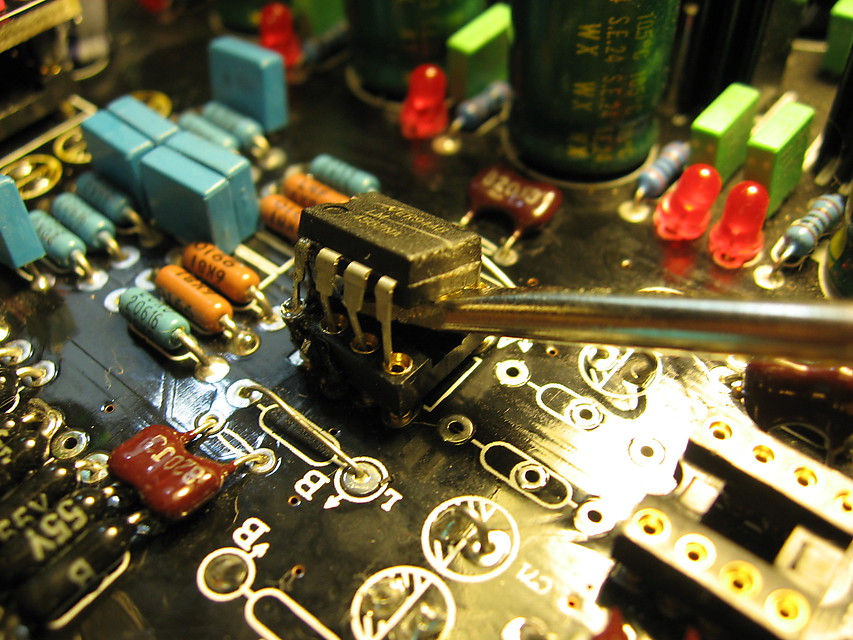
Levering an op-amp out of the socket
Output Capacitors
In a DAC, the output capacitor’s primary purpose is to block DC from the output signal, thus providing a measure of safety for your speakers. Unfortunately they are also in the signal path and potentially contribute more harm than good to the resultant sound quality – hence the phrase “the best cap is no cap.”
To compound matters they are often cheap electrolytic or tantalum capacitors – though if you’re lucky a small value film cap will be used as a bypass. The advantages of an electrolytic or tantalum in this position are of course capacitance value, size and cost: you can fit a tiny 10 μF capacitor that only costs pennies and hey, it gets the job done.
Without these constraints, however, options open up. Provided that you have the room, the sky’s the limit on replacement capacitors – but before dropping a C-Note on that Teflon cap, it’s worth trying a cheap mylar (polyester) cap like Wima MKS to hear if it’s a mod worth pursuing, particularly if space is an issue – are a terrific bargain for an inexpensive upgrade.
It’s also possible that the film cap leads will be not be long enough or may even be too thick for the board. If this is the case, there are several options:
- You can use some thin wire from the cap leads to the board.
- Short the cap pads on the board with a piece of wire and then place your replacement cap in series with the output signal. Like so: left output wire from board → Cap → left RCA output jack. This is a very convenient method as it eliminates any contortionist acts to get the caps connected to the board, and allows freer placement of the capacitors. Just try not to make the signal wire too long.
- Use a smaller value film cap. A 2.2 μF film cap is certainly physically smaller than a 10 μF and can make life a little easier in terms of space. (Just be sure to check the DC voltage is sufficiently low/non-existent at the the audio outputs with a digital multimeter without any components connected. If the amount is higher than a few mV, increase the cap value).
If the space just isn’t there or you’d feel more comfortable with a conservative approach, then replacing the stock electrolytic or tantalum capacitor with an electrolytic designed for audio is another option. Elna Silmic and Nichicon Muse are fairly cheap and are a worthwhile upgrade from the run-of-the-mill capacitors.
For the diminutive Muse TDA1543 DAC, I removed the stock electrolytics and replaced them with 1.5 μF film caps. The .0022 μF bypass capacitors were also replaced (see pictures below).
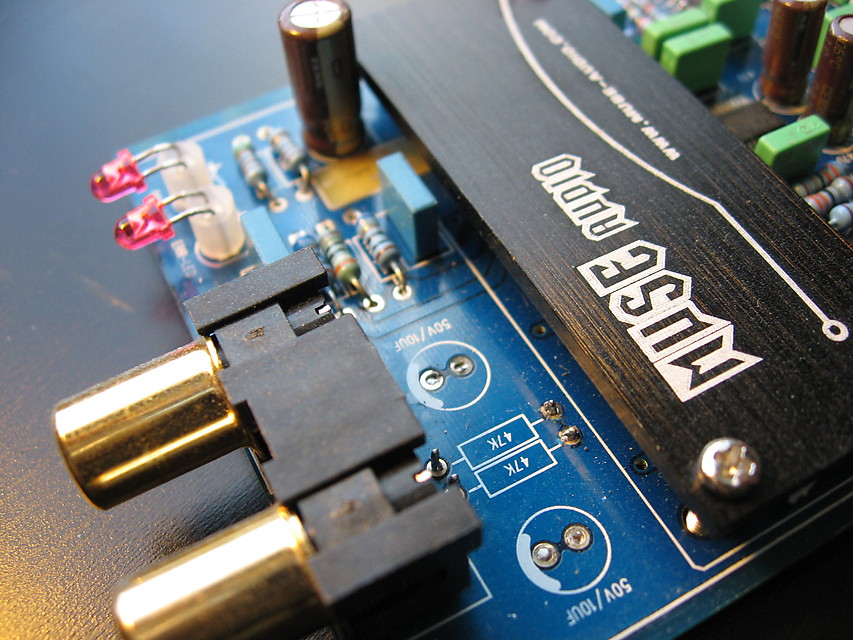
Electrolytic coupling caps removed
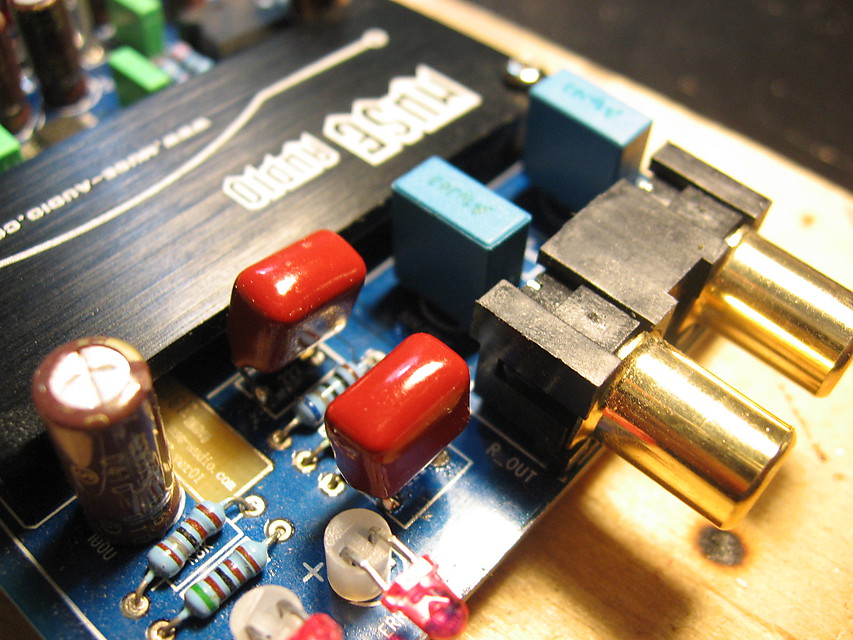
Electrolytics and Bypass Caps Replaced
Bypass Capacitors
A quick note about bypass capacitors. Some DACs have electrolytic output capacitors bypassed by small-value film caps. If replacing the electrolytic with film capacitors, then the bypass caps can be removed, or you can keep them to add to the overall value. If replacing electrolytics and you are cramped for space, try replacing the bypass caps with higher-quality and higher-value caps that will fit the board. There is no hard and fast rule about bypass cap value so I opt for the largest value that will fit the lead spacing, usually a 1 μF polypropylene or polyester cap. In the case of my Muse I used 1 μF in the bypass positions to increase the total value to 2.5 μF without needing larger caps.
Power Supply
I’m going to put a little soapbox under my feet for a second, and say that I believe that most roads to improved sound quality lead back to the power supply. I can’t help but feel that a predominant feature that separates lesser audio components from greater is the quality of the power supply (which may be related to the older corollary of the heavier the component, the better it’s likely to be). I spent some time on an Italian audio forum recently using Google Translate to muddle my way through the posts; one word that came up often was “food.” The Italians were constantly talking about what food they were using for their DACs, amps, and so on. It took me a few minutes before I realized they were referring to power supplies. I thought that was pretty cool – it puts another perspective on “you are what you eat.”
SMPS
If you’re using a wall-wart powered DAC, chances are the wall-wart is a cheap switch-mode power supply. SMPS for audio use have come a ways in just a few years (I use one with my amp and it’s excellent), but you certainly get what you pay for and if that power supply came free with the DAC, what you most likely got is a noisy power supply. Noisy enough to mask lower level detail, add a degree of “hash,” and just plain sound bad. Get thee to a linear power supply!
An inexpensive linear power supply will usually exhibit lower noise than an equivalent SMPS. Depending on the DC voltage requirements of your DAC, a linear supply can be had for little money. For example, a 12 V Pyramid-brand linear supply is available from Amazon for under $20 and a variable 4.5-12V supply can be purchased from Frys/Outpost, eBay, etc. It goes without saying that DIY opens up even more options, like the amb.org σ11 kit, a very high-performance linear regulated power.
For even greater performance, shunt-regulated power supplies are available from Paul Hynes, and shunt-regulator PCBs from diyaudio.com. At this level you’re likely to be spending more on the power supply than the DAC itself, but this is one area where there isn’t a lot of controversy: the better the power supply, the better the performance.
Filter/Smoothing caps
After the power supply your DAC is likely to have filter/smoothing capacitors. These are typically large value, higher voltage. If using a wall-wart powered device, there may only be one or two. Large units with dedicated power supplies will have more, with even larger values. Too much is never enough. Swap them out for the largest value you can find that can fit the board. Look for low-ESR caps, with high ripple-current rating. If you like, replace with the boutique brand of your choice.
The main thing is increasing the value of the caps. Just be sure the voltage meets the stock value, preferably higher. Note that the voltage and value will likely exclude the use of the OS-CON/organic polymer types, with the exception of the wall-wart powered units which only require 12v or less. Panasonic TS-HA are a good, inexpensive choice for this duty. In terms of performance, I have found the music to come across with greater ease with improved bass and mid-range delivery.
Here I’ve started by replacing the stock 4700 μF capacitor with a 15000 μF capacitor. Bigger is better!
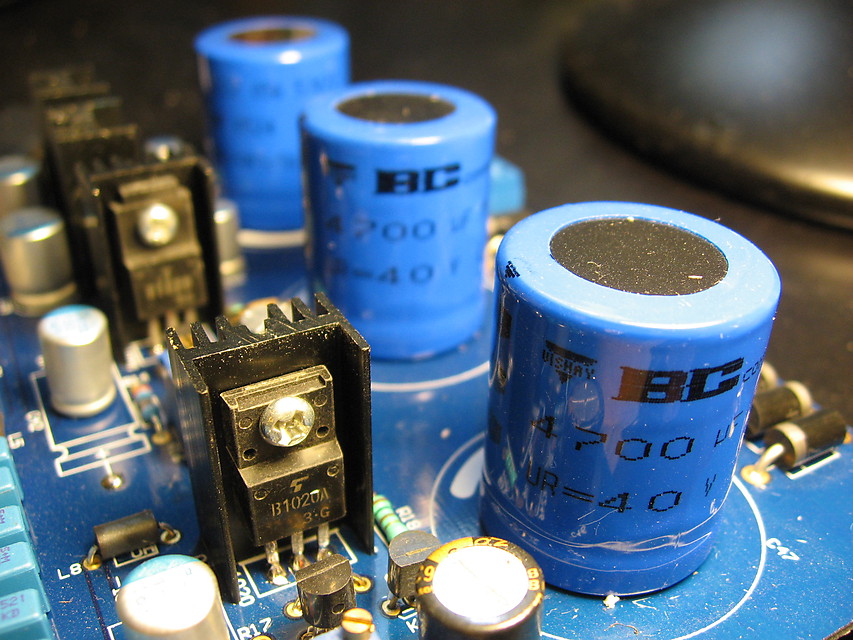
Original filter capacitor
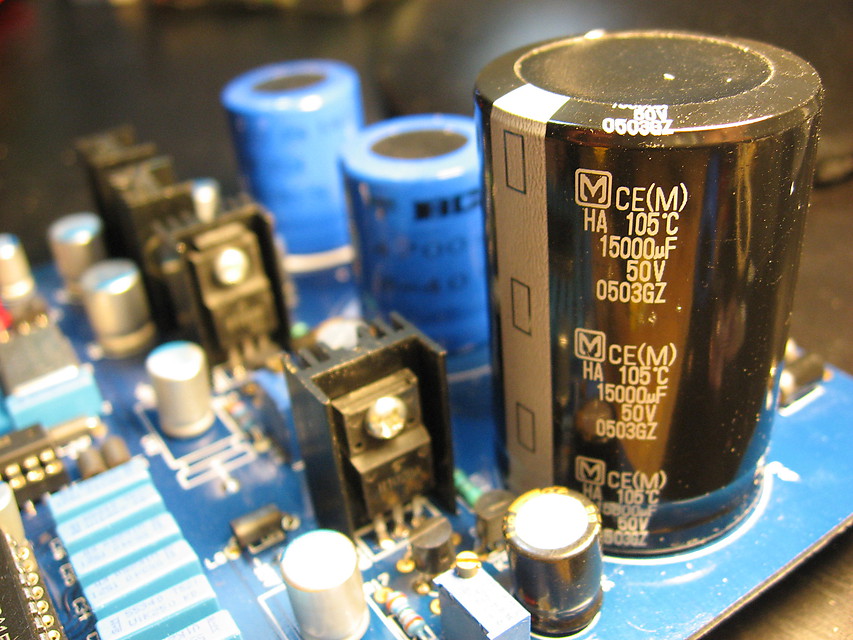
Replaced with a larger capacitor - bigger is better!
Voltage Regulator caps
What, your fingers are still itching for more? Just one more hit of solder fumes you say and you’ll quit? The capacitors located by the voltage regulators are another promising opportunity. In this position, once again the OS-CON (now hard to find, use Vishay organic polymer) are a great option due their ultra-low ESR, high ripple and other characteristics good for digital circuits. I have found, however that, barring the OS-CON/organic polymer type, improvements using other high quality electrolytics were not as noticeable to my ear.
For this TDA1541A DAC, I’ve replaced regulator caps with a field of organic polymer (see picture).
Field of Organic Polymer
Here endeth the lesson
At this point, your unit has probably become an unwieldy Frankenstein, or a veritable bird’s nest of wire and oversized parts. That means it’s time to fire it up! Do a safety check on wiring and voltages with your multimeter. Pour yourself a libation. Hit play. Now will all of these mods turn your budget DAC into a giant-killer? Maybe, maybe not. But you’ll likely improve its performance by a few notches and – depending on the mod – potentially tailor the sound to suit your tastes even more. As always, YMMV.
Some may argue that there is nothing to be gained by all this fiddling but I find doing these kinds of mods to be a good exercise for a rainy day and even meditative. Best of all is the sense of accomplishment and having fun. Isn’t that what this hobby is all about? Enjoy!


what is a good budget dac,$150 or less?not looking for usb connection, just for use between pre-amp and cd player.thank you.
Hi John S, for <$150 the market is pretty crowded but yes the Muse TDA1543 is only $50 US and is a wonderful DAC if you are looking for the warmer NOS sound. If you prefer a more 'hi-fi' sound (as in a little more analytical with a crisper top end), Muse also offers a version with PCM1793 and swappable opamp. Both can be found on ebay. Be sure to power them with a linear power supply – those can be found for <$30US on ebay as well.
hope this helps!
ainsley
good budget dacs for $150 or less without usb?thank you.
Hi John, have a look on eBay for TDA1543 DACs. Ainsley has photos of one in this article. The whole point is that you get something cheap and modify it, that’s the fun of it 😉
There are various outboard converters that one can us to convert SPDIF to USB. As far as I know, a simple converter can be made to allow a USB DAC to be fed from a SPDIF cable. I’ll do a little more research, but not a huge problem. Now, I’d rather have a Toslink setup, rather than USB, as my iMac allows for that … but something that allows SPDIF to whatever other inputs can be very handy.
Stew
would the TDA1543 X4 be a better choice than the single chip version?also, what name brand budget analog and digital cables would be a good choice?would silver or copper ic’s be the best?
Hi John – I think either the single or 4x DACs would be fine – the interesting part is that both are a very cheap platform for getting started with mods! With regard to cables, check out the article by Jake in this issue on the DH Labs cables. Another brand that seems to be well regarded is blue jeans; or of course you can DIY your own from scratch.
have a sacd player that came with a 2 prong,2 iec detachable power cable.is it safe to use a quality 3prong,3 iec power cable as a replacement?thank you.
Hi john, yes the 3 prong power cord will work fine provided it fits.
Good article. I bought a similar Muse DAC and after “soldermizing” the output + bypass caps, and having no suitable, or even unsuitable replacements to put in, I am running no caps at all. So “the best cap is no cap.” Yes, there’s a couple volts on the output, but seems to cause no problems going into my amp (which has blocking caps on the input…) The Muse is a good sounding unit.
Just a thought: among the many options to bypass the output caps, could one not simply put a cap in series with the RCA cord? This would require bridging (shorting) the output cap as I did. Also, this would be an easier test bed for different caps, if you had a bread board, true? On the negative side, there is still the problem of forgetting to use the “special” cord … and running the risk of putting DC voltage to an input not expecting it.
Hm, dunno if having a couple volts of DC on output is a good idea as a general rule but absolutely no cap at all is best. As for a cap in series between output and rca, yes that is one option that would certainly allow the use of higher quality caps; downside is this ultimately means losing the enclosure as you need a larger space to accomodate the caps and additional wiring. If you go this route then you might as well consider building a good linear power supply to fit in the enclosure…
other ideas: I am pretty happy with the “no cap” mod right now (Did I also mention that I am cheap?). One downside of the Muse is the very small enclosure. Thus an external box in line with the RCA cords having a pair of caps is probably more logical. Some of the boutique caps are very big … I just bought a pair of Mundorf silver/oil for a pre-amp and no way would they fit in the Muse box. A linear PS is something I’d try if I had one on hand. Another idea would be a 12V car battery. You can’t get much purer DC than that. Welcome to the lunatic fringe of audio!
I have a question regarding the Pyramid brand PSU, http://www.amazon.com/Pyramid-PS3KX-3-Amp-12-Volt-Supply/dp/B0002JTD2K/ mentioned in the article.
The title of the item says 12V but looking at the unit it says 13.8V, is there any obvious reason (besides an error) for the difference?
Thanks,
EK
Oh… My bad, I’m the one who added the link. I guess that’s “12V” as in car systems, which are typically assumed to be either 13.8 or 14.4V. You’d need to check the specs for the DAC that you’re using to see if that voltage is in tolerance.
The Pyramid has been used with 12v devices with no problem, BUT since writing the article I have learned that the amount heat generated by the higher voltage is not desireable with this DAC particularly with the stock enclosure. A 9v power supply is a safer choice.
That Pyramid supply comes with a schematic and should not take a lot of work to change the output, you could probably just change the zener from 12 volts to 9.1 volts and adjust the pot a little..
Just be aware that if you were to modify it down to 9v you could not draw the full rated current because the supply would overheat. These applications usually take very little current so you would be ok as long as you did not try and take more than a half amp or so.
Hi,
would Muse TDA1543 or PCM1793 DAC outperform Fiio E10/ASUS xonar U1?
Thx
The Fiio and Xonar have many other features besides those of a DAC, therefore it’s probable that additional processing is involved and sound quality will be compromised. The Muse DACs only perform one function and are therefore more likely to provide better performance.
Thank for your reply, just more question: Will it work with my PC? My soundcard (SB Live!) doesnt have SPDIF out, however I found one on my motherboad (optical out as well).
Hi,
Heres the thing:
I´m looking for the best choice of a set of speakers that i would hope you can help me with:
1.- Golden ear Triton two
2.- Salk Signature Sound Songtowers
3.- Grant Fidelity RBS-1 Reference Morel Bookshelf Speakers
Also I´m looking for the best choice between these two:
1.- Cambridge DACMAGIC
2.- Grant Fidelity TubeDAC-11 D/A Converter
Thanks and best regards
Miguel Casellas
Daniel, Miguel: thanks for your questions, but I think we need to keep questions closely related to the content of the article. 🙂
About a year on, and I’ve had good results with my (simple) mods. The output caps have been either Russian PIO or more recently, the Mundorf silver-oils mentioned earlier. Also some months ago I bought a 12 Volt car battery whose “current” duty (bad pun I know) is solely powering the Muse DAC. It sounds excellent. Honestly, though, I can’t say better or worse one way or the other, having no way to A/B things. However, i still have the default power supply so maybe could switch that in/out with the battery: that would be a good test.
I use the hifi diy1793 dac but many of my comments/observations are on this dac however i think they are similar in there basic topology, i bought it because i couldn’t find a good reason why it shouldn’t sound decent, it’s made from good capacitors resistors etc and uses Burr-Brown parts too.
I modded it with 40,000uf off the PSU which is an old unregulated robust variable voltage bench supply 25v@8 amps, a 10H a 53 ohm hammond “gorrilla” choke then 2 voltage regulators modded with 33,000uf (variable values) on the input and outputs of the 2 voltage regulators and about 120,000uf of (distributed values) bypasss/resevoir capacitance soldered on a flying lead to the pcb where the original 220uf input cap is located on the PCB and also bypassed this point with 100nf and 470nf and some 4000uf of electrolytics made from 1000uf caps and some bypassed with sets of lower value (various types) caps and also multiple different value ceramics on the actual power pins of the 2x mono opamps adapter via a short jumper all diiferent capacitances raided from dead old hifi athough i bought some new ones for the double voltage regulation system i am using. The DAC can run for about 10-15 seconds when disconnected from the DC jack…!!!
I used to use a float charged lead acid cell using a harbour freight automobile float charger but needed more supply voltage so it had to go.
Remember if you use one types of DAC they have a polarity protection diode which eats up about 0.8 volts of any voltage you feed them..i am running my dac at 15.9 volts as the virtual ground splits this in half to feed the 5v DAC psu line so as you can see you are not getting a good dropout voltage for the 5v regulators to “feed” on if you use 12v…2v -.8=11.2/2=5.6v not good, not when i looked up the specs of the voltage regulators used, it needs 1.2 volts difference…the diode problem which if you are brave can be worked around by simply bypassing it as I did with mine.
Modded the op amps with opa627/bm/bp running 10ma class into a 1M ohm input impedance valve buffer all connected with van den hul d102 which cost more than the DAC.
I wrote this after seeing the posters comments about PSU upgrades on what are simple DACs that no one in their right mind should take seriously but there’s always that crank…sounds is really great good as a basic DAC and can be improved substantially with some mods..I can certainly hear many more subtle background details in songs, bass is more tuneful and extended, more depth/space to recordings etc..surprising what a little bit of reading (actually quite a lot of reading) a big choke and some capacitors can achieve.
so you put lead on signel left end leed on signal rca jes in line signal ?