A Solo 103 Build
 This is the second in my series of articles on building full-range loudspeakers. Contrary to what I stated at the end of the last project, I decided to build a pair of small Fostex-based speakers for my next project. I chose the Solo 103 speaker from the Humble Homemade HiFi website for a few reasons. I had read good things about these speakers, and they look small enough that I could use them for the computer. (I never listen to anything on the computer so I am not sure what makes me think I need computer speakers other than it is a socially-acceptable place to store small(ish) speakers.) They also added a bit of build complexity compared to the previous project, but not too much – the boxes are still all right angles which in theory is super easy.
As it turns out, this may not have been the best choice of projects for one very important reason: I could not seem to get the driver needed. I knew from the get-go that the Fostex FE103E was discontinued and was to be replaced with the FE103En, but I assumed that I would be able to get a used pair of FE103E drivers from a hobbyist somewhere. That did not pan out. It was undetermined if the new FE103En would work well in this box but since they were all I could get, so I figured I would try them out. I am still mostly interested in gaining skills in cabinet building and I was sure they would not sound bad.
Most of the stuff in this article is probably obvious and old news to the grizzled veterans of DIY. Having no mentor in cabinet making other than the interwebs I have had many “learning experiences” that many might avoid with the guidance of an experienced wood worker. If anyone has any tips and suggestions on how I could improve my process I am all ears and definitely would appreciate any feedback.
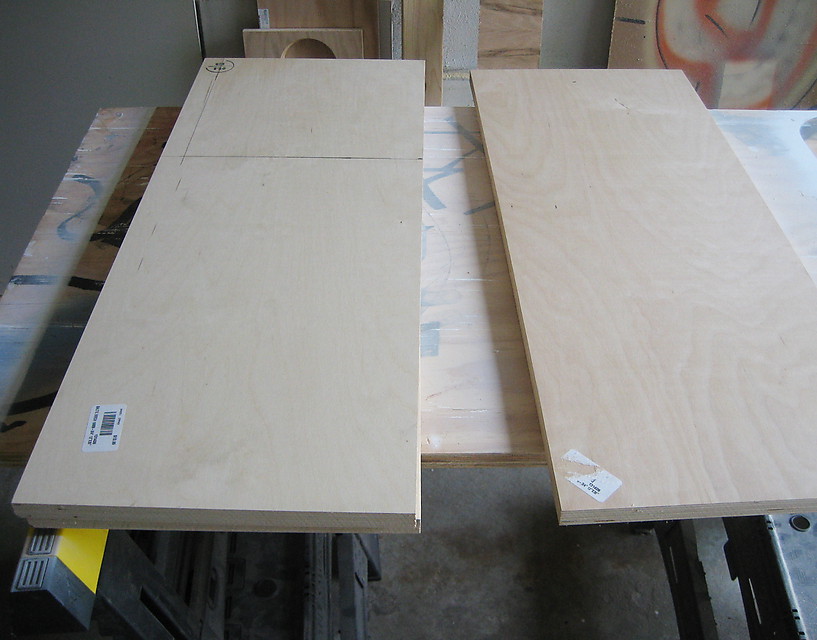
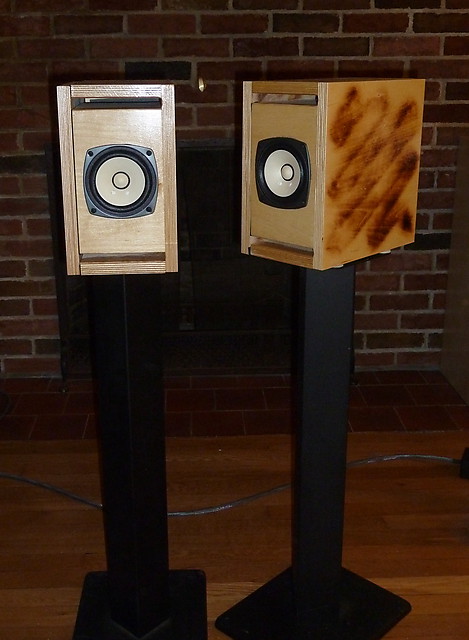
For this project I used ¾” Baltic Birch plywood that I got at the local Woodcraft, which came in 12” x 30” boards. For full sheets I will need to go to a supplier and borrow a friend’s truck. Damn hatchback keeping a man down. This plywood is a completely different animal to the plywood you get at the big box stores. The ¾” material I used for this project has 13 layers of birch, no junk filler, and no voids. You can see why people favor this stuff and I really love how the end grain looks once it’s cleaned up. I did use some regular ¾” plywood for the vents because I did not have enough of the good stuff.
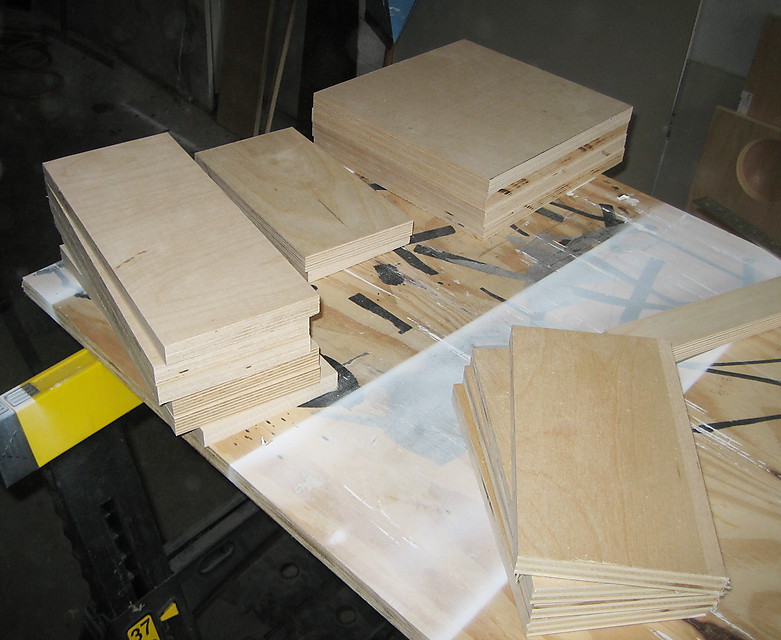
Precision and accuracy is what it is all about – this is obvious but not always the easiest thing to achieve for the novice. Due to the smaller starting material, it was not practical to use my EZ-Smart system, so most of my cuts were done on a 10” jobsite circular saw. While this is the proper tool for the job I still have a lot to learn on the proper usage. First I really need to get a better blade then the one that was supplied with it. I got a lot of chip out on the top veneer when cross cutting. Recently I read a post on a message board that had a great tip to prevent this – here is a link to the method. I did not use it for this project but will in the future. After this project I also bought a nice 80+ tooth blade that makes all the difference.
I also kept the gate in the same spot for all cuts of a given width but I still got some slight variation. This became a slight issue later but not a deal breaker. For most of the cross cuts of the smaller pieces I used a compound miter saw, which also took me a bit to get my precision down. I am now questioning how true the 90° position is based on some of my results. This is also most likely a result of technique.

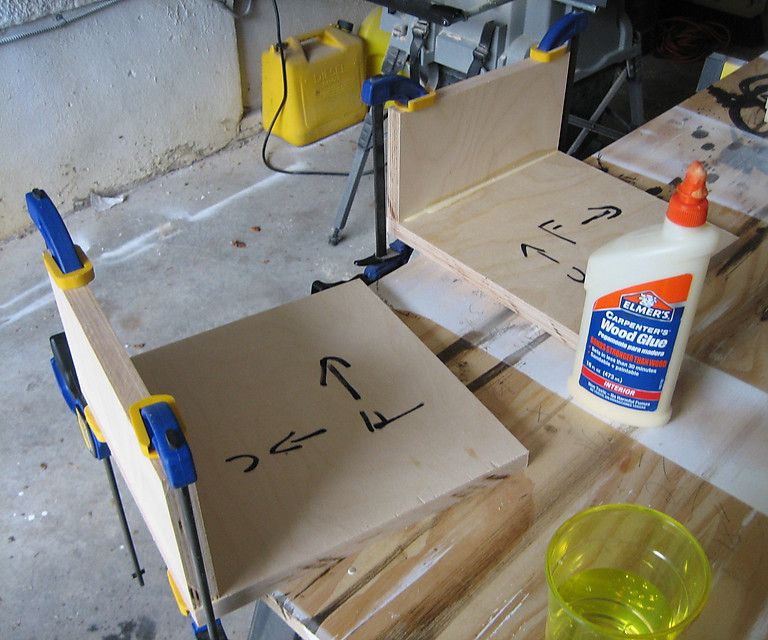
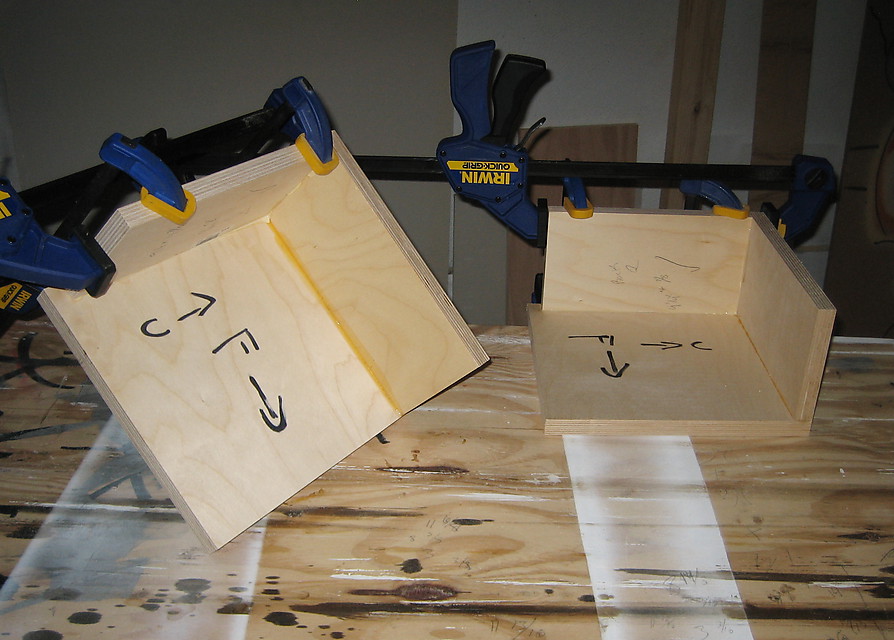
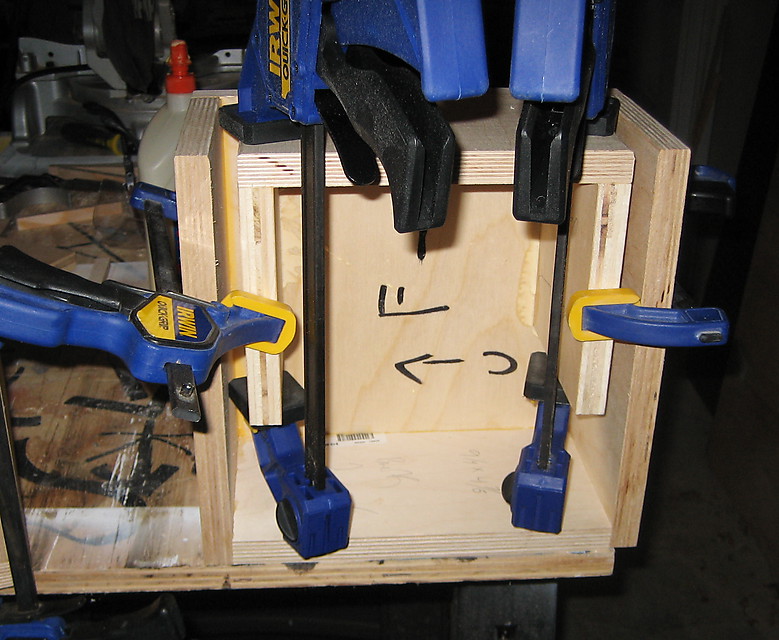
For the assembly of the cabinets I took it real slow this time. I again used regular wood glue but skipped brads because everything seemed to attach real tight and I did not think they were necessary. As far as taking it slow is concerned, I basically glued one or two panels in place at a time instead of trying to do the whole damn thing at once. (This is again probably one of those obvious things that an experienced person would never attempt.) I would then let it sit over night and the next day move on to the next step. This also had the added benefit of only taking around 30 to 40 minutes per day – easy to fit in and helped maintain domestic harmony.
All internal panels were glued to one side with the other side to be glued on once the project was completed. Whenever I needed a nice 90° angle I would use a piece of stock that I was sure was a true 90° and clamp it down next to the piece to be glued. This had the added benefit of keeping the clamped panel from sliding when I added too much clamping force – which I usually did. I still find attaching two panels at a perfect 90° to be challenging and something I need to work on.
There were some accuracy issues with the side panels being a bit too big. This was easily disguised by pushing everything up and forward, allowing the front and top to be nice and flush. If you examine the back and bottom of the speakers you will notice the difference but if you mentioned it to me I would call you a jerk. I imagine this could be sanded down with a belt sander but it did not seem to be worth the effort.
One other issue I had with this build was the hole for the driver. I should have cut this in the baffle before gluing it to the side. This would have made using a chamfer bit or something on the inside of the hole possible to let the driver “breathe.” Instead, I used a sanding bit in a Dremel and it was a bit sloppy.
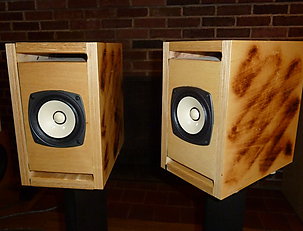
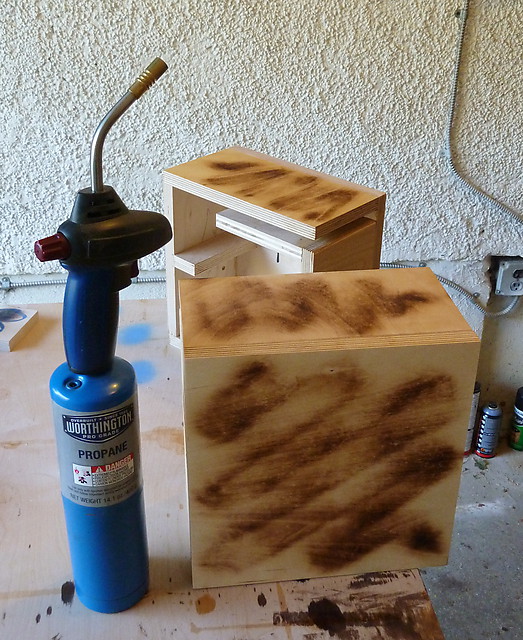
I always have grandiose plans for the finishing of the cabinets. It is funny how these get pared down the closer the project gets to completion. For these speakers I used oil-based high-gloss polyurethane that I applied with a brush after sanding the cabinets to 220 grit. I applied three coats, with a light sanding in-between. In the right light you can see some issues but overall the results are very nice. To add a little flare to the cabinets I used a torch to “caramelize” a pattern in the wood. This was done before the polyurethane and I really liked the results, though I imagine it’s not for everyone.
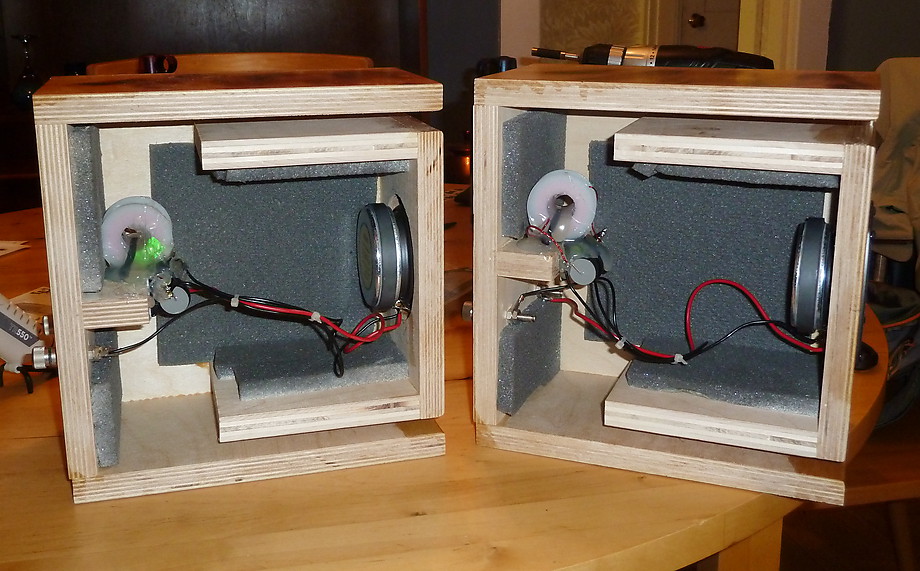
Final assembly consisted of attaching the binding posts, soldering together and mounting the filter network, wiring everything up, attaching Sonic Barrier, and screwing in the drivers. The binding posts were very nice and cheap from Parts Express – I think they will be my “go to” for the near future. They fit in nice and snug and seem well-enough made. The Sonic Barrier I am sure can be bettered. It does not always seem to be sticky enough but for this scale of a project it’s perfect. I am not going to spend $100 on one of the other products when this whole project is costing less then $150.
I bought the filter network components from Madisound and again I did not splurge on crazy capacitors and inductors. For the capacitor I used Solen from France, the resistor is an Eagle 10 watt and for the inductor I used the Madisound house brand. Once I soldered these together I mounted them to the back brace using two sticky cable mounts and beefy zip ties. I then applied a generous portion of hot glue to keep everything from wiggling around. Next I wired up the binding posts and the drivers. Almost time to listen!!
As usual, though, when the end is in sight I began to rush – never a good thing. I got the first driver in fine but when I moved onto the second one disaster struck. My screwdriver slipped and went right through the driver’s fabric surround like a knife through butter. For those wondering, one of these little drivers can really leave a nice dent in the wall of your garage. The worst thing about this was not the extra $40 I had to spend on a new driver it was that the stupid things were not in stock and would not be for another three weeks. Let’s just say I was a bit moody for the rest of that night.
But fast-forward three weeks and I have my fresh FE103En in hand. I very gently screw it into place, with my hand in what others have called the “sacrificial” position. I will not lose another driver in that manner, I promise.
Once the drivers are in all that is left to do is attach the side and listen! I sort of knew from test fitting that my tolerances on the internal panels were not great. This caused some gaps that concerned me. These were only around 1/32” but I still did not feel comfortable with the fit and the use of wood glue. It may have been fine but after all this work I did not want to risk the sound by having a leak somewhere. So I did what I thought was necessary and sacrificed aesthetics for sound. To ensure a total seal between all internal panels and the side I used ½” sticky speaker gasket tape. I then screwed the side on instead of glue. It definitely does not look as nice but it worked well and it is sealed.
These are really fantastic little speakers and I am truly satisfied with the sound. They are detail monsters and have an amazing ability to convey texture to the instruments. If you are a lover of acoustic guitar this may be a speaker you could live with for a long time. They do have a parallel band stop or notch filter which is to bring down the midrange a bit. I think this definitely helps achieve the very smooth sound these speakers have. Obviously these speakers will not be for everyone and they do have some limitations mostly based on size. I did find at higher volumes there can be some nastiness on the edges but I think this comes with the territory. They also do not play very low but I use them with a very nice sub so this is not an issue.
Here are a few comments from my friend Gayle, who gave them a good listen one Saturday. He is much better at the qualitative evaluation they I could hope to be and I will be roping him in to help evaluate future projects.
Right away, I was struck at how lively and real the attack and decay of acoustic guitar strings sounded. Banjo, ukulele, violin…all laid out unimpeded and uncolored. I suppose I could expect same results with jaw harps, sitars, and most anything else that gets plucked or strummed. Imaging is marvelous, especially in the front to back axis. The music often seems not to be coming from the drivers themselves, so, these little dudes handily fulfill the promise of a true stereo effect when it’s in the recording. Also, there is no undue sibilance (an unforgivable sin in my opinion), and when many instruments are playing at once they all remain separated both in timbre and in space. It’s a really cool effect, and there seems to be just the right amount of air. The Solo103s also sounded great outside the sweet spot, so there’s no need to be a captive to your own system.
Of course, there are a few shortcomings. Chesty baritone voices sound a bit less meaty than I’m used to hearing. The last little bit of metallic sparkle from cymbals seemed a little attenuated, and I did wish that these little speakers could make the ripe and blatty sound of real trumpets and horns more obvious. During this listening session, I never felt that they were being pushed too hard, but if I owned them I would live with a fear in the back of my mind that one false flick of the volume knob might just blow the snot out them.
Overall, I was very impressed. I definitely prefer my Magnepan 1.7s, but there is something very special about the clarity and micro-dynamics of the Solo103s that really got into my head. If the virtues of the Solo103s are what grab you as an audiophile, then you’ll love these little sweethearts.
Overall this has been an extremely satisfying project that I would highly recommend to someone just getting into loudspeaker DIY. They really are a very entertaining loudspeaker for relatively short money. As I mentioned above they would be fantastic speakers for use at a computer. They are not too large and will definitely make you smile in a near-field application.
As discussed, they do have shortcomings. The question for me is, can these shortcomings be alleviated with a larger (or smaller) driver? Maybe a horn or Onken design will do the trick? I have read some arguments that 4” is the perfect size for a full range. Of course this was coming from someone who sells a 4” single driver speaker. Luckily I have a good amount of drivers still to be used in a project. These include a 6” Mark Audio Alpair 10, a 3” Mark Audio Alpair 6, Fostex FE127E and Fostex FE126E. Maybe I should try another brand other than Mark Audio and Fostex, but I have these so it is what it is. I am also not going to put them all in similar boxes because what would be the fun in that.
This little journey is really fun for many reasons. First everything sounds better when you build it yourself. This is fact not opinion. Next there are so many designs out there that I want to hear but do not know anyone who owns them. I wanted to hear a slot ported single driver design so I built it. What does a Bigger is Better (BIB) sound like? I have no idea but I bet I will find out one day. The next project on the list is a pair of double mouth horns from Woden Design. The model I will be building is the Dunideer and is based on the 3” Mark Audio Alpair 6 driver. I have never listened to a horn of this type and this will be my very first build of a folded design. I am really looking forward to it!


Very cool – I like it – would love to hear it!
What amplifier do you use with this speakers? I have solo 103 (painted to the black piano color). I use with this speakers small SE amplifier on EL84 (3-4W:-).
Hello,very nice! what are the values for filter network,schematic?THANKS
go ahead and build the double mouth horn. I built a pair of Saburos a while back and was amazed at what i got from a 4.5″ driver (fe126). The Solos look nice for my second system, i have a pair of Merrill DC4 which might work well
hi
I want to make the project your very nice but the measures are not cutting wood. cordial greetings
henry
Hi, do you have the circuit diagram and parts value for the filter network please as I have a couple of pairs of Coral Holey Basket FE103A speakers taken from Sony TE-500a old reel to reel tape machines .
> I bought the filter network components from Madisound and again I did not splurge on crazy capacitors and inductors. For the capacitor I used Solen from France, the resistor is an Eagle 10 watt and for the inductor I used the Madisound house brand.<
Cheers Ben
Good afternoon. I have in stock a pair of Fostex FE127E and several pairs of Fostex FE103sigma. Does anyone have the exact dimensions for such a case for the Fostex FE127E and Fostex FE103 speaker? What filter and ratings should be used to equalize the frequency response in the first and second cases? Can anyone share information or a link to a project with this details? Thanks!