Using Apple’s AirTunes
Apple Inc. has a wonderful feature built-in to a few of its products that can provide a music lover with the ability to wirelessly stream music from a music library to a remote stereo system (or systems), and all with the simplicity that Apple is known for. This feature, called AirTunes, is part of iTunes and is supported by two of their wireless products: the Airport Express and Apple TV. For simplicity’s sake, only the Airport Express will be discussed in detail in this article.
Apple’s Airport Express, which is about the size of a deck of cards, is an 802.11a/b/g/n compliant device. It doesn’t just provide the ability to be a mobile fits-in-your-pocket wireless access point (great for hotel rooms), nor is it just a wireless bridge, or a wireless print server, or a wireless network extender – it’s also a key component in setting up a wireless streaming system for audio. And all that for less than a C-note (that’s slang for a hundred-dollar bill in the US).
Setting up such a streaming, or distributed, audio system requires three components:
- The source: this can be a computer (Mac or PC) running iTunes, or an Apple TV
- The destination: each destination, or audio system, requires it be connected to either an Airport Express or Apple TV, and
- Control: the ability to choose source libraries and destinations, song selection, transport functions, and other features is accomplished via Apple’s Remote application that will run on an iPod Touch, iPhone, or iPad (although the Remote application has not been optimized for the larger screen of the iPad, yet).
(Note: the Apple TV can be used as either a source or destination – although not simultaneously – and will be explained briefly as warranted).
Before we get into setting up such a system, there are two items that we need to get out of the way. First, I’ll assume you’re somewhat familiar with the iTunes application and, as such, have ripped at least a portion of your CD collection using iTunes. (For those of you who aren’t familiar with iTunes, it’s a free media management application from Apple that can be downloaded here and runs on both PCs and Macs.) Second, you’ll need a wireless (wi-fi) network. This isn’t absolutely necessary as the Airport Express can also be set up to create a wi-fi network (among other functions), but it helps if you already have a stable established wireless network in place. Finally, you’ll need some level of internet connectivity.
Now, on to the nitty-gritty.
The Source
Any computer, Mac or PC, that can run iTunes can act as a source. There are a few setup procedures in iTunes that are required to enable the AirTunes feature. First, open iTunes and then go to Preferences. Click on Sharing, as shown in figure 1 below, and make sure the ‘Share my library on my local network” is checked. From there you can choose to share your entire library, or just certain playlists.
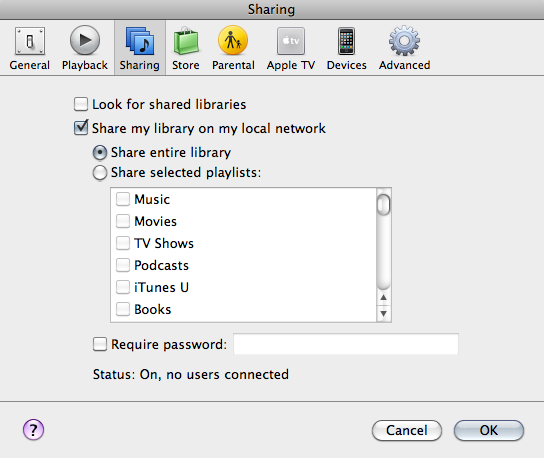
Figure 1. Choose to share whole iTunes library, or select specific playlists
Next, click on Devices and check the box next to “Look for remote speakers connected with AirTunes” as shown in figure 2. This is very important, as without it iTunes will ignore all destinations. I tend to leave the subsequent sub-selections unchecked, as I enjoy the ability to control the volume feeding a particular destination. While on this screen, also check the box next to “Look for iPod touch, iPhone, and iPad Remotes” as this will enable your library to be controlled via one of those devices using the Remote application.
As mentioned earlier, the Apple TV can also act as a source. If you have one and have music stored on its internal hard drive, no other setup is required. The internally stored music can be accessed for streaming as a separate library. This option can be appealing to those who would rather not keep a computer on all the time, but is limited in how much it can store (current Apple TVs come with 160 GB hard drives which are good for 250 to 400 CDs ripped in a lossless format, assuming no other media content is stored on the drive).
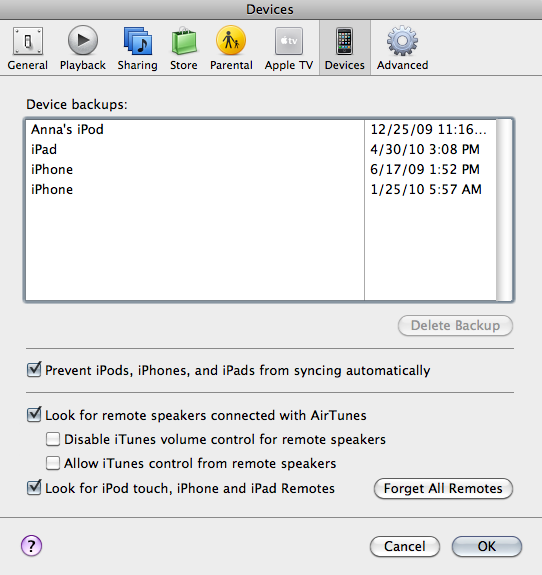
Figure 2. Enable AirTunes and Remotes
Now that we’ve got our libraries ready to be streamed, on we go to setting up each destination, audio system, or “Speaker Selection,” as Apple likes to call it.
The Destination
First, a little connectivity information about the Airport Express and, to a lesser extent, the Apple TV. Both devices can be attached to a stereo system in two ways:
- Via analog out: the Airport Express has an 1/8th inch mini stereo jack that can be connected directly to an unused input on your receiver or preamp. The Apple TV has standard left and right RCA jacks. This is a cheap and easy connection and is great for streaming music to smaller systems or even to your back yard (as I do) where casual listening is your primary goal. For an impromptu setup, nothing beats connecting either device directly to a pair of powered speakers (I do this with a pair of Audio Engine A2s to great delight). The drawback here is that you’ll be using the device’s internal D/A converter which, for some of you, may not be that appealing.
- Via toslink out: the same 1/8th inch mini jack on the Airport Express, as described above, also acts as a mini-toslink connection. A simple mini-toslink to toslink cable will provide you with a digital toslink connection to your receiver, D/A converter (DAC), or preamp. The Apple TV provides for a standard toslink connection. This option provides better fidelity than the analog out, and can be used in more revealing systems.
As a side note, Apple sells a cable connector kit that includes a mini-to-RCA left/right audio cable, a mini-to-optical digital Toslink audio cable, and an AirPort Express power extension cord (the former two of which are manufactured by Monster!). This kit retails for $39 and provides all manner of audio connectivity from an Airport Express to your audio system. Now that we have that out of the way, lets configure an Airport Express.
The Airport Express is configured using Apple’s free Airport Utility, available for both Mac and PC. With the Airport Express powered on, start the Airport Utility application and select the Airport Express that is to be configured. Initially, it will show up with a factory-supplied name (typically its MAC address in hex format). Now click on Airport and then the Base Station tab. As shown in figure 3, give it a descriptive name and a password.
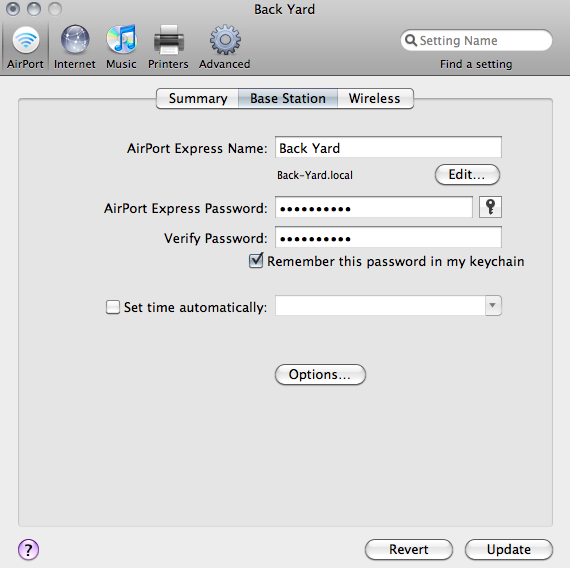
Figure 3. Configure the Airport Express
Next, click on the Wireless tab. Assuming you already have a wireless network, select “Join a wireless network” as shown in figure 4, and provide the network name and password information.
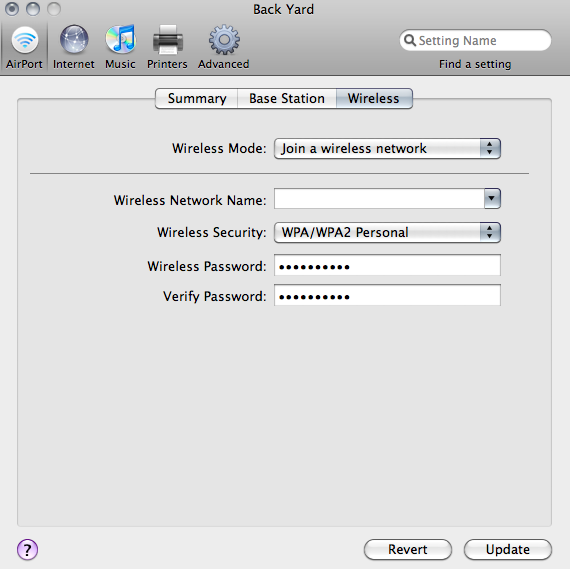
Figure 4. Enter the wireless network to be joined
Lastly, click on Music, as shown in figure 5, and check the box next to “Enable AirTunes.” Click on Update, and the Airport Utility will configure your Airport Express accordingly. Once the Airport Express reboots, it’s ready to receive an audio stream.
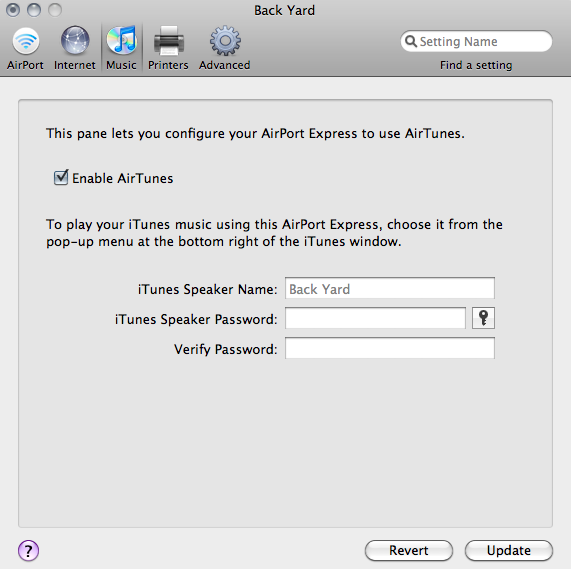
Figure 5. Make sure that you enable AirTunes
As mentioned earlier in the article, an Apple TV can also be used as a destination. No setup is required as long as it’s powered and connected to your network.
Now that we’ve configured both the source library (iTunes) and destination (Airport Express), on to controlling our audio stream.
Control
One way to control what gets sent where is via the computer you have iTunes running on. In the lower right-hand side of the iTunes window, you’ll see a little button labeled “Computer.” This is the default destination for your stream i.e. the speakers attached to the computer. Clicking on this button will pop up a selection menu showing you all available destinations, as shown in figure 6 below.
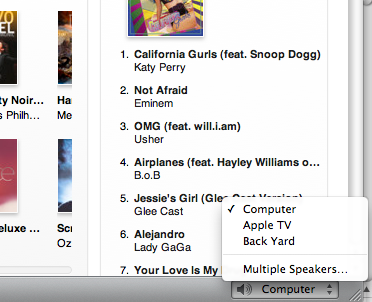
Figure 6. From within iTunes, you can select the destination for your music
Selecting any of the other destinations will redirect the stream to the selected destination. Clicking on “Multiple Speakers” will allow you to send the stream to multiple destinations (if you have them). Voila! You’re now streaming your library to a remote system.
Of course, it doesn’t end here. There’s a much sleeker, sexier, and easier way to control your streaming: using an iPod touch, an iPhone, or an iPad.
If you have any of these devices (we’ll refer to them generically as an “i-device” from now on), simply go to the App Store and download Apple’s free utility called Remote. Once downloaded, you’ll need to pair it with your iTunes library. Pairing is a simple enough procedure, just make sure iTunes is running on your computer and that both your computer and i-device are connected to your wireless network.
Start Remote on your i-device and touch the Settings button. Then touch the Add Library button, and a 4-digit code will be displayed, as shown in figure 7. In iTunes, click on your i-device under Devices in the left-hand column and enter the code displayed on your i-device. If you have other computers and/or libraries that you’d like to access, repeat this procedure. Once you’ve paired your i-device with a library (or libraries), simply choose it on the Settings screen and you’ll have access to your entire library!
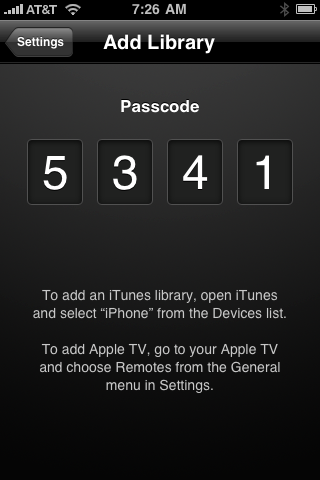
Figure 7. Initialize the remote connection to your iTunes library
To pair your i-device with an Apple TV library, follow the same procedure on your i-device, and then choose Remotes from the General Menu in Settings on your Apple TV.
Now that you’ve selected a library (your source), you can choose a destination (or destinations) from the same settings screen, as shown in figure 8. Simply select which speakers to turn On or Off. Touch the Done button and you’re good to go.
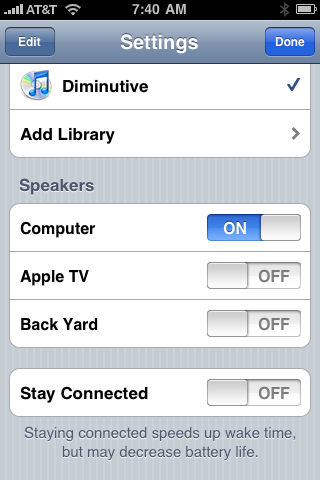
Figure 8. From the iPhone (or iPod Touch or iPad), you can select the destination for your music to play to
You can also change your speaker selection while playing a tune by touching the Speakers button, as shown in figures 9 and 10.
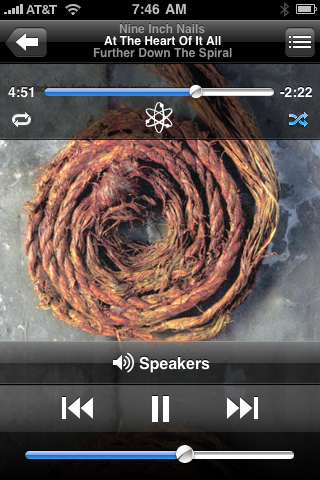
Figure 9. The iPhone or iPad or iPod touch allows full remote control while playing music

Figure 10. Multiple destinations can be selected
That was pretty painless. Right? For an initial investment of a $200 iPod touch and a $99 Airport Express, you now have a wireless distributed audio system. Each additional Airport Express will give you an added zone. Throw in an Apple TV. Have a party.
A real-world example of such a setup, my own, is composed of a computer that has my entire library stored on external drives. This computer feeds my primary system via USB, and then wirelessly streams to four other zones in my house through three Airport Express base stations and one Apple TV. All is controlled via the Remote application installed on my iPhone. I have instant access to all of my music in any of these rooms.
Finally, just a quick note regarding a limitation of the Airport Express (and Apple TV): it’s limited to playback of 16-bit / 44.1 kHz (or less) files. This isn’t that much of an issue, as feeding it a higher resolution file will not make it choke up and stutter. iTunes will simply down-sample the file prior to sending it off to the Airport Express in order to stream a seamless playlist, album, or (my favorite) your entire library in random order.


Well Mr. Quinn. It has been delightful reading your post. I throw alot of BBQ’s in the summer, and the summer is coming soon! I will make sure i buy rocklike speakers for my back yard in London. Everyday will be a smashing day listening to my favorite Duran Duran songs in the yard and on my deck. And when i show my neighbors how i did this from my Mac, i will tell them “I read this article by Joe Quinn. He showed me how to do this work!”
Cheers from London
Gabe Quaker
The setting “Share my library on my local network” (Edit > Preferences > Sharing tab) is for sharing itunes with up to five network COMPUTERS. It does not have to be enabled for AirTunes/AirportExpress. At least not on the Windows platform.
Steve
This is helpful, thanks. Are you able to tell me how I can use a mac air or ipad to stream subscription services such as Music Unlimited from my computer to my airport express and then connect the airport express to a DAC? That is, I don’t want to be able to hear only music that I have in my itunes library.
Hi Ellis, perhaps give airfoil a try? http://www.rogueamoeba.com/airfoil/mac/
Hi John
Thanks so much – seems perfect – I will try it.
Ellis
Cool – please let us know how it works out – it’s on my list of things to try out for a future article so any comments would be helpful.
Hi John
Airfoil is great – thanks. I now have an airport express connected to my DAC via a mini toslink (3.5mm) to toslink cable. It took me a while to figure out that I needed to tell Airfoil that I was using Google Chrome so that it recognised the application I was using to access Music Unlimited. So my laptop is now untethered (although the quality of the sound is better with the laptop hardwired to the DAC, which doesn’t matter for background music whenI am not listening seriously). This is a better solution than Sonos as I am not tied to a hardware system that could go bankrupt.
Thanks again for your help.
Cheers
Ellis
Dear Joe,
Thank you for the insightful article. This will be the basis of the exterior audio system in a country house i have. I wanted to ask you if I can have
3 airport express in my 3 zones, connected to my Crestron Swamp amplifier
one macmini server attached to a NAS with my itunes library
controlled via ipod/ipad running “remote” app.
Do I also need to have an appletv in each zone? I guess my question is, does the Airport handle the actual playback of my audio files off my mac server, or just the audio distribution part?
If I also need an appletv in each zone of course it won’t be a problem. But if you please advise how to configure the appletv’s, it would be great. I only want to access my network library, not the local appletv storage.
Thanks again for such an insightful article!
Hi George,
Thanks for the kind words. To answer your question, yes, one Airport Express is required for each zone. The output of the Airport Express is an eighth inch combination jack that is both analog stereo and optical TOSLINK. This means you can plug it into an outboard DAC using a mini optical cable, or into a preamp or receiver using an mini stereo to RCA cable (here’s a link to the required cables: http://store.apple.com/us/product/M9573LL/A?fnode=MTY1NDA0Mg). Please be aware, however, that if you use multiple Airport Express units, you can only have the same audio streamed to them. You cannot have one song playing in one room and a different song playing in a different room.
That said, if you’re going to use a Crestron multi-zone amp, you would only need to plug one Airport Express into it, and it would then feed your three zones.
An AppleTV is not required, unless you want to stream video to each zone (BTW, the newer generation of AppleTV does not provide on-board storage i.e. it is strictly a streaming device).
Hope this helps.
Joe
PS: The Remote app will work just fine as you’ve described it.
Joe,
Great informative write up.
Do you know if the 16-bit / 44.1 kHz (or less) limitation applies if you are using the optical digital output of the airplay?
I thought if using that, it just passed the digital stream through in it’s original form..
Not sure.
Hi Rob,
Yes, the optical output of the AEx is limited to 16/44.1. You can still stream higher resolution files to it, though. iTunes will down-sample higher res files when streaming to it.
Hope this helps.
JQ
Tnx buddy!
Hi. I’m investigating a whole house audio system using as many as 10 to 12 Airport Express zones. Do you know if there are limitations to this? Will the Remote app display that many destinations?
Thank you.
PS This is going into a new construction home so I have the ability to hard wire the Airport Express units if wireless interference will be a drawback. I am thinking of wiring each zone to a central distribution point which will house the Airport Express units and the amplifiers. Ceiling and wall speakers will then be in each zone. Do you think this will work? Thank you.
Hi Brad,
Apple does not specifically state how many units can be deployed on a single network. Per the following link:
http://support.apple.com/kb/HT1515?viewlocale=en_US
Apple says 3-6 units depending on environmental factors, but this only applies if using each unit wirelessly. Hard wiring them is an option, as the single RJ-45 port can act as either a WAN or LAN connection, and I would assume one could use more than the 3-6 specified by Apple.
Also, please be aware that such a setup as you are describing only allows a single stream of audio to be transmitted to each zone i.e one source to multiple destinations/zones (you can, however, independently activate or deactivate each zone).
Hope this helps.
Joe
Thank you Joe. I think I am going to give it a try. Seems to me that an Apple based system that is flexible in the future (ie enhanced Airport Express, Apps, etc) is better than using a Sonos type system (small time company, hard-wired system that will become obsolete).
Do you know if the Airport can be used as WAN and LAN at the same time? Meaning, if I hard wire all Airport Express units to avoid interference and therefore limit myself to one stream of audio via the wired system, can one of the zones still stream wirelessly? So, I could stream wired via a laptop using the remote app to say 8 zones on the first floor of the house and then wirelessly to a single zone on the second floor if I choose?
Thanks! I’m quite the novice so your advice is very much appreciated!
Hi Brad,
Yes, you can have some of the units hardwired and others wireless, and stream to both simultaneously.
Joe
If a unit is hardwired, will it also still be able to operate wirelessly? So, I could include it in a multi-zone stream from ITunes on a computer or separately stream wirelessly from an IPhone?
Yes, and yes. They are really quite versatile.
Joe
Very interesting article, thanks! Is there any “hack” that will allow me to have two different streams playing in two different airports at the same time?
In my lounge i have an apple TV for the TV plus airport express to act as a wireless extender. if I used Toslink to connect speakers in the lounge to the apple TV then would this give me the audio for iTunes music and videos (but not TV and DVD) in the lounge. If i then wired the outside speakers to the airport express could i then have, through home sharing, another zone outside where i could stream music from the iPad source to outside while at the same time a movie from the itunes library was played via apple TV on the inside speakers? i.e 2 zomes playing from 2 sources at teh same time.