Computer audio on the Mac – getting started
More and more audiophiles are using a computer to purchase, manage, and play back music. The advantages of storing everything on a computer are compelling: better ways to organize and search your music collection, access to more advanced “hi-rez” formats, and of course, no need for shelves and shelves of physical CD cases.
It’s not really as simple as that, of course… but given the flexibility and convenience, we at HifiZine decided to explore computer-based playback a little more. This article aims to be a helpful “getting started” guide – not the be all and end all, but to get you started on the path of using a Mac computer as a music “source” or “transport” in a hi-fidelity music playback system. The playback software we’ll be using in this introductory article is iTunes.
Table of contents
- Hardware and software
- Getting started with a music library
- Playing tracks
- Connecting a DAC
- Managing your library
- Remote control
- Other players
- Concluding remarks
Hardware and software
The first thing you’ll need, of course, is a Mac. It will need to have a reasonably recent version of the OS X operating system, and the latest version of iTunes. As of the time of writing, iTunes is still supported on OS X 10.5 Leopard and will work on a PowerPC machine. This is a good way to explore computer-based playback cheaply, if you have or can borrow an old computer for this purpose – my first music computer was a first-generation G4 Mac mini.
If you decide to set up a permanent music computer, you should be looking towards an Intel CPU running OS X 10.6 Snow Leopard or OS X 10.7 Lion. You don’t need a powerhouse machine – my music computer is the cheapest 2011 Mac mini with 2 GB of RAM – although once you get into more advanced features of some of the alternate players, you may want to invest in more memory. A Mac mini is a great solution, as it is sufficiently powerful, small enough to fit almost anywhere, and can be run “headless” if you wish. The current (2011 onwards) Mac mini doesn’t have a CD drive in it, so you will also need to purchase an external “Superdrive” to go with it.
While a Mac mini is a great choice for a dedicated machine, iMacs and MacBooks can also be used. I have one of each of those too, and while the Mini is the main music machine in the living room, the others get used for desktop and headphone listening respectively. I think the key thing, though, is to just get started with what you have. Once you understand the ins and outs of computer-based audio playback better, you can decide on whether to get a dedicated machine for music.
You will also need a DAC that can be interfaced to the computer. I’ll cover that in a later section.
Getting started with a music library
Let’s get some music loaded into your machine. I’m going to assume that you have a CD collection that you want to import or “rip.” I suggest that you work through this section with perhaps a dozen CDs first, and make sure that everything is to your satisfaction before doing your whole collection. Just in case. You will find the ripping process to be quite time-consuming, so it’s best set up as a “background task” while doing something else. Avoid making that “something else” include using the same computer that the CD is being ripped on, though.
You will firstly need to set the options that control how iTunes operates. Let’s go through the iTunes Preferences screens one at a time. Firstly, here is the General Settings screen:
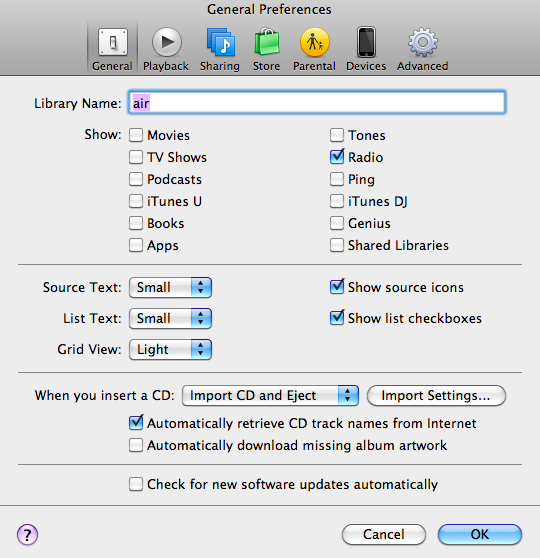
I’ve turned off most of the junk in the top section, as I just use iTunes for music. The important settings are near the bottom of this screen. Firstly, I have set it to “Import CD and Eject” when I insert a CD. This is the most convenient setting for a dedicated machine – when I buy a new CD, I just pop it in the slot and away it goes. If the machine is not a primary music machine, though, you may prefer to set this to “Show CD” or “Ask to Import CD.”
The option “Automatically retrieve CD track names from Internet” should be turned on. CDs don’t actually contain any information about artists and tracks on them, so what iTunes does is connect to a database called CDDB (for “Compact Disc Database”) that is managed by Gracenote, a division of Sony. Information about the audio data on the CD is used to match against the database to figure out what CD you have just inserted. In the rare case that a match can’t be found, you can import the CD anyway and manually enter the track names later.
The option “Automatically download missing album artwork” is enabled only if you are logged into the iTunes store. If checked, iTunes will get the album cover artwork from the iTunes store. This doesn’t always work, in which case you need to do it manually – I’ll cover that later.
The “Import Settings…” button is very critical, and you need to make sure that you have these set right, or you will end up having to re-rip a bunch of CDs! Not fun. Here is how I have it set:
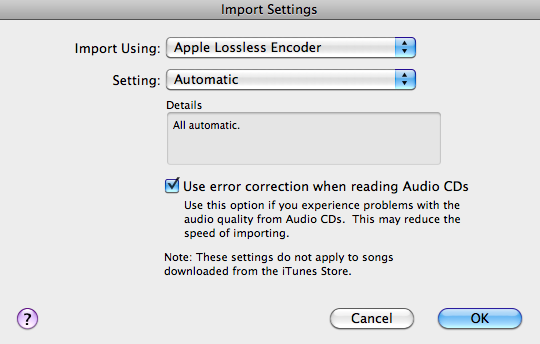
A key decision that you need to make early on is which file format to use. You will definitely want to use a lossless format, which leaves you with three choices: AIFF, Apple Lossless, and WAV. I use Apple Lossless, because the files are smaller than the other two formats, and I’d suggest that this is a sensible choice for most people. Since the files are lossless, you can convert them to a different lossless format later with no reduction in audio quality.
I’d recommend leaving the error correction option on. With this option on, iTunes generally gets the bits off the CD correctly, although it will fail on a few CDs. Sometimes it’s because they are scratched, although I have had it fail on a brand new CD. If you get an album with errors on it (you will know because it sounds terrible), you may wish to try an alternative ripper on that CD, such as XLD.
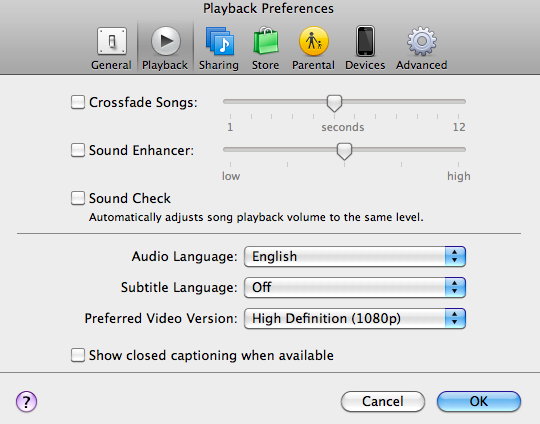
On the Playback Preferences screen, be sure to turn off the three audio processing settings, as they modify the data being played back:
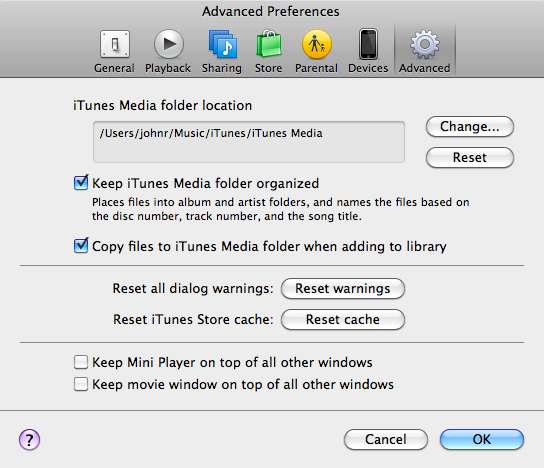
On the Advanced Preferences screen (below), I suggest turning on the “Keep iTunes Media folder organized” setting, as well as the “Copy files to iTunes media folder when adding to library” setting. This ensures that all of your files are in the same place in the file system. If you wish to change the location of the Media folder – for example to put it on an external disk drive – I suggest getting started with the default location, and I’ll provide instructions later on how to move the whole library.
OK! With all of that set up, insert a CD into the drive. If you don’t have iTunes set to automatically import CDs, then you may get a dialog asking you if you wish to import. Or, you can right-click on the CD name on the left-hand menu, and select “Import CD.” Do a few CDs, and then move onto the next section.
Playing tracks
Let’s make sure that you can play music. Firstly, click on the “Music” menu item at the top left of the iTunes screen, and then the icon in the toolbar to display the icon view. You should get something that looks like this:
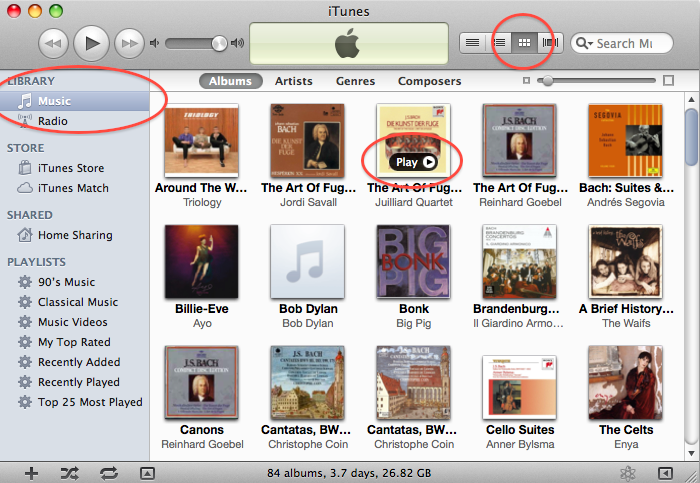
(The suggested menu and buttons are highlighted with a red circle.) If you hover the mouse over an album, you will see a “Play” button pop up – click on it to play the album. Alternately, you can double-click on the album icon to look inside:
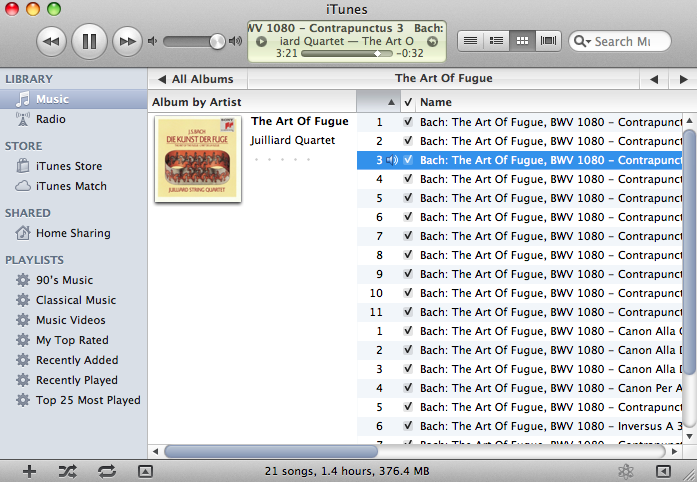
Double-clicking on any track will play it. You should now have audio coming from your computer’s speaker. Here are some tips that you may find useful to know, that help with playing back music in iTunes.
- While playing a track, Cmd-L will change the display to show the current track being played.
- The left and right arrows will skip the playing track forwards and backwards through the current track list.
- The up and down arrows will move through the track list without changing the currently playing track, and then you can play the selected track by pressing Return.
- The Space bar pauses playback.
- Cmd-Option-left and Cmd-Option-right will skip backwards or forwards.
- Cmd-up and Cmd-down will raise and lower the volume.
- Cmd-Option-up will mute and unmute the output.
OK! So far so good! Let’s get your DAC set up so you can listen to better quality sound.
Connecting a DAC
With a typical choice of computer hardware like the aforementioned 2011 Mac mini, there are at least seven ways of getting audio out of it and into your stereo system – no-one ever said that computers make life simpler!
- Audio line output
- Optical output
- USB
- FireWire
- HDMI
- Thunderbolt
- Over the network
In this article, I will address only items 2, 3, and 4. There’s an additional option that doesn’t neatly fit into this list, which is using a converter of some kind between the computer and a DAC with S/PDIF or AES/EBU input, and I’ll cover that briefly too. But let’s dismiss the others first:
Audio line output. It’s a fairly simple matter to plug the audio output from your Mac straight into your stereo with a suitable cable (3.5 mm stereo jack to a pair of RCAs). It’s useful as a temporary solution to use to test out your library while you get your DAC sorted out.
HDMI. As noted by Oliver Masciarotte in his forth-coming book, To Serve & Groove, this is probably best suited for AV receivers. On the Mac mini, you will most likely want to use the HDMI connector to connect a monitor, so I’ll skip this one.
Thunderbolt. This is a relatively new standard, and as yet there are very few DACs that support it. They are also likely to be expensive, professional multi-channel units. So I’ll skip this one too. At the current time, I’d suggest that the best use for Thunderbolt in a music player is for your external storage.
Over the network. This is an interesting topic, arguably deserving of its own article. However, for the primary purpose of playing hi-fidelity audio from a dedicated music computer, it’s not likely to be the best solution.
The photograph below shows the back of my Mac mini. Depending on your choice of hardware and interface, yours will of course look different.
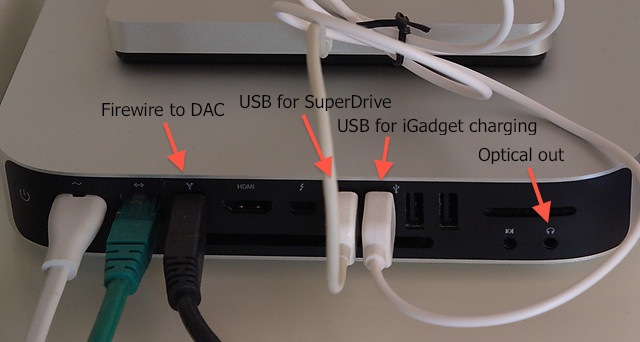
Audio-related connections on Mac mini (2011 model)
Optical
Most current Macs (the Macbook Air being the exception, alas) have an optical output port hiding inside the headphone jack. To use it, you will need a mini-Toslink to TOSLINK cable, which are readily available, and of course a DAC that accepts optical input.
While optical connections are generally panned for their poor jitter performance, it’s not really as cut-and-dried as that, as there is more to it than just “optical.” If you have a DAC that re-samples the audio bit-stream, then the effective jitter of the optical connection may be nowhere near as bad as you think. Also, the 2011 Mac mini is reported to have very low jitter on its optical output. So if you have a DAC that supports optical in, at least give it a try.
When you plug a mini-TOSLINK cable into the headphone out, the Mac detects it automatically. You can see this in the Sound pane of System Preferences (where it says “Optical digital-out port”):
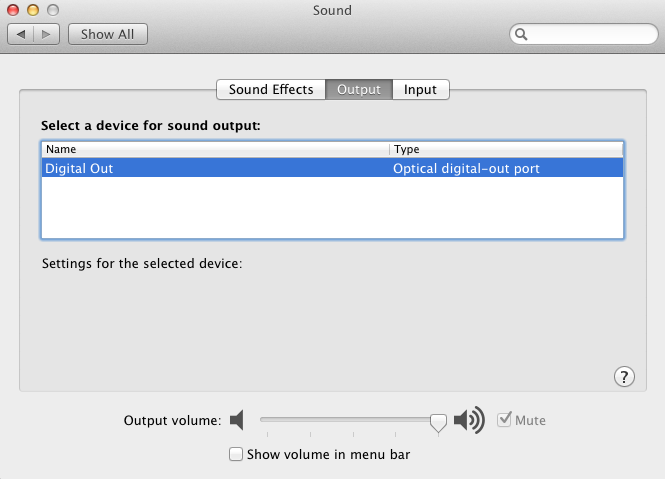
When using the TOSLINK out, the Mac’s system volume control is disabled. So you may as well uncheck the “Show volume in menu bar” option.
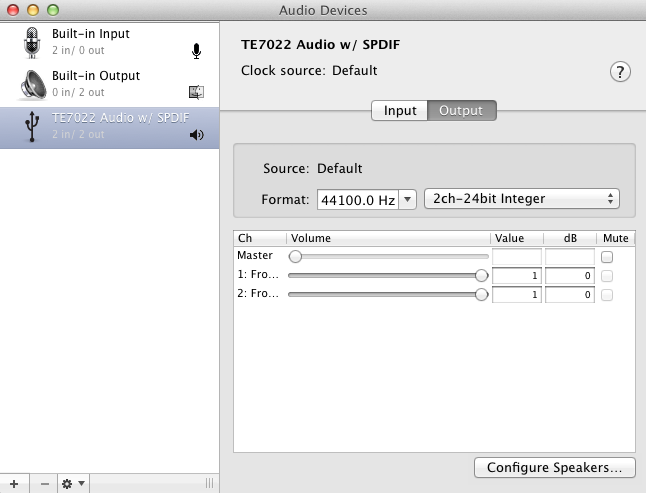
Now you will need to start a little application called Audio MIDI Setup, which you can find in the Utilities folder under Applications. Double-click to run it. (You may want to leave it stuck in the Dock for future use – right-click on the icon in the dock and select Options -> Keep in Dock.) You should now see the following screen – if not, go to the Window menu and select “Show Audio Window.”
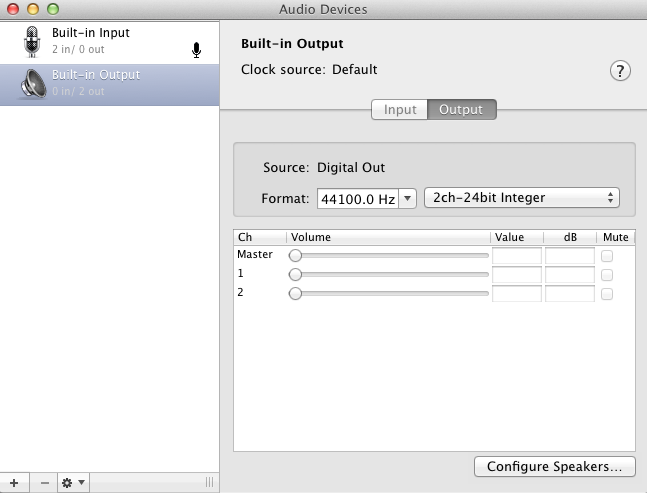
Note that I have selected Built-in Output so it displays on the right, and set it to 44.1 kHz and 24-bit output. For now, this will do.
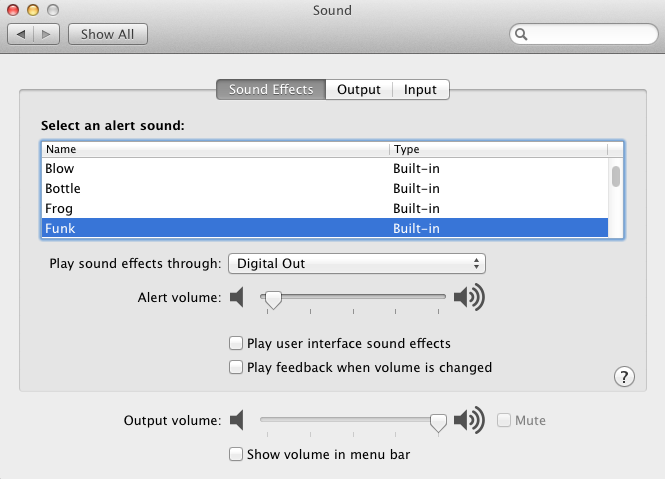
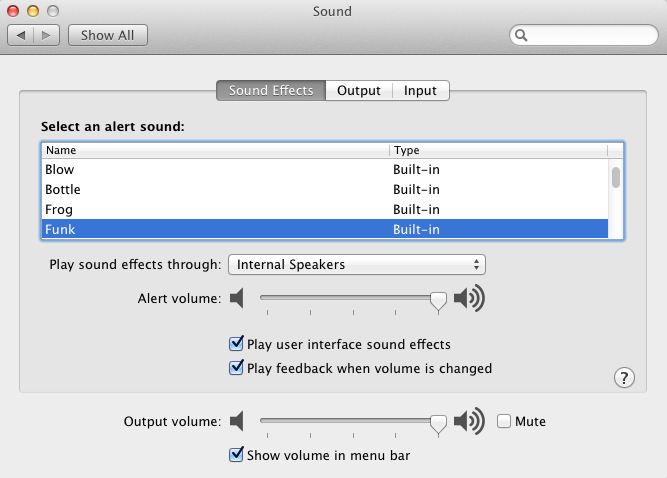
Note that all audio will now be directed to the optical output, including system bleeps and boops. Since this is connected to your stereo system, this is rather annoying. One workaround is to turn off as many of those as possible in the Sound Effects preferences, and turn the Alert Volume waa-ay down. Like this:
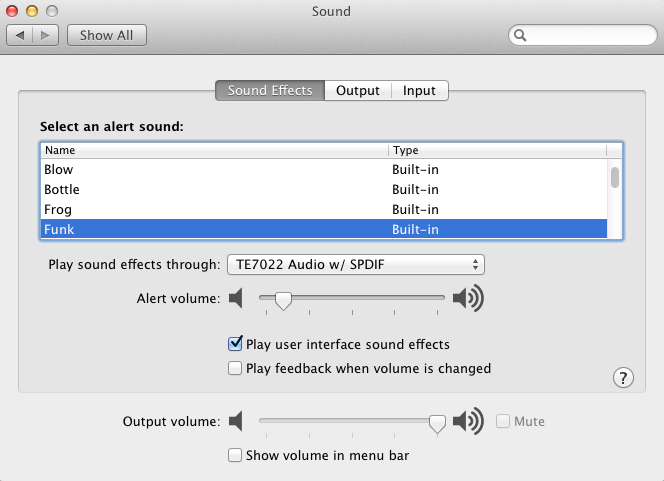
Another workaround is to connect a cheap USB speaker or DAC and direct the sound effects to that. In that case, the Sound Effects preferences looks like this (where “TE7022 Audio” is a USB-connected DAC):
By far the best option, however, is to use a music player that can be set to direct its output to a specific device, and which will “hog” that output to prevent anything else from generating sound through it. We’ll look at that in the next article though.
USB
USB stands for “Universal Serial Bus” and is the most common method of connecting external peripheral devices to computers. This is good, because compatibility is high and you can get almost anything with a USB plug on it these days. For audio, it can potentially be bad, because a “bus” is by definition shared amongst many devices, and that can involve some contention for the bandwidth on the bus. However, USB DACs are common and in the last couple of years there has been a lot of attention given to DACs that deliver good audio quality via USB. Also, all Macs including the Macbook Air have USB ports (two on the MacBooks and four on the Mac mini and iMac).
If you are looking to purchase a DAC with a USB input, be sure to check the specifications of the USB input carefully; often, the USB input has a lesser specification than the S/PDIF input. In this day and age, I would suggest that you look for a DAC that supports at least 24/96 (24-bit, 96 kHz) audio via USB.
Connecting the DAC is simple – just plug the cable in at both ends. Don’t use a hub, though. Conventional wisdom has it that you should not have any other USB devices active at all for best performance, which means that if you need external drives, try to use FireWire (or Thunderbolt).
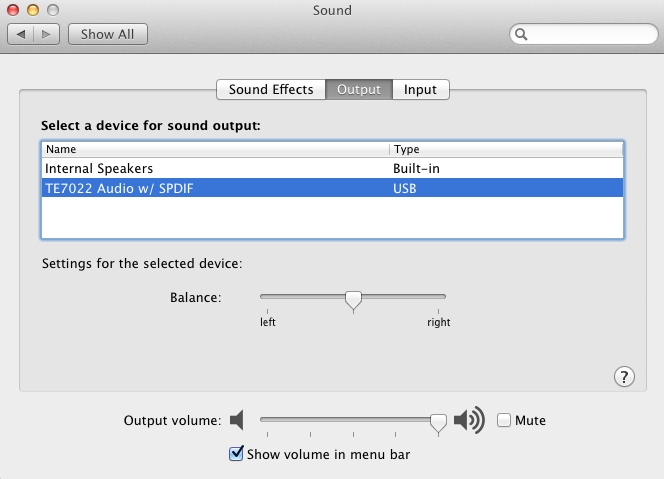
Then, select the USB DAC as the sound output device in System Preferences:
And configure it in Audio MIDI:
Note that this time there are two volume-control sliders, for the left and right channels. These should be set to maximum, to prevent OS X from scaling the signal before sending it out – if you want to do volume control in the computer, let the music player itself do it.
You will probably want to send sound effects to the internal speaker instead of the USB DAC:
FireWire
FireWire aka IEEE 1394 is a serial bus interface standard like USB, but with better inherent support for realtime transfer like audio and video. Much of its use is therefore in the audio and video industries, and many of the DACs listed on the Pure Music FireWire DAC page have this origin. These are typically known as “audio interfaces” as they are intended for recording and mixing, and thus have input capabilities with microphone preamps, and multichannel output. There are, however, a number of “audiophile” DACs in the list as well, typically on the expensive side.
Again, connecting the DAC is simply a matter of plugging it in. Macs have only a single FireWire port, as FireWire devices are designed to be “daisy chained” – you plug the first device into the computer, then the second device into the first device, and so on. If you are using a FireWire DAC and need external storage, you may want to choose USB or (Thunderbolt) drives.
Not all Macs have a FireWire port: the Macbook Air doesn’t, nor do some of the older Macbooks. Note also that current Macs have a FireWire 800 port, while many FireWire DACs have FireWire 400 ports. All you need to do in this case is to get a cable with a FireWire 400 plug on one end and a FireWire 800 port on the other, as FireWire 800 is backwards-compatible with FireWire 400.
Configuring System Preferences and Audio MIDI for a FireWire DAC is pretty much the same as configuring for a USB DAC. As noted above, many of these devices support multi-channel audio, and we can see that by looking more carefully at the Audio MIDI window:
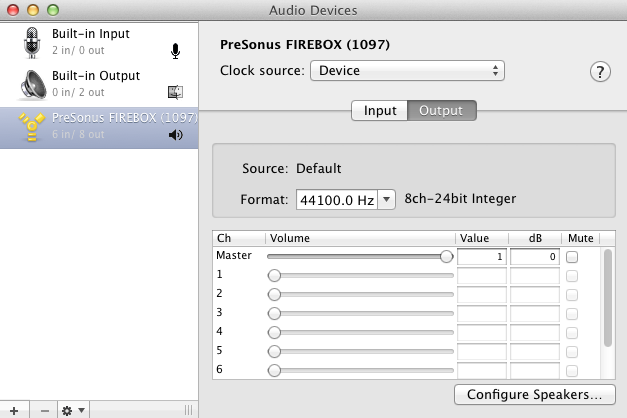
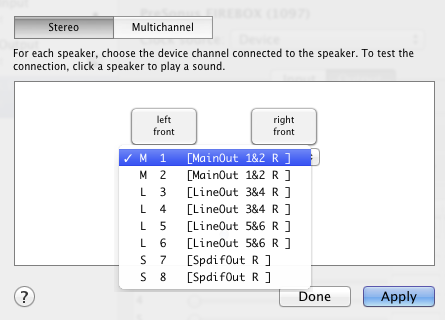
Note the “8ch-24 bit Integer” notice. Clicking on the Configure Speakers button leads to a dialog that allows the main left and right output channels to be assigned to any of the output channels of the DAC:
S/PDIF converters
Another option, apart from the direct connections described above is to use a bus-to-S/PDIF converter, where “bus” is either USB or FireWire.
USB-to-S/PDIF converters have been receiving a lot of attention lately, and range in price from under a hundred dollars to well over a thousand. If you have an existing non-USB DAC that you like and wish to use with your computer source, a high quality converter may well be the best solution. Even if you have or purchase a DAC with a USB input, a converter may still provide the best performance, as many DACs do not support the same sample rates and resolutions on the USB input as they do on the S/PDIF input.
FireWire to S/PDIF converters are relatively few and far between, although Weiss do make a couple (expensive). However, many of the FireWire audio interfaces mentioned above have S/PDIF outputs, so can be used as such a converter. (You can see the S/PDIF output channels in the screenshot just above). I don’t know what the audio performance will be like, but if you try it, please report in a comment below.
Connecting and configuring a converter is the same as for a USB or FireWire DAC. Then connect your S/PDIF cable from the converter to your DAC.
Managing your library
In this section I’ll delve into the organization of the iTunes library. This is the main reason for using iTunes – even if you switch to a different music player later, many of them allow you to use iTunes as the “user interface” to select what to play.
Getting artwork
If you see an album in your library that doesn’t have artwork attached, the first thing to try is getting it from the iTunes store.
Right-click on the album, and select the “Get Album Artwork” option. If you’re logged into the iTunes store, then with any luck, the album artwork will shortly appear:

If that doesn’t work, then you can do it manually. Use Google Images (or any other search engine) to locate a usable image of the album cover – 500 x 500 is a good size for this purpose. Download it to your computer, and then right-click on the album (not an individual track) and open the Info window. Double-click on the Artwork box, and you will be prompted to select a file. Select the image file you just downloaded, and click OK. iTunes will then “process” the artwork – that is, add it to each audio file.
This procedure can be streamlined with a utility called Album Artwork Assistant, which is essentially an automated version of the above.
Finally, if you can’t locate a suitable image online, you may simply have to scan the cover yourself.
Setting up smart playlists
The key – in my opinion – to making effective use of iTunes is the use of smart playlists. I’m really not a fan of ad-hoc playlists – ones that you build by dragging songs or albums into. Most of the time, I just want an effective way to navigate my music library and find albums.
To create a smart playlist, use the File menu and select “New Smart Playlist…” A good way to start is to make a playlist for the music genres that interest you. You do this by creating “rules” that iTunes matches against the Genre field of each track. Here, for example, is how I created a smart playlist for my (fictional) “Country and Western” playlist:
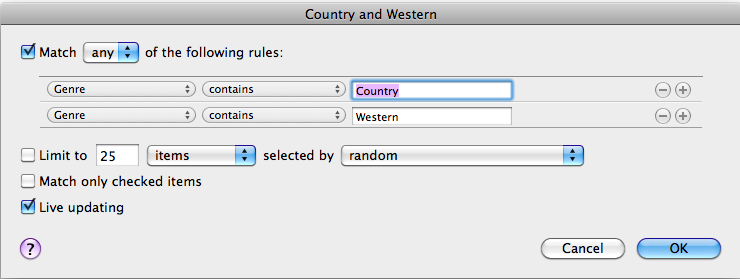
Country and Western smart playlist setup
Note the selection of “any” near the top. This says that a track is included in the playlist if its Genre field contains the word “Country” or if it contains the word “Western.” Now, click on OK, then click on the new playlist in the left menu. (It should be called “Untitled” at this point.) Click on the album view icon in the toolbar:
Album View Icon
And see what you get! At this point, you may wish to rename the playlist.
Bear in mind that the Genre field for any track is not cast in concrete – the value you are seeing will simply be the value iTunes fetched from Gracenote – that is, someone else’s idea of what genre any particular album belongs to. You can change this if you want to. While you can change it for each track, I always do this for whole albums. Just right-click on an album icon and select “Get Info.” If you get a dialog asking “Are you sure you want to edit information for multiple items?”, click Yes. The Info window is shown below. You can select a genre in the bottom-most field of the window – you can either select from the drop-down menu, or just type in what you think the genre should be. Then click OK.
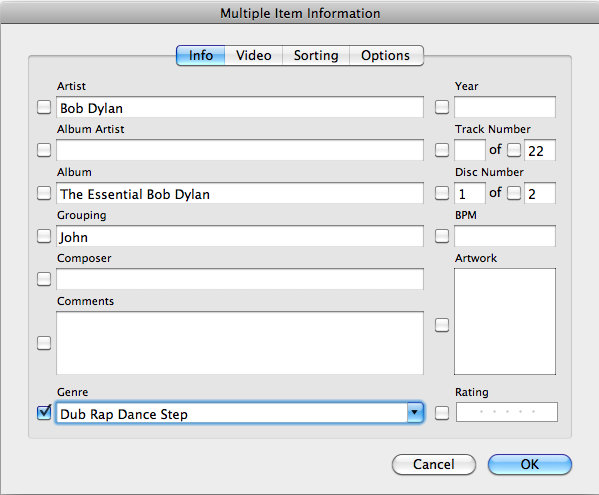
Setting Album Genre
You will notice a number of other fields in the screenshot above, any of which can be used to match tracks or albums for a smart playlist. I like to use the Comments field, where you can put anything you want. For example, below is the setting for a “violin” playlist. It checks the album title, as well as the Comments field, so if “violin” is not in the title of an album that I want to appear in this playlist, I just add the word “violin;” to the Comments field. And viola!
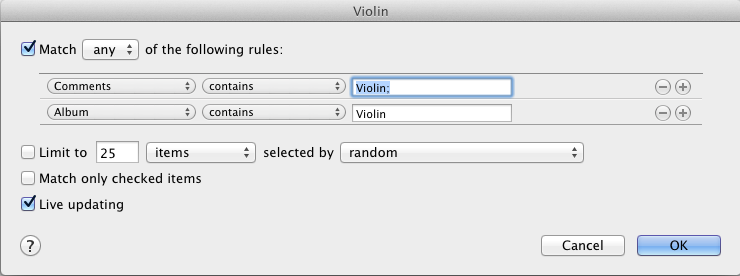
Violins smart playlist
Smart playlists should be organized into folders by type. The bulk of my collection is classical, so I have (in addition to the Genre playlists) sets of playlists for composer, ensemble/orchestra, and instrument or music style (set up with the Comments field as shown above). I also use the Grouping field to put in the owner of the CD, so other members of the household can find their own CDs easily. Here’s an example of some folders with smart playlists:

iTunes Smart Playlists and folders
Finally, here’s a little trick you can do with smart playlists. Sometimes an album will have a genre that you miss in your set of smart playlists. Create another playlist folder called say Miscellaneous, and create a smart playlist called say Missed Genres in there. Then configure it like this:
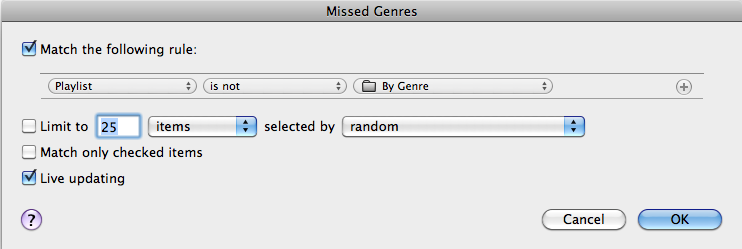
Missed Genres smart playlist
Here, “By Genre” is the folder containing my genre-specific smart playlists. So what this playlist does is include every album that has a genre that you haven’t accounted for. When you find albums in this playlist, it means that they haven’t shown up in your genre playlists. So you may then want to create a new Genre playlist, adjust your existing playlist settings, or simply change the genre field of the album.
Finally, iTunes comes pre-configured with a “Recently Added” smart playlist, which includes items added in the last two weeks. I find it handy to create another similar playlist that includes items added in the last day. This way I can rip a number of CDs, and easily find them later in the day when I want to check them and add the artwork.
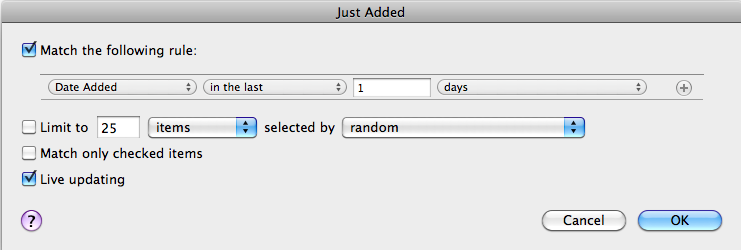
“Just Added” playlist
Moving your iTunes library
You may want to move your iTunes library from time to time. For example, if you have a large library, you may want to store the iTunes library on an external drive. This operation is complicated by a little wrinkle in the iTunes setup, which is that the “library” consists of two parts:
- The actual music files, and
- The “metadata” that describes the music files.
You can see these in your Music folder. Here is how mine looks:
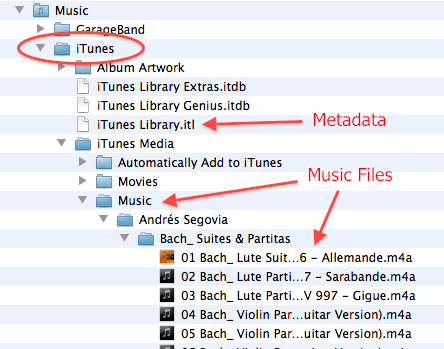
iTunes Folder structure
In the instructions given by Apple for “moving” your library, only the music files are moved, and the metadata stays where it is. You can do it this way if you like – just remember that your metadata remains in your home folder, while the music files themselves will be on the external drive.
Another approach is to move the metadata and the music files together. That way, the iTunes library file goes wherever your music files go. To do it this way:
- Use the finder to move (or copy) the iTunes folder (circled in red in the screenshot above) to the external drive. (This may of course take a while if your library is large.)
- Quit iTunes if you haven’t already.
- Start iTunes while holding the Option key. You will see this dialog:
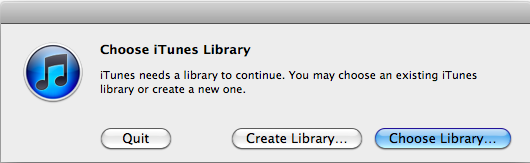
Click Choose Library, and then select the iTunes folder on the external drive. After a while, iTunes will open with all the music files. (This is not an undocumented hack – Apple provides this as the method of restoring an iTunes library from a backup.)
You can check that iTunes is using the files are on the external disk in a couple of ways. First, in the Advanced tab of iTunes preferences, check the location of the media folder – it should be on the external drive. Second, right-click on any track and choose “Show in Finder.” The window that opens should show that the audio file is located on the external drive.
Remote control
You’ll probably want a way of controlling the player from your listening chair. I’ve assumed up to now that you have a display, keyboard, and mouse connected to the music computer. If your music computer is a Mac mini, you can run it “headless” – that is, without the display, keyboard, and mouse – once you have it set up. This makes the Mac mini a true part of your stereo system, that you can place anywhere there is free space. (Mine is on an Ikea Lack wall shelf that also holds the networking hardware; a 2m Firewire cable connects it to the DAC.) If your computer is headless, then some form of remote control is of course essential; otherwise it’s a convenience.
iGadget
An iPhone, iPod Touch, or iPad can be used to control iTunes on the music computer, with the free Remote application (“app”) available on the iTunes store. “Free” is of course relative – if you have an iGadget handy, then it’s free; if not, then even the cheapest iPod Touch is a fairly expensive remote control.
The Remote app is, in our household, preferred by the non-IT half for controlling the music computer, over using a display/keyboard/mouse. As a result, we have made the music computer permanently headless. The Remote app also works with many of the more advanced players (to be discussed in the next article).
Screen sharing
You can use screen sharing on a laptop to control iTunes running on your music computer. I like this option as it’s fast to scan through and search the music library, and I’m often working on a laptop anyway while listening to music. (It’s also essential if you have a headless music computer, as there will be times when you need access to the full screen.)
Screen sharing is built into OS X; to enable it, go to the Sharing pane in the System Preferences of the music computer and check it. Then, on the laptop, open a Finder window, click on the name of the music computer in the left column, and then click on the Screen Sharing button.
Using a remote desktop does take some getting used to. There is also a potential drawback of this approach: if your music computer is not headless, it may have a much larger screen resolution than the laptop – trying to control the 2560 x 1440 screen of a 27″ iMac from an 11″ MacBook Air is an exercise in frustration. If you have a headless Mini, however, you can set its screen resolution to something that you find best to work with from the laptop.
Apple Remote
The inexpensive Apple Remote has a limited amount of functionality for controlling iTunes remotely, provided that the music computer has an infrared port. As of the time of writing, this includes the current iMacs and the Mac mini, but not the MacBook Air.
Functions that can be accessed via the Apple Remote are play/pause, fast-forward/rewind, and track skip. You cannot select albums or playlists. Volume works “sometimes”… it varies with player and configuration. With Snow Leopard, the Menu button brings up Front Row, but I am not able to subsequently do anything useful with it. With Lion, Front Row has been removed, and the Menu button does nothing.
So, you get limited remote control functionality this way, but it is also very cheap. Since it’s infrared, not wireless, you will need to have “line of sight” – more or less – to the music computer from the listening chair.
Other clients
There are other options for controlling a remote Mac. On an iPad, the apps iTeleport and Logmein can be used this way. There are also various VNC-based programs that can be used to control the Mac from a Windows laptop. And, non-Apple smart-phones and tablets may have apps that can be used to control iTunes remotely – as of the time of writing, it appears that apps for Android and Meego (on the Nokia N9) exist, at least.
This section could be a whole article of its own, so I won’t investigate these options further at this time. If it’s of interest to you, please let us know what you find out in a comment below.
Other players
Once you have your library and audio set up to your satisfaction, you will want to try using some other music players. These player offer more capabilities than iTunes, as well as better audio quality. Many of them integrate into the iTunes used interface, so the work you have done with setting up your library is not wasted. Each offers a different set of features, too numerous and varied to list here, but they also all have a free trial period so you can try them out for yourself:
Concluding remarks
While it sounds a bit involved, computer-based audio can be rewarding once you get up that learning curve a bit. Personally, I love the convenience of it all, as I’ve never been particularly good at organizing shelves of CDs. And if I really want a spinning disc, I reach for one of those black ones now. It is, after all, all about the pleasure of playing back the music that you have.
I hope you’ve found this article informative and helpful. If so, you may wish to pick up a copy of Oliver Masciarotte’s book “To Serve & Groove,” (reviewed in this issue) as it contains a wealth of additional information that you will find useful. Happy ripping!
Acknowledgments
This article was improved greatly by feedback from Joe Quinn, Oliver Masciarotte, and Patrick Dillon.


what a great article
the”system” i am going to purchase is mac mini(late 2012 version,ivy bridge etc)
2.6GHz,i7,8gb RAM, either 1tb SATA HDD
OR
256gb SSD with
schiit gungnir dac(usb)
do u have an opinion on hdd vs ssd?ca founder says ssd is better but u said above something about it “wearing” out and not being suitable for storage but if i “store” my music on/in say mac time capsule or on iCloud wont that obviate that problem and supposedly wont the music “sound” better?
can u explain all the different “things” amarra sells? which one should i purchase?
there seems tobe different versions prices
i have no desire to rerip my600+ cd’s to mm/any opinion on ripping service like “pickled productions”-they put cd collection on archival dvds & u load them on hd
will streaming music ie MOG@320kbps “sound” better with the gungnir or any DAC 4 that matter? thanks your info will be soo helpfull getting started – bobbmd
Hi Bob, thanks for your comment, much appreciated. The important thing is to get started, your 600+ Cd collection will take about 200 GB in Apple lossless, so my suggestion would be to get the internal SSD and then you’re set for a while, and you can investigate external storage options a bit later. I don’t think you really need an i7 processor but sadly, in my part of the world anyway, Apple’s pricing policies don’t let you get an i5 with an SSD off-the-shelf.
Great article! Very instructive. I’ve been using a Mac Mini as a media player for some time, and am happy with my setup although it is much less complete than yours. However, one feature I’d like that you have not covered: I would like to have the Mini stream its audio (from whatever source is currently active) over the network so that it can be listened to in my home LAN using VLC or similar. Do you have any suggestions for this?
John,
Very good tutorial on this subject! I’ve been using a Mac Mini as a media player for some time, and am happy with my setup although it is much less complete than yours. However, one feature I’d like that you have not covered: I would like to have the Mini stream its audio (from whatever source is currently active) over the network so that it can be listened to in my home LAN using VLC or similar. Do you have any suggestions for this?
Hi Don, I’m not quite sure I understand what you are trying to do… I use an Airport Express in my study and use iTunes to send audio to it. The Airport Express is connected to an external DAC via optical. Is that what you had in mind?
John,
The MacMini audio is currently driving an analog amplifier to speakers in the media room. I control the Mini using a bluetooth mouse, and by screen sharing with a MacBook Pro and iPad. I also have IR repeaters for remote control of DVD and amplifier functions because the screen is about 35 feet away from the equipment room. What I would like to do is have the Mini audio simultaneously stream whatever audio is currently active, over the house WiFi system so that it can be heard through computers in other rooms.
My Mini is on a wired ethernet to the home LAN, which is set up with wifi routers (not Airport Express – one is a Time Capsule and others are Belkin, Westell, etc). It seems that what I’m trying to do would be much like what is already possible with screen sharing, but for audio not video.
The audio sources I am using are iTunes, VLC (internet radio and movie playback),web browser (Netflix, Hulu, etc), and DVD Player.
Thanks!
Hi Don, thanks for the additional information. I haven’t had time to investigate much, but I noticed that in Mountain Lion, Airplay devices show up in the Sound panel of System Preferences, so you can set the default output device to a remote Airplay device and any application can play audio through it. However I don’t know if there’s a way to play through multiple devices (not that I know of).
Another option to look into would be Rogue Amoeba Airfoil and Airfoil Speakers. The latter will allow another computer to act as an Airplay device.
As mentioned in the article, networked audio is a subject for a whole article in itself, and things have changed enough now that it may be worth doing an update to the article by Joe Quinn (https://www.hifizine.com/2010/06/distributed-audio-using-apples-airtunes/). It would be an update If you make further progress, please keep me updated here or via the Contact form.
John, I would REALLY like you to address the HDMI option. Even briefly!
I will be connecting a Mac Mini to an existing home theater system. The AV Receiver is an Onkyo 707. I believe it has burr-brown dacs and is capable of 24/192. That’s how I listen to blu-ray audio and SACD, and thought I was going to connect the mac mini the same way! All music I will be listening to are AFLAC or vinyl/HDtrack 24/96,192
(My upstairs iMac is connected to an external DAC through the optical and into some Audio Engine A5’s.)
Am I not going to be happy with the sound output from the HDMI output? Should I stick to optical and an external DAC? What about the DAC in the Receiver?
Hi Greg, perhaps the best thing would be for you to try it and report back so the rest of us know 🙂 As far as I can tell, an audio device connected by HDMI will function like any other, but I don’t have a good way to test it. Your experience could help others, if you’d care to try it and let us know.
Wow, what a great article. Thanks so much. Quick question: I have an external DAC that accepts 24/96 via optical toslink. My files on my macbook pro i7 are lossless. Should I move the settings in my midi to 96000.0 Hz or leave it at 44100.0 Hz (or will this cause the MacBook pro to upsample?)?
Hi JB, thanks for your comment. One approach is to use a music player that changes the device sample rate to match the file being played. Pure Music, Audirvana Plus, and others will do this, and allow you to continue to use the iTunes interface (I assume that’s what you are using now). Another approach is to set the music player to upsample lower-rate files to 24/96. Again, alternate players will offer a higher-quality upsampling than just iTunes.
I wonder if you are able to help. I’ve been trying to connect my Chordette Qute Dac to my Mac mini, through Audirvana +. I use the Mini to listen to music (through ITunes) and to watch movies stored on my external hard drives, which are connected to the Mini via USB or Firewire. Trouble is, I can’t get any sound out of the movies if the Audirvana player is on and I can’t get any music unless its not on. I’ve set the settings in Audio Devices for the Chord to be the default output device and the dac is connected to the Mini via USB and optical digital cable. I just can’t figure out where I’ve gone wrong.
Update. Right now, even if the music player is off, I can’t get any sound from a movie. I’m using VLC by the way.
Hi Mike, I don’t know anything about VLC, but in Audirvana Plus, do you have the Exclusive access mode box checked? (Preferences -> Audio System). That would prevent other programs from using the DAC.
Hello,
Impressive and detailed article, thank you very much. I’m just on a very early stage of getting a better sound system using my 2012 mac mini. I just ordered a DAC, small desktop amp and a pair of bookshelf speakers. And while reading about preferences between USB and optical connections between the mac mini and the DAC, I just found out of the existence of other music players that work better than itunes (there, you can see how new is all this to me) and the better music files formats. I did not care about changing the music format before, but now that I will have a better way to listen to the files, I would like to obtain the best of what my system can reach. So, for people like me, what is your suggestion on how to proceed with an existing (big) itunes library that is not on AIFF, Apple lossless or WAV format? Most of my music files are on ACC, or MPEG (I do not have the CDs anymore!). I’m sure there is a software that can do the conversion but what will you recommend (>80 GB of music) will be the best option? It looks that the newest version of itunes does not have such option. I converted a MPEG to ACC and I ended with a duplicate. Will the conversion software create a duplicate too? Once the files are on AIFF, does it affect how the ipod or iphone plays the files or just the space required to store them? Also, if I get a new song from itunes, do I need to converted to AIFF or I can specified on itunes the format? One more thing, I’m happy to pay the $49 for Audirvana plus, but do you think that will be worth the time, money and effort (mean changing the format of all my library)? Finally, I love my podcast and audiobooks, can I still play them having the Audirvana?
Thanks.
Hi Luis, AAC is a lossy format, and once your files are in that format, converting them to a lossless format will not recover the lost information. The only way to get the information back would to re-rip them from original CDs. Without the CDs, I’m afraid you may as well leave the files in AAC. However, Audirvana does include AAC on its list of supported file types – I haven’t tried it myself but you can download the free trial and give it a try 🙂
Sir, in a world chalked full of confusion, incompleteness and poor writing you are a God Send. My Schiit Bifrost is on the way and this is SUPER helpful. Thank you so much. You should be hired as a consultant to anyone writing instructions for… well, anything, and they should pay you a lot. $200 an hour minimum. Really, you obviously have the aptitude. I could keep gushing here, but I will stop now. Truly a breath of fresh air… Okay, I will stop now. Promise!
Well, can I ask a question. iTunes is making a mess of my meta data. It is organizing some albums as more than one album due to different artists on the same record. I’m cleaning it up, but as I have 500 CD’s to go, this is a chore! Also, it is doing this all the time with many classical 2 CD sets. Then there is sorting issues. For example, listing Disk 2 before Disk 1 even though the titles are exactly the same. Say, “Best Music Ever [Disk 2]” followed by “Best Music Ever [Disk 1]” though this has only happening with once set now and it is driving my obsessive compulsive nature to distraction.
P.S. Forgive the sloppy typos. This is what happens after a session of importing CD after CD all evening long!
Hi Dean, thanks for your kind words. In cases where albums show up with [Disk 1], [Disk 2] etc in the name, I remove the [Disk 1] part from the album name field (in Get Info), so that all disks show up as one album. By default, the tracks within the album will show up in the right order.
If you have disks being split into separate albums, do Get Info on the album and set the Album Artist. That will (should!) make the album whole again.
Hope this helps
Thanks! For some reason I was worried making a a 2 CD set into the same would jumble the tracks.
One final question please. You reference a review of other mac players. I saw the review of Amarra, but nothing else – I looked through the site and searched on a few terms. Was that article ever written and if so, where is it please?
Sure, no worries 🙂 I haven’t written the second article yet. It will probably be more of a look at the advanced features of the various players, rather than a review per se. I’m working on an article on the Pure Music crossover feature for the next issue (March) but that’s fairly specialized. The more general article will be in June. Sorry I realize that’s not much help now though 🙂
John – Great article but I have a question. I get the process of moving the music files and metadata to the external drive, but how would you play these files from the external drive using Amarra? Is there something in Amarra preferences that tell it to play from the external drive?
Hi Janine, I assume that if you start up iTunes with the Option key pressed and select the external library, then Amarra will use it. Could you try and report back? I don’t have the current version of Amarra but will see about getting one.
Thanks John, this is a very informative article but there are still some things I’m not sure about, one of which is: what happens when audio is output through a Mac’s USB port (or Toslink or HDMI for that matter)? Is the audio uncompressed, i.e. converted from the original ALAC or AAC into basic digital code that any DAC can convert into analogue? Perhaps if I explain my current predicament:-
At the moment all my music is ripped to iTunes in Apple Lossless format. I can stream to an Airport Express with a Toslink connection to my hi-fi amp. So far so good but I’ve got my eye on an Oppo BDP-105 Blu-ray player which also acts as a streamer, DAC and AV pre-amp. Unfortunately, it doesn’t seem to support ALAC; only FLAC and WAV. Obviously I could convert my library to one of these formats but to be honest I’d rather not as I like the convenience of using iTunes for managing my library and syncing with iPhones, iPads and iCloud etc.
It does however also come with an “Asynchronous USB DAC input” which it claims “If your computer can play it, the BDP-105EU can convert it to analogue.” That suggests that it will play my music if my Mac is connected directly to the deck but that would seem to contradict the other statement. I can’t be sure and it would be an expensive mistake to make so any help would be most welcome!
Guy
Hi Guy
“Is the audio uncompressed, i.e. converted from the original ALAC or AAC into basic digital code that any DAC can convert into analogue?” – Yes, the audio on the USB will have been converted by the player (iTunes etc) to generic PCM format. File formats like ALAC, AAC, FLAC, WAV refer to how the digital audio data is encoded into a computer file, not to the format that it presents on the USB or TOSLINK output.
So while the OPPO will (according to the specs, I don’t have one) only play WAV and FLAC files from a disc or USB stick/drive, this is not relevant to digital audio input on the USB, coax or optical inputs.
If for some reason you needed to play from a disc, you could burn a playlist in CD format.
Just to note: if your original file is AAC, the PCM data on the USB will be “uncompressed” but the information that was lost when the audio data was originally compressed will not be recovered. It’s best to always rip files with a lossless file format, and generate AAC files only for space-constrained devices (iPod etc).
That’s great John, just what I wanted to know.
Many thanks
What a great article you have written here for people like me who want better sound from our itunes libraries but are confused about how to do it. Really, the best way not to waste our money is to understand the process first by reading your article. Now I now how everything works and what I should spend money on. Just a super-informative and easy-to-read article. Well done!
Hi John,
Finally got a Lacie 3T external drive and copied itunes folder from my macmini to it. Holding down the option key when starting itunes and selecting the itunes file on the 3T drive does indeed let Amarra play from there. One more question: when I add new music to the macmini hd and then copy to external, will it over write everything or just add the new music?
Thanks…Janine
Hi Janine, glad things are working for you. When you say “when I add new music to the macmini hd and then copy to external,” could I just clarify? You are asking when you rip a CD or use “Add to LIbrary…”? If so, as long as your options are set as shown above in the article, then the files will be written to the music library on the external HD. The library on your external HD should become your “master copy”, you shouldn’t use the old library on the macmini internal HD, or things will be confused/out of sync.
Please do make sure that you have a backup system for your library though 🙂
Months later follow up question: I assume from this that multiple Macs running iTunes can be set to access the same iTunes library on the external storage device? (So the headless, CD-drive-less Mini can be the player while a remote Mac is ripping CDs to the same library?)
Hi Brandon, it might work. My suggestion however would be to have the remote Mac loading onto its local disk. Then use Add to Library… on the Mini to import the files from the remote drive. Or, if the remote Mac has a complete copy of the library, use a synchronization utility to mirror the library to the Mini. I used rsync for this but I expect there are friendlier options. That way you get a backup copy into the bargain.
Thanks John, Yes, I meant when I rip a CD. I’ll check the options.
Great article! I stumbled across this searching for this exact topic! My question is; if most of my files are files purchased from iTunes, is it worth it to upgrade to a different player (Audirvana, Pure Music, etc.)? I have a DAC that supports optical and asynchronous USB.
Hi Thayne, that question I would have to take a pass on 🙂 I’d suggest it would be best to take advantage of the free trial period of the players and try for yourself. You may even find that the players have other features absent in iTunes that you like. Please post back with what you discover 🙂
Brilliant. So helpful.
Thank you so much.
Hi very new to computer audio world so I have probably a very simple question for you?????
What does the DAC do and why do I need one? I assume it stands for Digital to Audio Conversion?
If I hook my mac up to my receiver via hdmi it plays the audio just fine. What is the job or purpose of the DAC?
Thanks so much.
Hi Mike, if you have the setup working with your AVR and you’re happy with it then I say stick with it 🙂
The DAC is a digital-to-analog convertor, which converts the digital signal from the Mac to an analog signal that can be put through an amplifier and then into speakers. Your AVR will be doing this function internally, in addition to providing the amplification. Using a separate DAC, preamp, and amps, is the approach that two-channel enthusiasts tend to go with, as it allows one to choose and upgrade individual sections of the electronics chain as one likes. It can also be more expensive and definitely more time-consuming.
Hiya John,
Thanks for posting the above, it’s very interesting. I am playing my computer based music, WAV files on macbook pro through a leema outboard dac, into Primare preamp/amp but it still sounds shit compared to cd playback, all the info seems to be there, it just sounds lifeless. It’s driving me nuts, any ideas? Do I perhaps need to put my iTunes library onto a NAS drive and then through a streamer into the preamp. All this sounds to be a bit extreme to get the same performance as my CD player!!!! Aaargghhhhhh!!!!!!!!
Hi David, I’d suggest taking a methodical approach:
1. Is the Leema DAC sounding good when driven directly by digital from the CD player?
2. Check that the files really are lossless
3. Try different interfaces to the DAC
4. Try one of the more advanced players listed above – they all have free trials
Hope this helps, let us know.
Great info. I had a deconstructed (case removed, motherboard and cards and drives bolted nto shelf) and modified (silent fans, large heat sink) powermac G4 tower (1998) with 4 HDs and 2 optical drives (for ripping and burning DVDs) stealthily built into a sideboard in my living room in 2003 before the mini was an option! I am building a mini based system (i5 2.5ghz/16gb/240ssd) and am wondering if an external firewire drive OR the “second” drive space hidden in the mini is best for additional storage. my question is about sound quality/noise from the sata internal vs the firewire external.????
thanks.
Hi Dimitri, I’d go for the external drive because of flexibility/upgradability. Whether and how much of a difference to sound quality it will make I can’t say from personal experience, although it’s generally recommended.
Dear All,
let me tell you right at the beginning, i have Zero knowledge in technical aspect of Hi-Fi sound but i am passionate about listening good quality music output. I have just bought iMac and i am not happy with its sound quality. So my audiophile friend suggested me to get a DAC, amp and stereo speakers and things will change.
I have 3 simple questions, if someone can help me with.
1st) Does DAC really help in getting better sound output? Has anyone experienced using direct Jack from computer to AMP and then later tried with USB to DAC to Amp? Did you feel the experience is better with DAC?
2nd) i am planning to buy HRT Music Streamer ll (thats what my friend suggested) if anyone has hands on review about its quality, I would be happy to read.
3rd) What sort of Cable would be better to connect Mac with DAC: USB or Thunderbolt ?
Thanks in advance
Iqbal
Hi Iqbal, I’d suggest if it’s possible that you try a borrow a DAC to try out. Perhaps your audiophile friend can help? Depending on what your listening habits are you might even consider looking into a combined DAC/headphone amp.
Thanks John for your reply.
I will do that, only difference is my friend has DAC worth 2500$ so its pointless when i am going to listen music on his DAC and then buy HRT worth 150$ 🙂
Hello I have a 2010 mac mini and use a DVI cable to connect it to my monitor,the trouble is I can only get sound out of the mac mini speaker not the ones on the monitor and an ordinary Twin RCA to 3.5 mm lead doesn’t work neither does a single 3.5 mm to 3.5 mm audio cable,so could I use the optical output on my monitor to connect to my mac mini via a 3.5 mm jack?
Many thanks.
Karl.
Hi Karl, sorry, edited response, I did not read your question carefully. Does the monitor have an optical output or optical input? If the former, then I don’t know what you are trying to do.
Sorry I missed that one and thank you for getting back to me.My monitor has an S/PDIF socket which I am hoping will allow me to get sound through it’s speakers when connected to my mac mini via the correct cable.
Hi Karl, if the S/PDIF socket on the monitor is an optical input, then you *should* be able to connect it to the Mac mini with a mini TOSLINK to TOSLINK cable. However #1, if you’ve tried analog cables and they aren’t working, perhaps check the monitor settings? However #2, I don’t know what monitor it is but I wouldn’t have expected very good sound quality. (?) I’d suggest looking around at external DAC/amps and speakers 🙂
Hello John thank you for responding to my query.If I use a HDMI Cable and connect my monitor to my HI-FI amplifier I can get sound through my big speakers,but the picture resolution is lower,however I need both HDMI inputs for my Xbox 360 and PS3,my monitor by the way is a BenQ M2700HD and I am both that both of it’s speakers would be better than the single one in the mac mini.
Regards.
Karl.
Sorry I meant to say that I am sure both of my monitors speakers would be better than the single one that the mac mini has.
Hi Karl, sure, makes sense. According to the manual for your monitor it has HDMI inputs, I’d guess you could connect the Mac mini to the monitor with an HDMI cable and set the audio output device on the mini to HDMI.
Hello yes my monitor does have HDMI ports,but as I said both are being used for games consoles that’s why I am using the DVI connector and because my monitor has an S/PDIF port I was hoping I could use that for sound.
Ah, right. Maybe that’s why the monitor isn’t playing sound from the mini, as it is prioritizing/picking it up from the HDMI input only. I’m afraid this is an issue with your monitor and setup and nothing I can help with 🙂
Hello yes I think you are right the mac mini is prioritising sound for HDMI even a standard audio cable doesn’t work,but if HDMI is what you are supposed to use with a mac mini then why is the resolution lower,it seams Apple didn’t think it through very well.
Thanks for trying to help me,but I may as well buy that digital cable and give it a go especially as it is only £6.00.
Cheers.
Karl.
A really great article, clear,simple and concise!
I’ve just used it to put all my classical CD’s on my Mac Mini.
Many many thanks!
Hi Neil, thank you! Glad it helped you.
Hello,
I ‘m planning to buy a Mac Mini and a Dac, and connect them to my Bryston B100 integrated amplifier,and the speakers are Mordaunt Short MS208 floor standing speakers.Now as a dac,I’m planning to buy either a Resonessence Concero (usb connection) or a Schiit Bifrost optical/toslink (no usb version) to connect it to the Mac Mini. I was wondering if you have an idea about what kinda differences that I should expect between two dacs and different connections. I must also say I prefer bright,crisp sounding units than warm ones. .If you have any/any other suggestions to me,I’d appreciate so much.Thanks in advance and thank you for that excellent article
H.A.
Hi HA, glad you liked the article and thanks for the comment. I wouldn’t be able to provide an answer to your question. However perhaps it might be worth you looking for a DAC with USB as well as SPDIF (coax and optical) inputs. Please have a look at the review by Oliver Masciarotte of the MicroMega MyDAC that we published recently, it is in the price range you are looking at.
https://www.hifizine.com/2013/12/micromega-mydac/
Hi
I read your article on setting up computer based audio. I bought a Mac mini and combined it with pure sound to run the itunes database then plugged it into a bel canto integrated amp using a USB cable. The result is the best sound I have ever heard from a cd quality audio file. Thank you for your easy to follow instructions. Can’t wait to get my hands on some DSD files to play through my kit.
Phill
Hi Phill, thanks for the comment, glad my article helped you 🙂
Hi John
What a great ,detailed article to the point and clear to understand for ordinary people like me, without technical background. I have read other articles before but was left confused.
I just picked up a mac mini (mid 2011) i5, 2.5 Ghz, 8 Gigs of Ram, 500 Gb HD running Lion OS.
I took it to Apple Store and the assistant there run diagnostics ans told me the machine is fine.
My question to you,how do you feel about upgrading the RAM ,I see people go up to 8 Gigs or even 16.
Do you think it’s a good idea or not .
Thanks
George
Hi George, thanks for the comment! You say the machine has 8 GB already installed, that should be more than adequate. You can monitor memory usage in Activity Monitor.
Hi John,i have a imac and it has the toslink/headphone out and the USB. Could you tell me what music files can be sent from each output if you have both 24/96 and 24/192? 24/96khz out of both or…24/192khz out of any? Great article and easy to understand. Thanks,Brent
Hi Brent, thanks for the comment. The TOSLINK output sample rate depends on the model, recent minis and MBPs support 192k. As of the 2012 model iMac though, this output is limited to 96 kHz – http://support.apple.com/kb/HT5522 . I can’t find the equiv spec for the 2013 model.
The rate on USB depends on the DAC. Refer to its specs, or if you already have it, you can confirm the available sample rates in Audio MIDI Setup. Hope this helps, good luck 🙂
PS. The TOSLINK output doesn’t support 88.2 kHz at least on the older models. Again this may have changed with the newest ones.
Hi John- very helpful article ,particularly for a person like myself inexperienced with computer audio. I’m using a macbook air (2012) to store my CDs and playback through a micro streamer DAC , Exposure integrated amp and Harbeth 30.1 speakers. However, my spouse has dropbox on the laptop and we are running out of memory. Currently i have about 60 CDs on the laptop and need to put another 200. I’m considering an external hard drive to store all the CDs, are there any specific criteria I should look for in picking an external Hard drive? My goal is to get the best possible sound out of my audio system.
Hi Mel, for attached storage I like SSDs. See https://www.hifizine.com/2013/12/the-silent-desktop/
With regard to dropbox, you might want to look into “selective sync.” I haven’t used it but it may help mitigate the problem. https://www.dropbox.com/help/175/en
thanks so much John for both suggestions
I’m going to try the LaCie Rugged USB 3.0 Thunderbolt series 256 GB SSD; its expensive but hopefully will do the job well.
mel
Hi Mel, no worries at all. That looks like a nice drive, esp. with both cables included.
John
I’ve connected my new OPPO BDP-105D to my Mac Mini via the USB port and configured Audio MIDI and Sound preferences as you describe. When the Mini restarts it detects the OPPO DAC just fine. However, when I power off the OPPO and then back on, without powering off the Mac, the Mac no longer sees the OPPO on the output device lists. I assume the Mac needs to re-poll the USB ports to see the OPPO coming back on but it does not do this automatically. So is there a way for the Mac to recognize the OPPO when it powers up without having to restart the MAC each time? Would there be a similar problem for the optical port on the Mini?
Peter
Hello Peter, soorry, I missed this question. I don’t know why the Oppo wouldn’t be recognized by the Mac on Oppo power-cycle. The optical wouldn’t have the problem, I don’t think, because the Mac doesn’t know if there’s anything at the other end or not.
Hi John, great article and very helpful. I have a choice of computers to act as source for amp and speakers, a MacBook Air or an early 2006 iMac. I am considering buying an external DAC to try out with both sources, but didn’t want to spend too much. Do you think a DAC for under $100 (with USB, TOSLINK and Coaxial inputs) capable of 24/192 would give better results than using audio out of either computer? I has it’s own external power supply which I can upgrade to a linear PS as suggested by many audio fans as a worthwhile improvement to eliminate electrical noise on most computer USB ports.
Second question. I believe that the highest possible sampling rate is desirable during ripping CDs, but what is the advantage of “up-sampling” files that is possible with some “audiophile ” audio players for OS X? Is this analogous to reducing “jaggies” in graphics or “smoothing” fonts? Is up sampling a form of smoothing that produces sound that is more like a true analog recording?
Hi Ian, to be honest I feel that under $100 with USB, coax, and optical might be pushing it. If you can up the budget to say $200 and only need USB there are a lot more options. We’ll have a review of another before too long and I’ll be soon be receiving a different unit for personal use in that price range which I may report on (if I like it enough).
With regard to CD ripping, the CD will be ripped at 44.1 kHz. It is important to do it with lossless encoding (as above). Upsampling is not smoothing the jaggies so much as making big jaggies into smaller jaggies. Except that there’s also a twist, which is that the size of the steps can be varied to change the noise spectrum. In either case, once you’ve done that, then the smoothing becomes easier. It’s something you need to try with your particular player and gear – most DACs perform upsampling internally anyway, but if your player can do upsampling you’re changing the processing path somewhat. That is actually one of the topics I wanted to cover in the well-overdue follow-up to this article…
Thanks for your thoughtful reply. I look forward to your future article. I am ripping as ALAC files which sound good through over-ear AKG headphones just from the headphone socket of both computers. Pity that the MBAir does not have optical out, but thunderbolt port is an option for both audio out or external HD. Despite your warnings I might still buy the cheaper DAC ($74.95 australian dollars) and see how it sounds. From my reading, the linear power supply mod is a good way of lowering the noise floor that is sometimes a problem with cheaper DACs. If it sounds good I will write a review of it. If it is less than perfect it will still work as a second system or for experiments. The three input options are good for”proof-of-concept” and interfacing with a variety of sources. TOSLINK is especially good for electrical isolation for hum or grounding problems and later I can buy a much better DAC if I am not satisfied. Besides my audio system is middle range rather than top range. If I can’t hear any obvious distortion and it sounds better than analog out I will be happy at least for a while;-)
Thanks again for your well written articles.
Ian
Hi John, I bought the DAC (DIGITECH AC-1633 from a well-known hobby electronics shop in Australia) as the shop offered a 7-day return if not satisfied or it was not suitable for the purpose. So I thought I had nothing to lose. I am currently running it powered through the USB port of an early 2006 iMac. This is the same machine that I am using to rip CDs to Apple Lossless using the internal Superdrive and storing on an external 640 gb external drive. I forgot to mention that the $74.95 DAC also contains a headphone amplifier with volume control. I have all iTines and iMac volume controls set to maximum and system alerts turned to minimum. I am listening and comparing outputs from computer earphone socket and DAC earphone socket. I have not yet connected RCA analogue outs to an external amp and speakers. I have tried to match the levels through both outputs during my AB testing.
Preliminary AB testing suggests that the output from the DAC is better than the computer earphone out. The bass seems to go lower with more power, the midrange is more refined or revealing and there is adequate treble. Bowed and plucked double bass seems solid and convincing, kick drum and snare produce a satisfactory attack. Rim shots are convincing. Cymbals, bells and triangle sound true to life. Plucked acoustic instruments exhibit finger on string noises and fretboard buzzes. Low level details such as crowd noises on live recordings can be clearly heard and there is no obvious random noise floor on quiet passages. I would describe the DAC’s overall tone as neutral.
I am sure that a more sophisticated (read more expensive) DAC may well provide more features or better resolution but this unit is a keeper for now. I have not had the time to try the Optical or coaxial inputs, but the literature with the DAC says that the sample rate for these modes extends to 192kHz while the USB is limited to 96kHz.
SUMMARY Probably not perfect, but adequate for anyone who only has USB output on a laptop or wishes to experiment with coaxial or optical digital outputs rather than analogue outputs.
Hi Ian, I am familiar with the “well-known hobby electronics shop” but have not seen that DAC. I like your approach 🙂
Hi John, sorry it has tKen so long to reply, I am moving house soon and have been very busy. I finally lashed out and bought a TOSLINK optical cable to connect from IMac to DAC. Maybe I am imagining things, but I believe the optical output has the edge on the USB output. It just seems a bit more “open”, “airy” or effortless if that makes sense. I hate to wax lyrical, but it is almost the difference between looking through a freshly cleaned window versus a dusty window. Difference is especially obvious on live recordings. It is probably not suprising as the TOSLINK sample rate of the DAC is specified as 2X that of the USB input. I am not familiar with the idea of digital “bandwidth” does that work in a similar way to analogue circuits where you need frequency response and transient response etc to be greater than what is expected from the source so there is less distortion.
I would appreciate your comments on how this works, ie: does a high sample rate ability translate to better sound even if you are feeding it with a lower sample rate source?
Cheers
Ian
So much to learn, so little time ;-D
Hi Ian, the sample rate capability is simply the maximum sample rate capability of the device. Unless you are upsampling in the computer, then the bitstream going to the DAC is nominally the same. However, there can still be differences in sound. I do have one DAC that sounds better through the TOSLINK than through the USB. Some will categorically state that it has to be the other way around, but it’s not that cut and dried. I suspect that the USB receiver in inexpensive DACs must be pretty dire, and TOSLINK also has the potential advantage of galvanic isolation.
Hi John- I am using the micro streamer DAC with USB input. When I configure the Audio MIDI output , the volume master slider switch is all the way to the right but the 1 and 2 slider switches are at zero. My computer is a Mac air with OSX 10.8 if that is relevant. I note in your slide at this point you mention the left and right channels are at maximum volume and you show the master at zero.
When i highlight Built-in output the left and right sliders do appear at max and the master at zero but NOT when i highlight the micro streamer DAC.
Any thoughts on whats going on? Problem?
thanks for your help in advance.
mel
Hi John,
Is there any way to get iTunes to automatically play through my Firewire Motu Ultralite? Logic will select this as default automatically but I can’t find any way to get iTunes to do this. Is it possible? At the moment I have to go to Sys Prefs or Audio/Midi Setup and change manually every time I turn on the Mac (OSX 10.9.5).
John
Hi John, once it’s set in System Preferences it should stay there, unless some other program “hogs” that output device. So it’s possible that Logic is making that change when you run it. However, rather than rely on iTunes and the System Preferences, it would be better to use another program that allows you to specify the output device (I never did write that followup article…). If you’re using iTunes, perhaps BitPerfect would fit the bill.
Thank you for a very informative article.
In regards to a specific issue on hi rez output via USB:
The solution to the problem in connecting an external DAC to a MacBook Pro (Mac OS X) to pass the high resolution (hi rez) file at 24/96 audio out via the USB cable to the DAC:
In Audio Midi Setup; “The trick is to set 24/96 for output, but 16/96 for input. It seems that OS X reserves the bandwidth on the UBS chain for input, even though the DAC will never use it”
More information here:
http://www.audioasylum.com/cgi/t.mpl?f=pcaudio&m=143708
Hi John,
This is a very good article… But i have a problem when play FLAC file with Audirvana Plus…
First of all, SORRY FOR MY ENGLISH…
I have a iMac 27″ 2011 i5 processor (512MB VGA and 24GB Ram)
The computer is… Stressed by working 24/7 and i am current using the Hyperspace application to have 4 separate desktop in the current mode:
space 1 – for ParallelsDesktop (i need windows xp/7 for work)
space 2 – for Mail
space 3 – surfing web with Safari
space 4 – download torrent with Transmission, play video mkv/bluray 720/1080p to my home theater (AVR Harman Kardon 160 and Plasma Samsung), and play music with Audirvana Plus (from iMac to AVR 160 with HDMI cable and adaptor connect to iMac)
The problem… When i play a video file all is ok (VLC or MacGo), but, if i am using ONLY the Audirvana the music start and, after 10 minute, it stop because the monitor of the iMac go to stop mode…
If i play the music DIRECTLY FROM THE MAC, nothing of this problem is present… After 10 minutes of inactivity (and play music) the monitor go to stop mode, but i can continue to hear the music from the speaker of the iMac…
Where is the problem??? Why the music stop when i hear it from the AVR sintoampli? I am using a 10mt HDMI cable…
I have to disable the “monitor stop”??? But i prefer to leave these function active… And why no problem when i hear directly from mac???
Thanks for your help.
Best regard
Hi Andrea, with HDMI, the audio data is inserted into the video data. This has some unexpected consequences: 1. if the video resolution / frame rate is not high enough than it can limit the sample rate x number of channels; 2. If there is no video data, then there is also no audio data… 🙁 So while I have not tried your specific scenario I imagine that is the reason that audio stops when your display sleeps. You might be able to work around the problem by setting display brightness to minimum (and turning off the TV), although this is a bit clumsy…
Hi John,
Forgot to mention the OS installed, i am using SNOW LEOPARD 10.6.8
Bye 🙂
hi John,
thanks for reply.
i have try with direct cable toslink/jack to the sintoampli AVR-160… when the monitor go to stop mode the music continue to play on my amplifier…
this is the right way… but i don’t hear the system sounds (beep and other)
it’s really strange that apple don’t support music continue play with the HDMI cable…
thanks for help me 🙂
Hi Andrea, it’s just the way HDMI works, not Apple’s fault 🙂 If you go to the System Preferences and then Sound you should be able to set the system beeps to go out the TOSLINK.
Where can I find the second article, please?
Hi Raz, as it turns out, the missing second article is going to be a set of much more specialized articles. I wrote one on using the Pure Music player as an active crossover here: https://www.hifizine.com/2013/06/pure-music-fabfilter-proq-active-speaker/ . Currently in preparation is an article on extending the Mac music system with networked music endpoints using the Raspberry Pi. But my suggestion is just try a few of those music players listed above, they all have something to offer over and above iTunes. Thanks 🙂
Hello, John… excellent forum. Im getting into hi fi digital music… I plan to upgrade my player and potentially adding a USB to S/PDIF converter. These are the 2 options I´m looking at
1. Foobar2k + Windows PC + M2Tech EVO + ONKYO DAC
2. Itunes + Audirvana + mini mac + ONKYO DAC
Which one of the 2 would give a better more natural sound.
Thanks !!
Hi Julio, sorry but I don’t know 🙂
Hi John, Just bought a Denon RCDM40DAB Micro Component CD Receiver which has optical input socket for a Linear PCM Signal. I am going to connect it to my 2013 MacBook pro (MD212B/A) via an optical cable. My question is, would the sound quality be much improved by using a spate DAC and if so what would be the best way to connect it? Many thanks.
Hi Steve, If you have a separate DAC, you would have to connect it to the analog input of the receiver. How well that will work out “just depends”. Some units will digitise the analog input signal whereas other will have an analog path. Unless stated otherwise, though, it probably makes sense to assume the former. This is not necessarily a problem but it will impose a ceiling on what you can obtain with a separate DAC. My suggestion would be to just try the optical path, and if you don’t find it satisfactory, then perhaps it would be better to just rethink your strategy. BTW I saw that the Denon has a USB input but it’s not clear to me whether that will work with your computer or whether it only works with iPhones and the like.
John – thanks for a very helpful article. I’m interested in your view about the biggest determinants of audio quality are, after the speakers and receiver.
I’m thinking about upgrading my 5.1 home-theater system (w/Sonos and iPod devices to transmit the music to the receiver) — a Pioneer VSX-74txvi, which has a Burr-Brown DSD1791 DAC. The speakers are Dynaudio. My musical media are copies of my CDs into iTunes (presently AAC 256kb/sec). I mention these to give a general idea of the baseline, which is rather good.
If I played music from AIFF files stored on a Mac, would an external DAC be likely to add much to my receiver? Does a medium-level receiver wash out the quality of a high-end external DAC? What about the media organizer, iTunes v. Audirvana, for example? How do S/PDIF v. USB jacks rank as a determinant of audio quality? I’d welcome any thoughts you may have.
Hi Jax, I think the receiver will basically set your ceiling. I’d be inclined to try a lossless format and better players in the computer first to see if that makes any difference, and then take a step back and rethink the whole system. With regard to SPDIF vs USB, it depends a lot on the DAC and in particular the quality of the USB implementation – they are all over the place (in my experience) but seem to be getting much better overall.
Hello John,
I stumbled upon your article by accident. Great article ! Although this describes exactly the way i organise my music library already for years now, the article provided me actually with something new here :The MIDI control section. Thanks!
Maybe I could give a little useful contribution here too: about FLAC and iTunes:
I tried Fluke and the playing of FLAC files from within iTunes but this did not satisfy me. Then I fount the program “MAX” from sbooth. I used to convert a lot of FLAC files to Apple lossless and play them in iTunes. the program is freeware.
Great article. I first tried something different; Got a Thunderbolt to HDMI connector to connect the late model iMac to the Yamaha A/V. Worked great for a month then the iMac would not boot up if anything was connected to the Thunderbolt port. Connecting after booting and everything works great. Still working on that with Apple, probably problem with the Thunderbolt port, but in the meantime got a mini Toslink to Toslink cable and that works but the sound is not as good or as clear as with the Thunderbolt/HDMI connection no matter what settings are chosen even if I choose 96KHz format which seems to give an overly enhanced midrange. Not sure I understand what’s happening with optical vs the HDMI connection. I see that there are Toslinks and then there are Toslinks, some are $15, some $50 and some $200 or more. I got the $15 cable. Understand the optical signal gets bounced around in the fiber but is there really that much difference?
Solved my own problem. After trying everything possible, new cables, hooking up a Thunderbolt drive etc… the Yamaha A/V became the last suspect. Bought a new model and everything works fine. The old A/V HDMI inputs were fried or rather half baked because they still worked once the iMac was booted up but would not let the iMac boot if the HDMI was plugged in beforehand. There must also be other stuff broken as well inside. Anyway the Toslink optical connection works as well as the HDMI /Thunderbolt connection.
Hello, John,
A welcome discussion! I just added an Orei DA 21 optical SPDIF/coaxial digital to RCA analog audio converter to an iMac’s audio out port, and the gain in audio quality and stereo imaging is surprising through a Sony MDR V6 headphone.
What has changed is that it’s no longer possible to control volume with the F11 and 12 keys; now I have to use command key + up or down arrow keys. That’s fine but It’s still a mystery how to control YouTube audio from the keyboard. I’m forced to reduce volume at the speaker icon in the YouTube window, and on some other sites there’s no way to adjust volume of an online video. What am I missing? Thanks.